
There are many ways to start out a garland. This version is with inexpensive wire from the dollar store, hot glue and pinecones. It cost about $3 to make two to five good length stands.

Cure your pinecones
If you plan on storing your garland from year to year you will want to cure the pinecones to get rid of the bugs. If you don’t you will have many bugs crawling around your house.
To do this stack your pinecones on a tray and bake @ 300° for 20 minutes. My pinecones began to leave a very unpleasant woodsy smell in my house so I pulled them out and sprinkled with cinnamon and nutmeg. It worked great and my house smelled like Christmas.

Prepare wire for the garland
While they are curing prepare your wire. You will want several feet for the garland length, plus more on each end for wiring onto a fence post etc.
I had 5′ length garlands with an extra 3′ feet on both ends to give me plenty of room to attach to my fence post. My total length was 11 feet.
To handle all that wire roll up the first 3′ and secure with a paperclip. Do the same with the last 3′ as well, this will set up your working wire area.
Next prepare the short wires to be hot glued to the top of the pinecones. As you can see in the picture this takes about 6″ of wire. Bend in half and then give a little foot to sit on top of the pinecone or wrap around the stem if there is one.

Once glued on, place the pinecone in an upward position until the glue has hardened. I used the bag holding all my pinecones to hold the glued cones in place. . 😊
Note: some people prefer to just wrap the wire around the end of the pinecone. Depending on the type of pinecone you have this could work quite well and save you time gluing. Since mine were flat on the bottom and not wanting the wire to show, I opted to glue the wire on.

Build the garland shape
To start off my garland I used three pinecones first then the ribbon. I actually left about 3″of space on the wire to tie the ribbon on and glued the ribbon in place so it wouldn’t slide or turn upside down.
To keep the pinecones from slipping I used the pattern below. The yellow line represents my 11′ wire and the blue lines represent the 6″ wire attached to the pinecone. First twist the blue wire around the yellow wire, like a twistie tie. Then wrap the yellow wire around the blue wire once.
This method allowed me to keep the pinecones exactly where I wanted them.

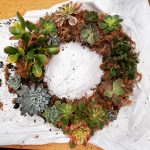
To get the shape on my garland I built it on a flat surface and placed the pinecones where I wanted them before I began. This mostly consisted of using the larger cones flat against the table and smaller cones on top.

In this illustration the blue circled pinecones are the large cones wired in place first. The yellow circled cones were put on last and were smaller.
This pattern gave me the nice shape. Even after I hung it up, the pinecones stayed where I placed them. The wire also helped as I could bend something to keep a cone where I wanted it.

I used 6″ of wire glued to the pinecone for easy handling. This also meant I had wire left poking out once the cone had been twisted into place.
To solve this I used needle nose plyers to curl each wire against the main wire. This kept the wire from being seen, but also added stability to the cones.

When done, unravel your 3′ wire on either end of your garland and string it up on a fence, mantle etc.

Thanks for stopping by. Please share some of your garland making tips or garlands you’ve wanted to try.
I can’t get over how adorable the pinecone garland looks with the bows. It is such a nice idea for the winter months. I have seen the Christmas garland with bows but not pinecone garland.
Thanks Deb, I was inspired by the many pinecones falling in my yard. 😂
It’s neat that you got to make the garland for super cheap. I’ve never done this before and it’s interesting to learn that baking the pinecones will help with killing the bugs. Love how this turned out!! Thanks for sharing.
Nancy ♥ exquisitely.me
Nancy, thanks for stopping by. I’m glad you liked it. 😊
What a sweet idea. I really love it! I love making crafts as well, do you have an Etsy shop? These are great!
Hi Shyla,
I don’t have an Etsy shop, but I may one day. Crafts are a great way to dress up the home.
Have a happy new year.
Thye look so good! I’m not very crafty and would never think to make something like this myself but they look incredible and don’t sound too hard to make either. x
Sophie
http://www.glowsteady.co.uk