
by Natalie | Nov 22, 2018 | Home Decor, Personal Development
Each year my family draws each other’s names for Christmas. While we do have store bought gifts, these particular gifts are supposed to be handmade.
I wanted my kids to know the real spirit of giving and found it was easier to encourage them to give their time in making a present than it was earn money to buy a present.
As the years have gone by our kids (and ourselves) have really gotten into it.
Calendar or photobook
My favorites have been when my husband has made me a personalized calendar from shutterfly.com. They have deals constantly and are worth looking into. If they by chance aren’t having deals, Walgreens and Walmart let you make them for around $12.
Made from Felt
My next go-to for homemade presents is felt. It comes in a variety of colors and doesn’t unravel on the edges, making it easy to work with. You can either go with inexpensive 50¢ felt or get a more luxurious look with wool felt.
My Little Pony Castle
This is my newest homemade gift, the My Little Pony Castle playset. The pony buttons can be found at Walmart, Joanne’s or Amazon. I then attached each pony with rainbow ribbon. It folds up to make a convenient quiet book. Let me know if you’re interested and I can share my pattern.

Trolls Poppy and Branch
Last year I made Poppy and Branch out of felt. Felt is so easy to use and makes cute gifts.

Christmas Pajamas
Another great go-to is creating fun shirt and pj’s gifts (really anything made from cotton will work).
I stumbled across this idea years ago while teaching art at a family camp. A little boy had been using toll paint and unbeknownst to me or his mother, ended up getting some on his shirt. By the time she found it, the paint had dried. She came back to the art room begging for help and we had to tell her once it was dry it was permanent, which up to this point had been a bad thing. But I told her to leave the shirt and I’d see if I could match the colors and paint over it. I was able to fix the shirt and while I painted it I realized I should have been doing this all along.
Masking tape stencil
Here are some of the best examples we’ve done for our homemade Christmas presents. This is the masking tape technique. Use masking tape to create a “stencil”then paint over it

TV show Pysch
This particular gift is a throw back to the TV show Psych. My daughter has been working on this and is going to add the words,” I’ve heard it both ways. ”

Freestyle paint
Despicable Me, Gru and Minions
You can also freestyle paint it, which I used in our Despicable Me theme for the purple minion and masking tape for Gru’s scarf.


Freezer Paper Stencil
Another toll paint method is to cut your design out of freezer paper and iron (wax side down) onto your shirt. This also creates a stencil to paint on.
You can cut it with a Cricut, Shillouett machine or a razer.
At the time our son had been calling himself “the happy kid ” so I made him a smiley face shirt. So far I’ve noticed dark colored cotton shirts don’t absorb the toll paint as well. I’m guessing this is because the fibers already hold alot of pigment. Prewashing new shirts can help a little. Deep red shirts have been the least effective with holding onto paint.

Setting the paint in the shirt
Whichever technique you choose, cover the shirt with an old towel and iron the paint into the shirt. This helps set the paint (after it has dried) and makes it a permanent image. For all of my projects (except red shirts) the painting has become permanent and only fades with natural wear.
Weaving
Our older son learned how to make a bead bracelet. This picture gives an idea of the set up. There was not any DIY for this style on YouTube – which as you can tell is very simple and easy to do. I guess my son needs to make a video.
In the mean time you can check out a different DIY beadloom style here.

PVC Pipe toys
And of course there is PVC pipe. Whether you are making marshmallows shooters or lounging chairs, PVC pipe has endless possibilities. These were made by my boys for each other last year.

Copper wire doll furniture
We also had some creative gifts come from copper wire. My son, twisted it into the shape of lawn furniture for his sister’s house, making a chair and a swing.

Doll house renovation
The house came a few years before. It was a rickety, old doll house from a yard sale. I revived it with support beams along the roof and foundation, cardboard roof shingles and painted siding shingles.


Tic Tac Toe
This Tic Tac Toe game was given by my then two year old. I sewed the bag from plaid and burlap. My daughter painted on paper, which I cut into circles and modge podged to the bottom of glass beads. I liked how it preserved her artwork and let her participate in the giving process.

Seasoned Salts
The last present I will share today is gifting seasoned salts. Bacon salt is easy and a tasty gift for the men in your life (or anyone who really loves bacon). The bacon flavor came out well in the food. We used it on salads, sandwiches, soups etc. This gift needs to be stored in the fridge.
To make, cook a pound of bacon to very crispy. Let cool and crumble into tiny bacon pieces. Add two cups of course salt and two tsp of ground pepper. Mix together and fill up your bottles.

The packaging was made with burlap, doubled over and glued around the neck of the bottle from the dollar store.
Tied with Raffia and a homemade, laminated tag.

The possibilities are endless. I hope this sparks some creative ideas and as always feel free to send questions or comments.
And have a wonderful Christmas holiday. 🎄 🌟 🎁

by Natalie | Oct 26, 2018 | Home Decor
I love Halloween because of the excuse to dress up, make rediculously cute treats and eat sugar (though I admit I’m laying off the sugar a little more than I did as a kid) dressing up never affects my health 😉. Here are my top 5 DIY for Halloween.
#1 Homemade Costumes
You may or may not be into dressing up, you may or may not like to make costumes yourself, but seeing the creativity of others never dulls. Here are some of my favorites over the years (stickers used to protect the innocent- not an actual part of the costume😊)
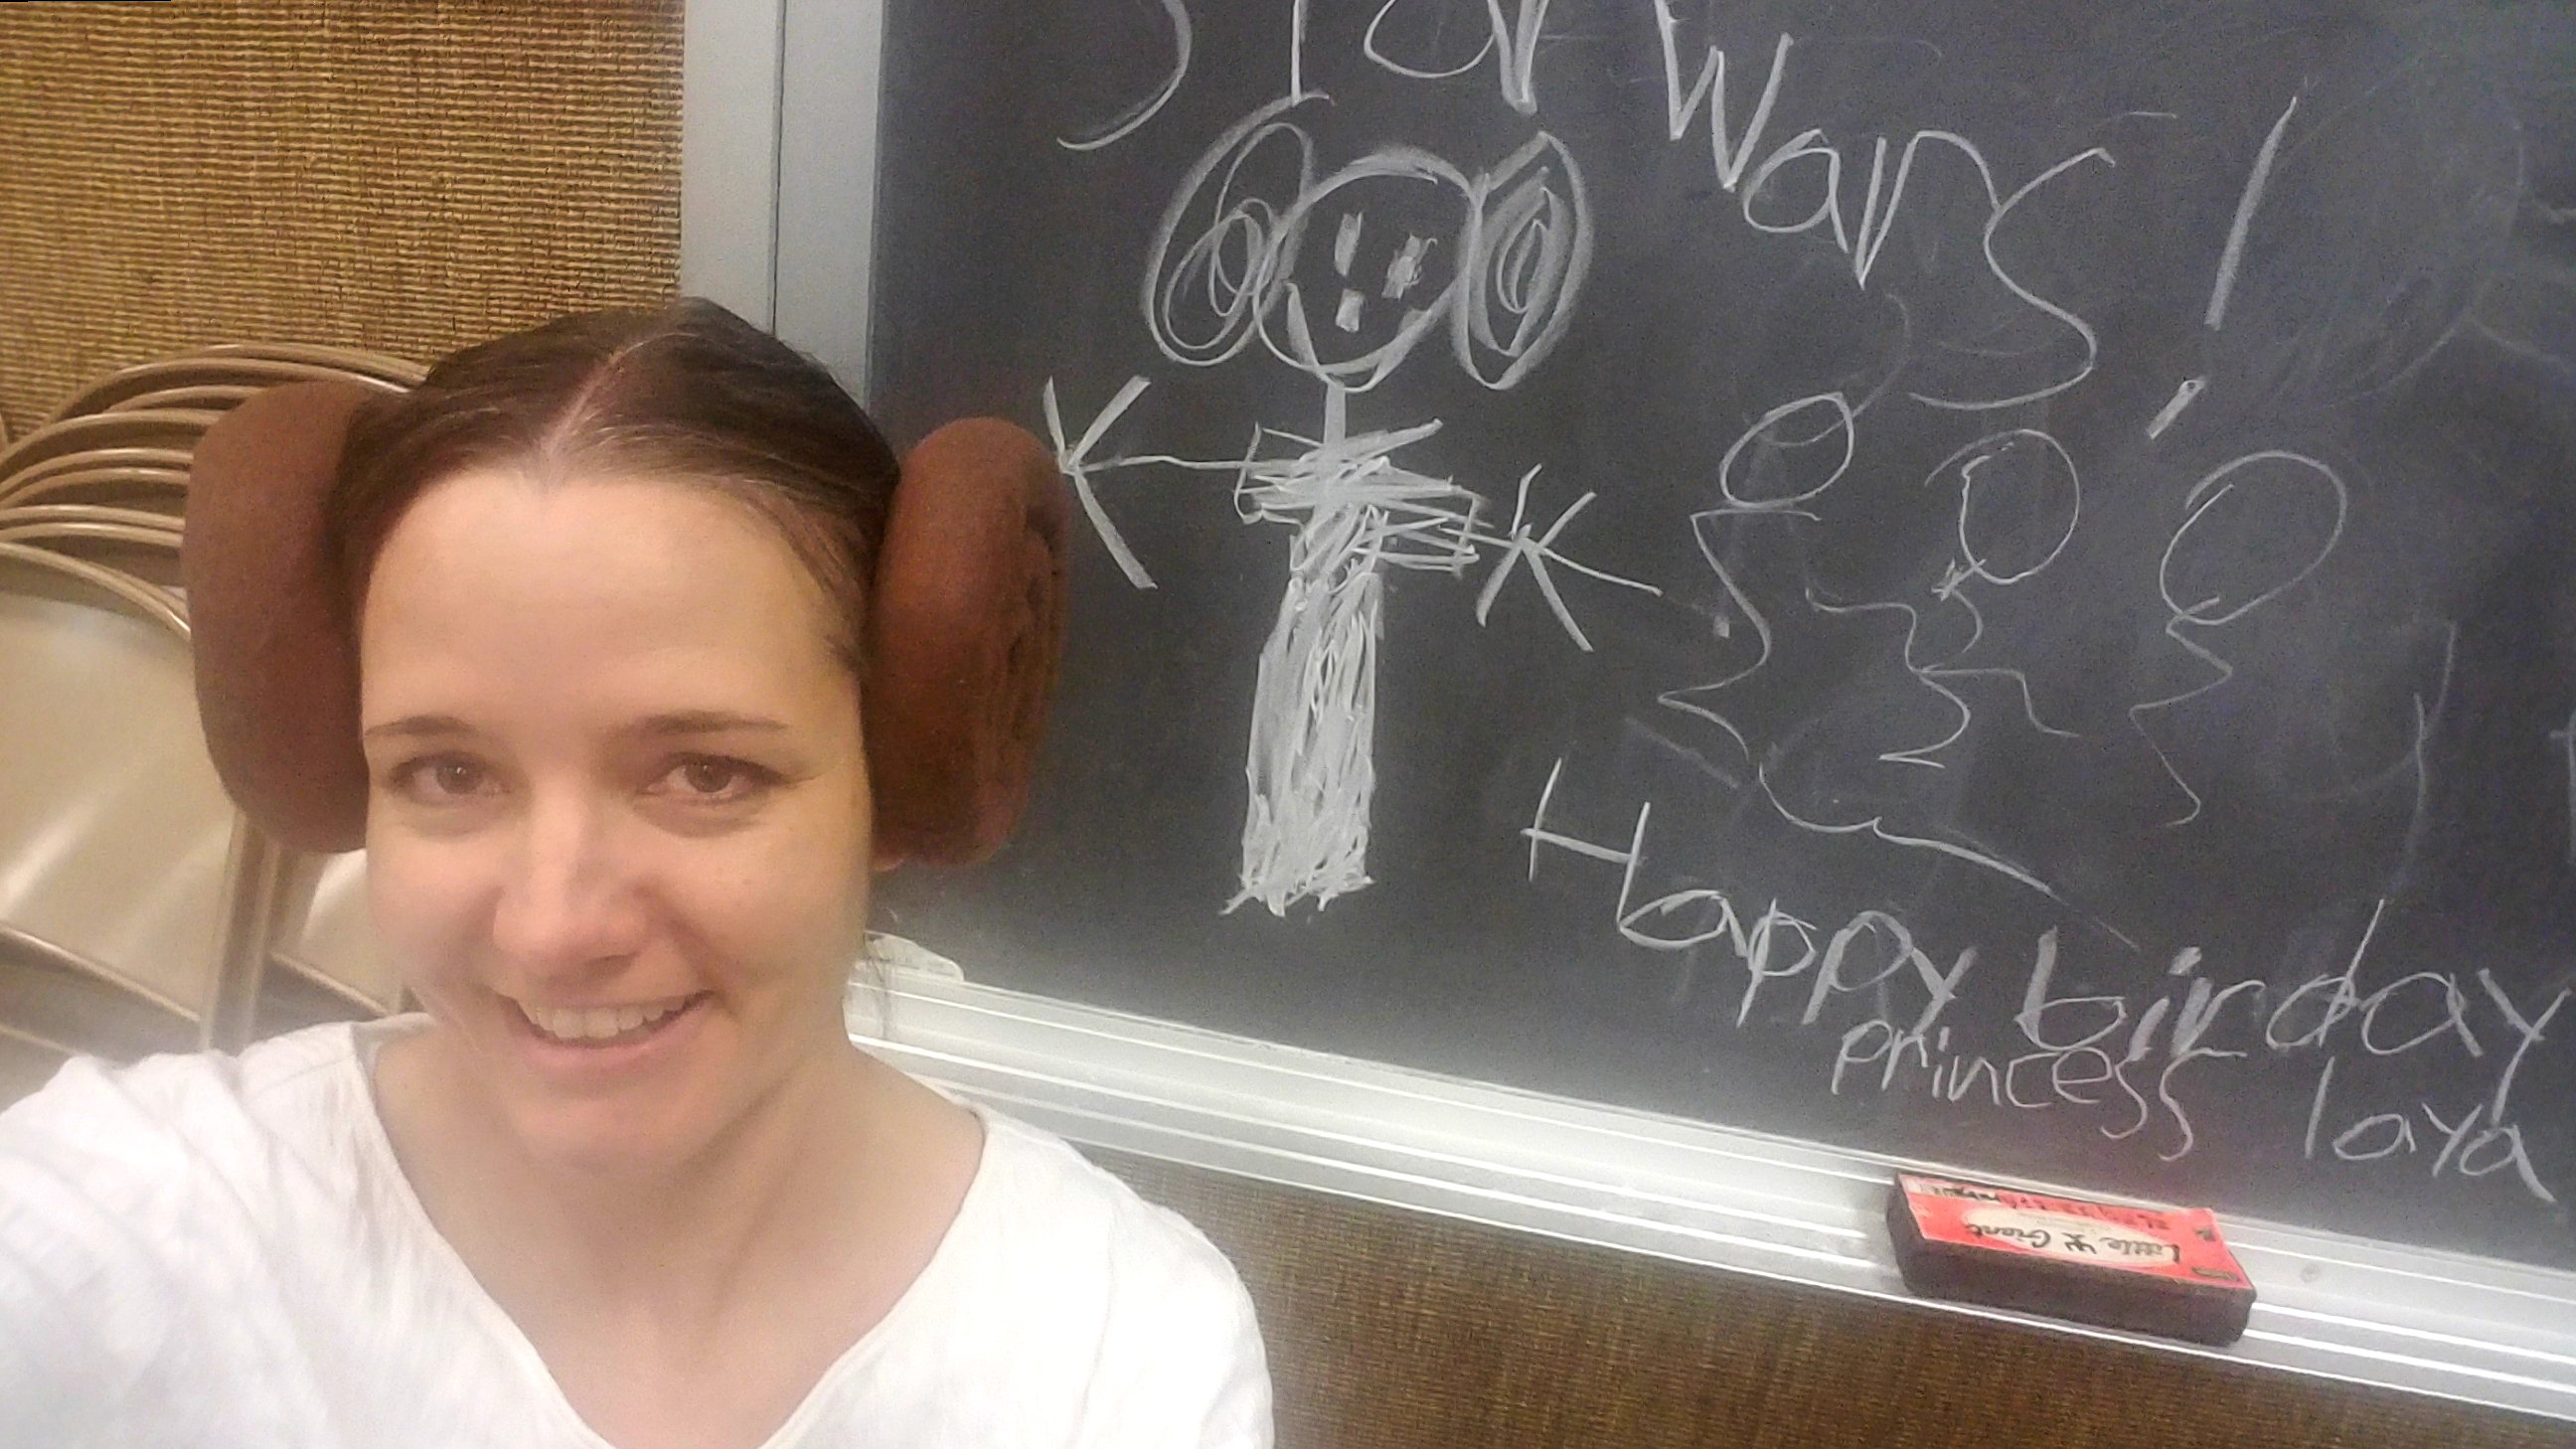
Star Wars! People will always know who you are and you may even get fan art. Princess Leia’s iconic hair stands out to even the youngest fans.
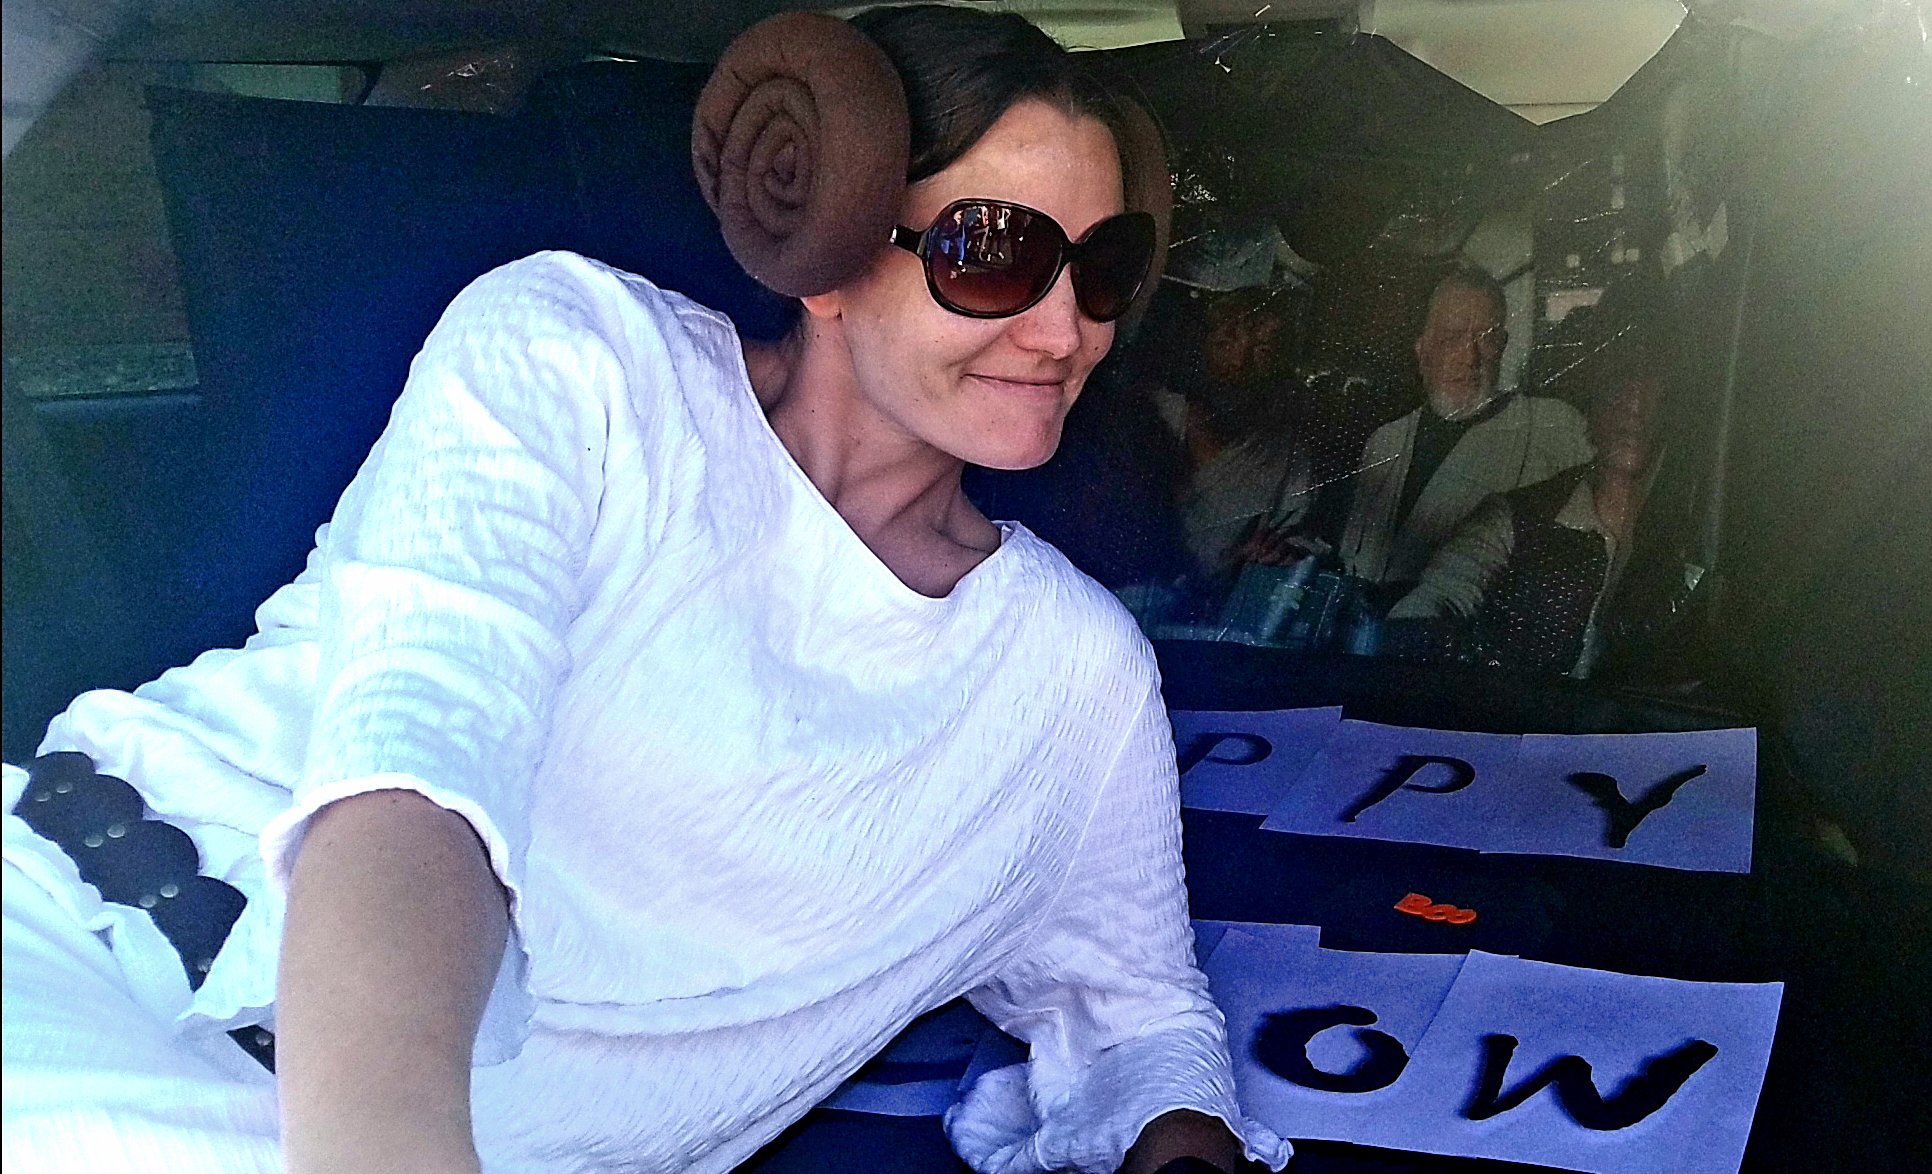
Oh the scandal! Obi Wan Kenobi and Princess Leia on a date…chaperoned by a little Yoda – so it’s all good.

A little tiger – if you know an awesome face painter, arrange for a cool addition to your costume through face paint.

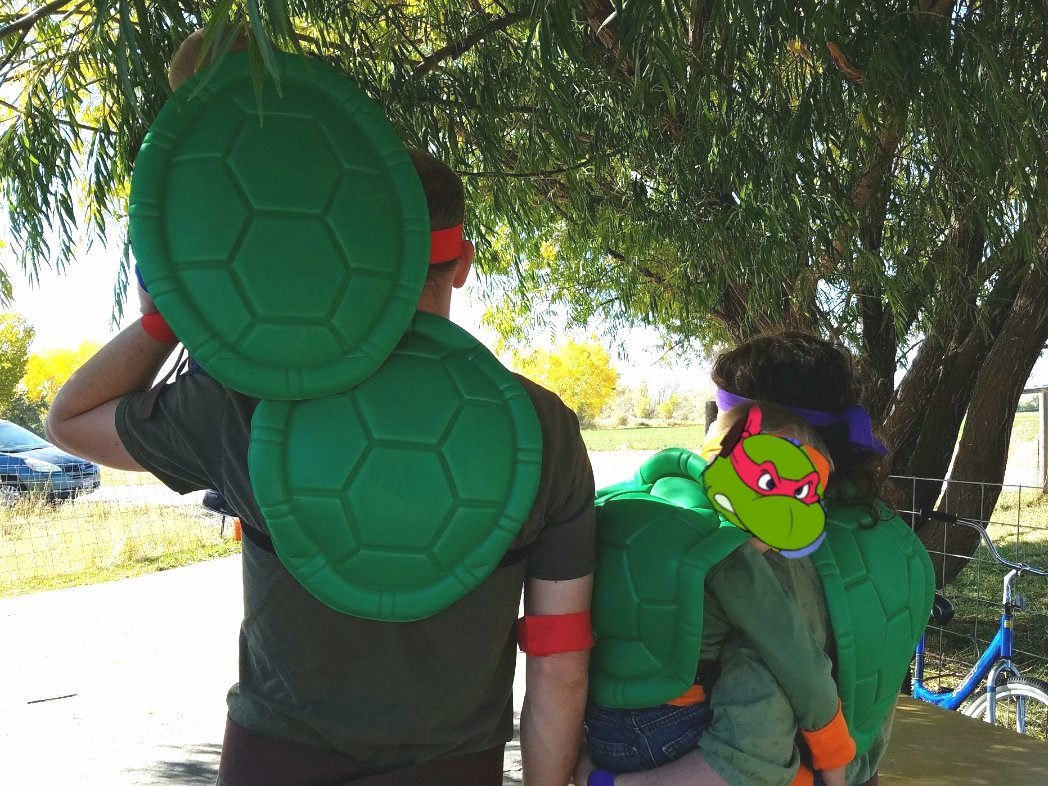
A family of Teenage Mutant Ninja Turtles with easy shells from the dollar store.
Harry Potter theme was fun (with Peter Pan and Wendy – I couldn’t get them to all agree–I really wanted one of them to be Doby… sigh) . No one actually wanted to be Harry.

The Neville costume was made from thrift store pillow cases and the ties from felt. I let them make their own ties so they are different. Hermione’ s cloak is just a big piece of felt fastened around the neck, we made their house emblems with paint on felt.
Hagrid’s costume was a heavy metal rockers wig and a rug for the beard.
Peter Pan ‘s costume was made from felt and green tights.
Wendy’s costume was a night gown from the thrift store that I took in on the sides and reconstructed the sleeves.
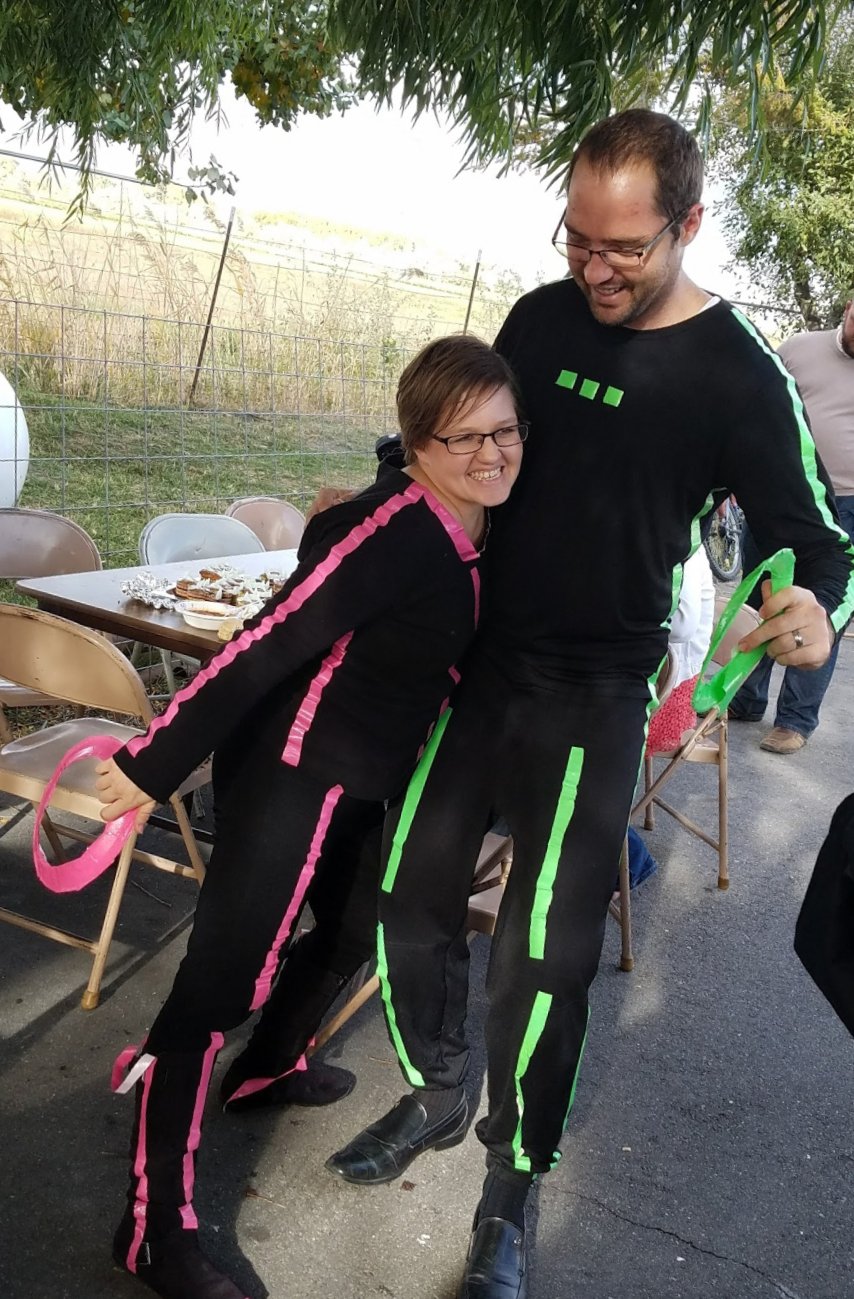
And last, but not least Tron. Simply wear all black and make a few strategic lines with neon tape. I loved it! Easy and fun.
#2 Cute Treats
Why else would I figure out how to make tiny edible candy pumpkins or bat and monster cupcakes than to make a hit at the Halloween party? It was totally worth it.


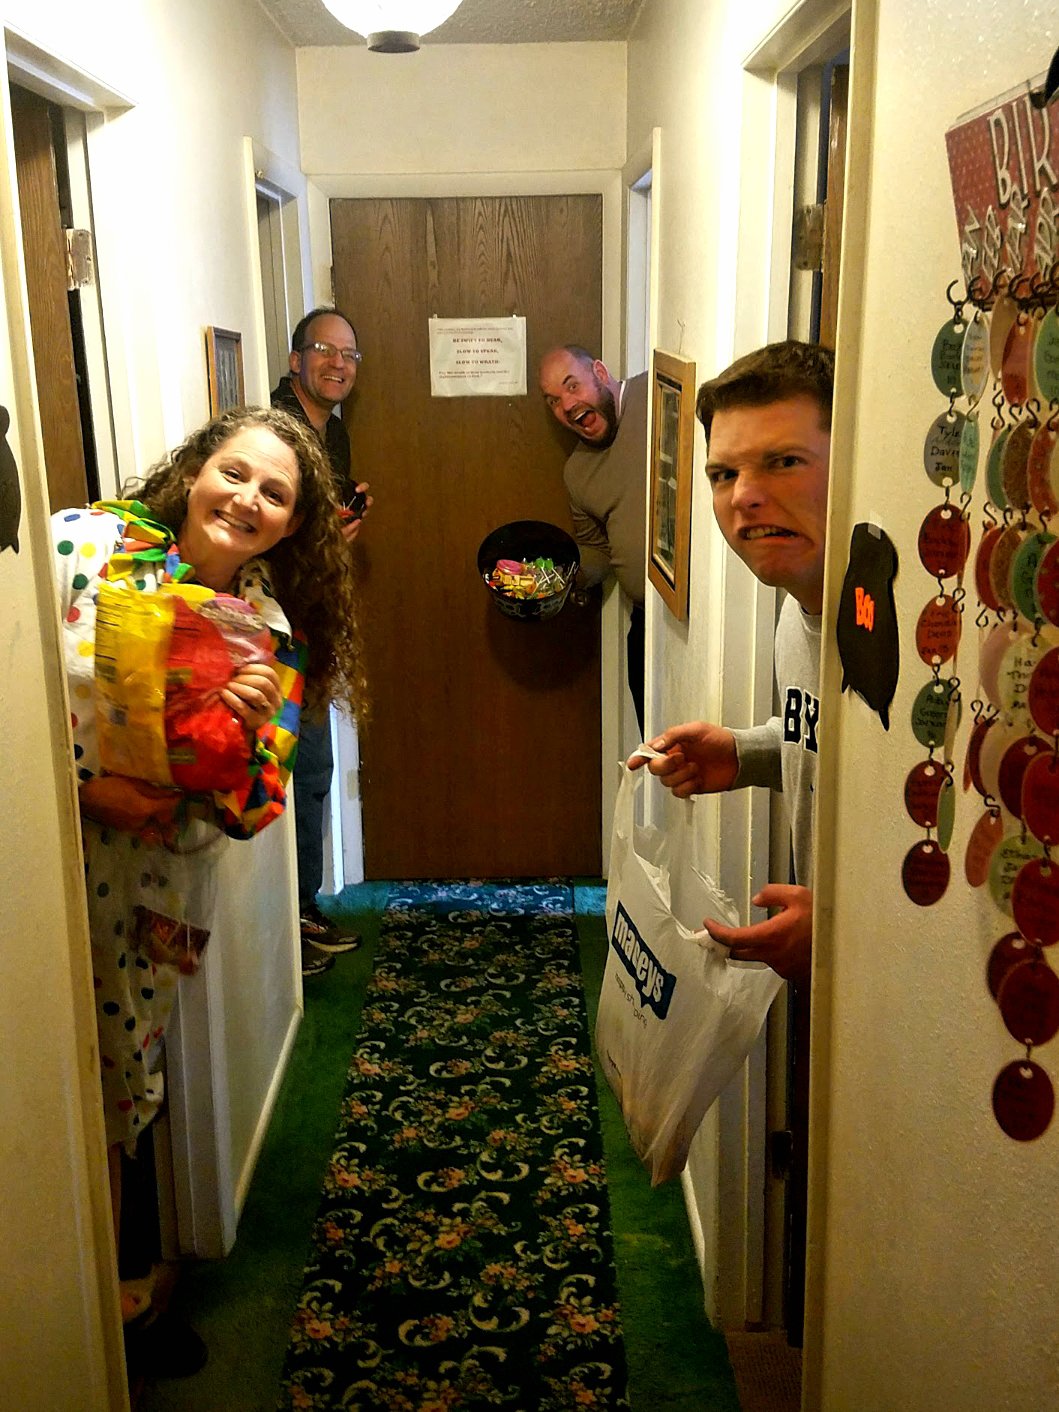
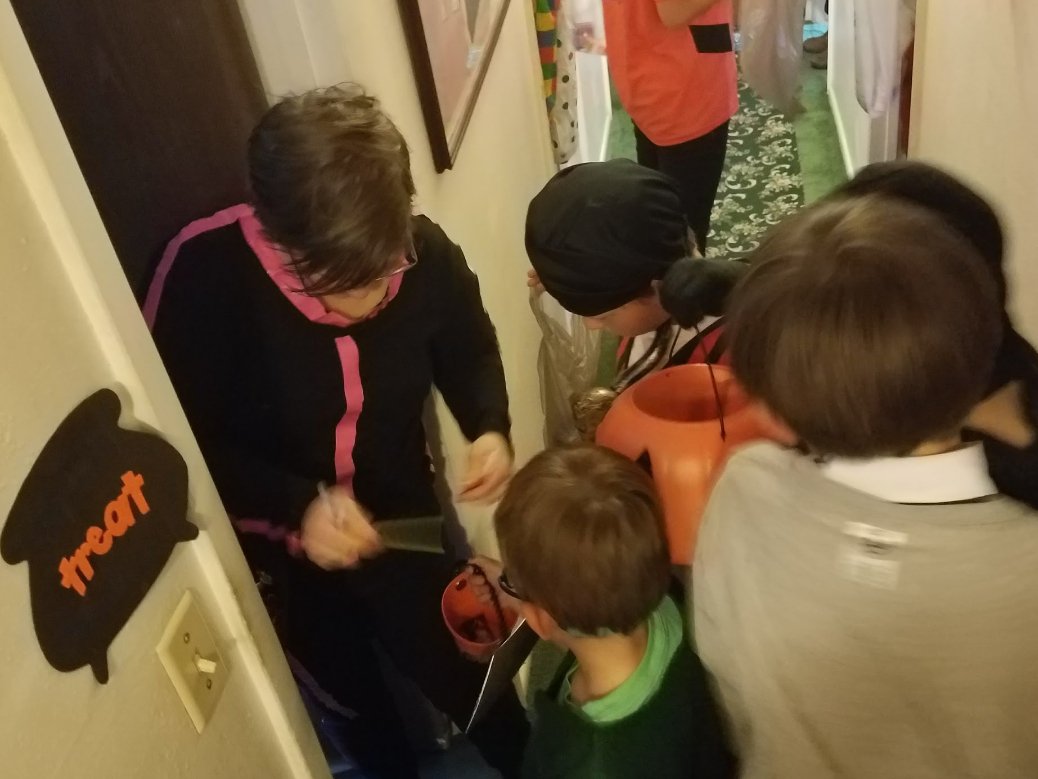
#3 Hallway Trick – or – Treat
Ok, this tops my list of happy memories. If you have a long hallway and little kids to entertain – you HAVE to try this 😊.
The adults stand in the doorway and the kids come get candy. Seeing everyone’s costumes – and dressing up is an absolute blast and everyone stays warm. I love these people!
#4 “Scary” Decorations
I wasn’t into “Scary” until I had kids. They practically beg for scary which I resist and do moderately scary 😳😊 – which they love. My four year old was crying that she didn’t want to go home, “but why,” I encouraged, “your room is so fancy!” (alluding to Fancy Nancy whom she adores). She cried, “my room IS fancy, but not our house.”
Sigh…
“What would we need to do to make our house fancy? ”
“We need spider webs and rats!”
… Ya, that is what fancy is to a four year old.
I did spider webs last year, they stuck to EVERYTHING! Not again!
This had taken its place. A window cut out is dramatic with no added electricity and minimal cleaning up afterwords.
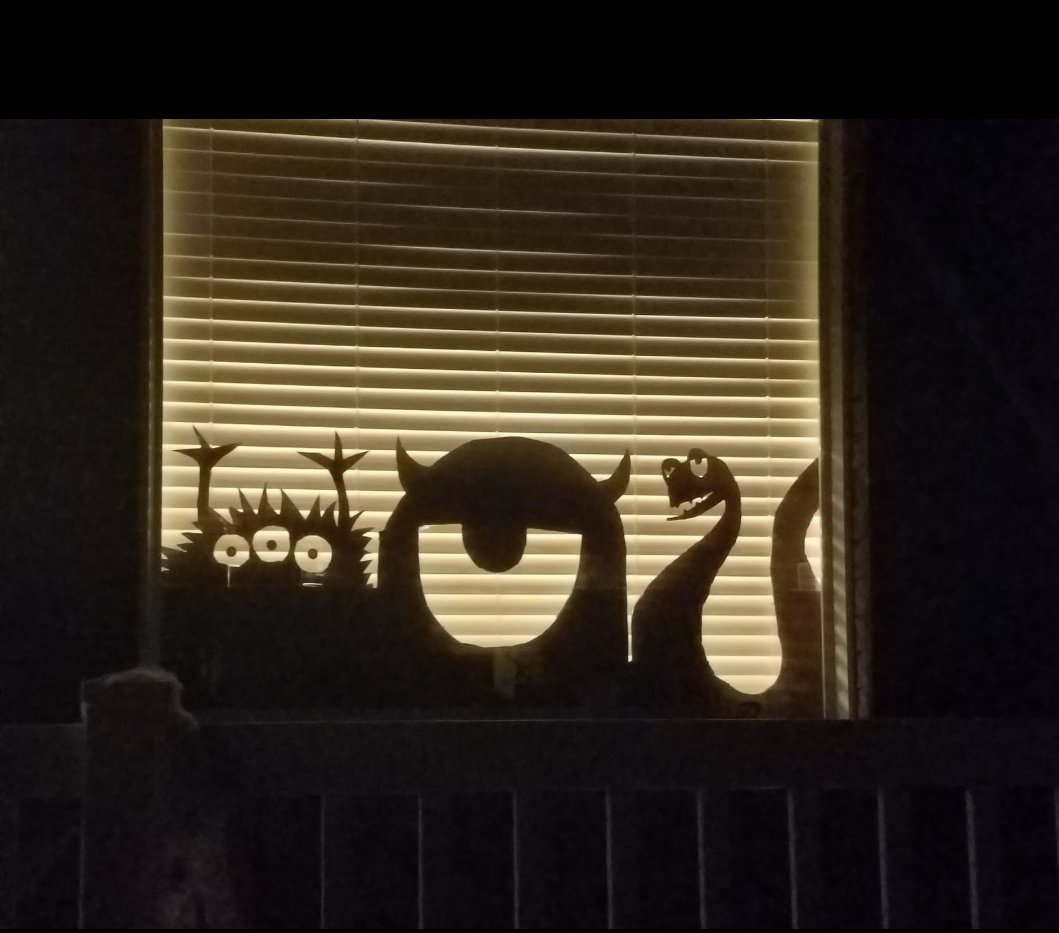
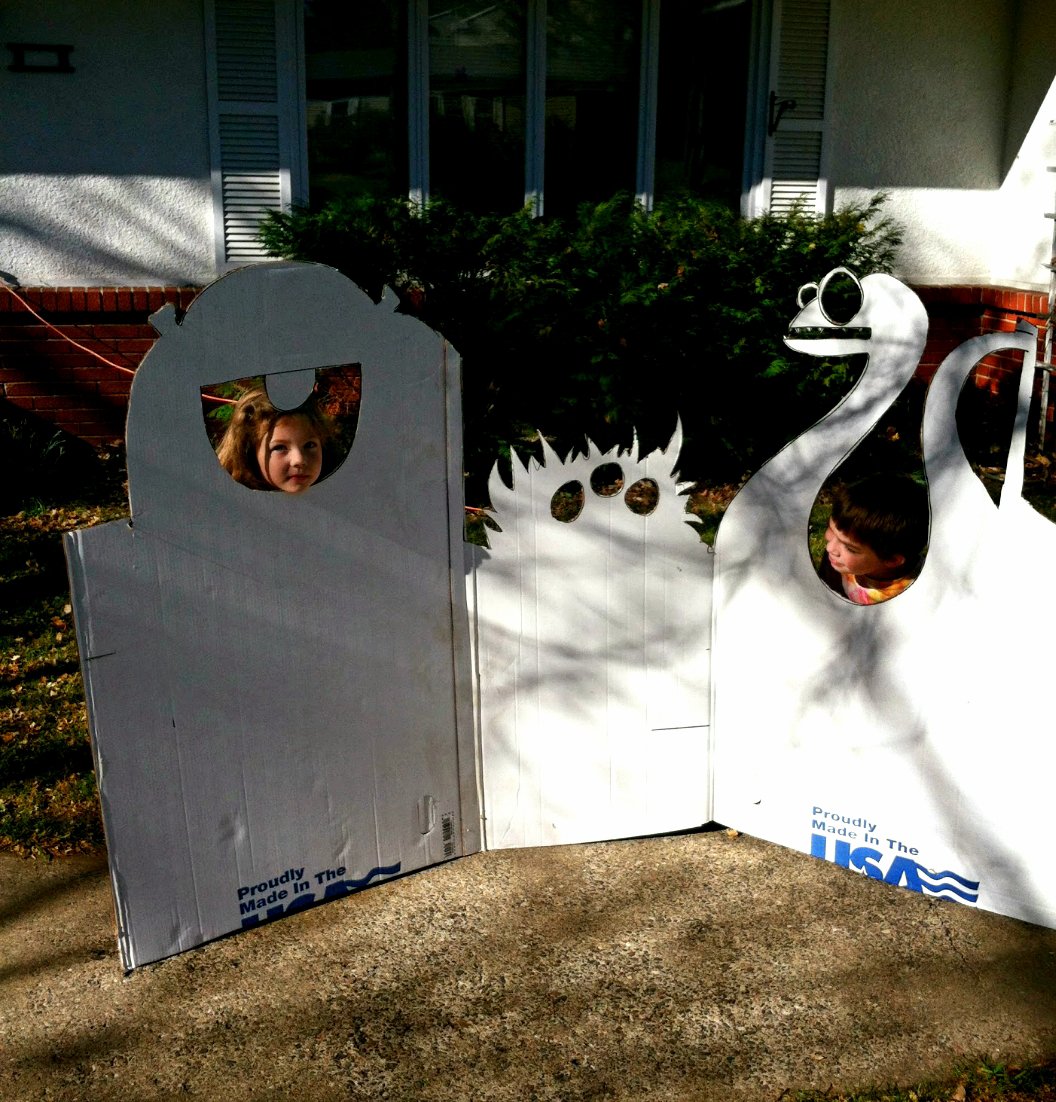
It’s made from a large cardboard box. The very observant will notice the two pictures are different – that’s because I’ve done this with two houses now. I love it because it’s easy, it doesn’t take additional electricity and people love it. When the holiday is over I fold it up and store it behind our storage shelf in the garage.
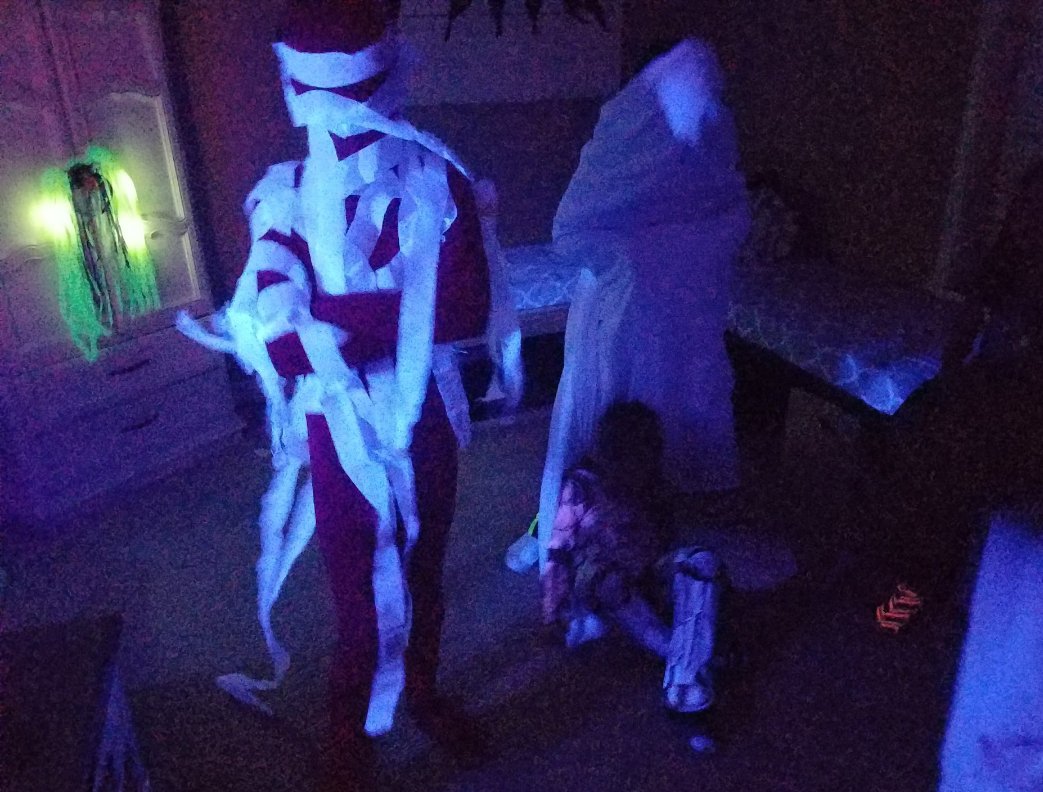
#5 Glow in the dark Halloween party.
To start off get a black light. Just a black light bulb in a table lamp. Then we had teams turn people into mummies. The black light made everything glow. We also played balloon volleyball with a glow stick in the balloon and topped it off with pizza.
What is your favorite Halloween DIY?
by Natalie | Aug 14, 2018 | Home Decor, Home Renovation
You know back when chalk boards were all the rage and they were being painted everywhere? It looks like the style is starting slow and now ease out of the kitchen, I think because they were often big and black and well…permanent.
It’s hard to commit to something like that. I never painted my wall black (though I did try magnetic paint at one point, that’s another story), deep down inside I kind of wanted to know what it would be like to have a chalkboard that could have cute things drawn on it, still it was so permanent. My husband had reviewed these awesome chalk markers and I had no place to use them.
until now….
The day came while we were at a city festival and one of the booths was giving away blackboard wall decals – basically removable chalk board walls. I had to try it and since I am trying it, why not tell you about it.
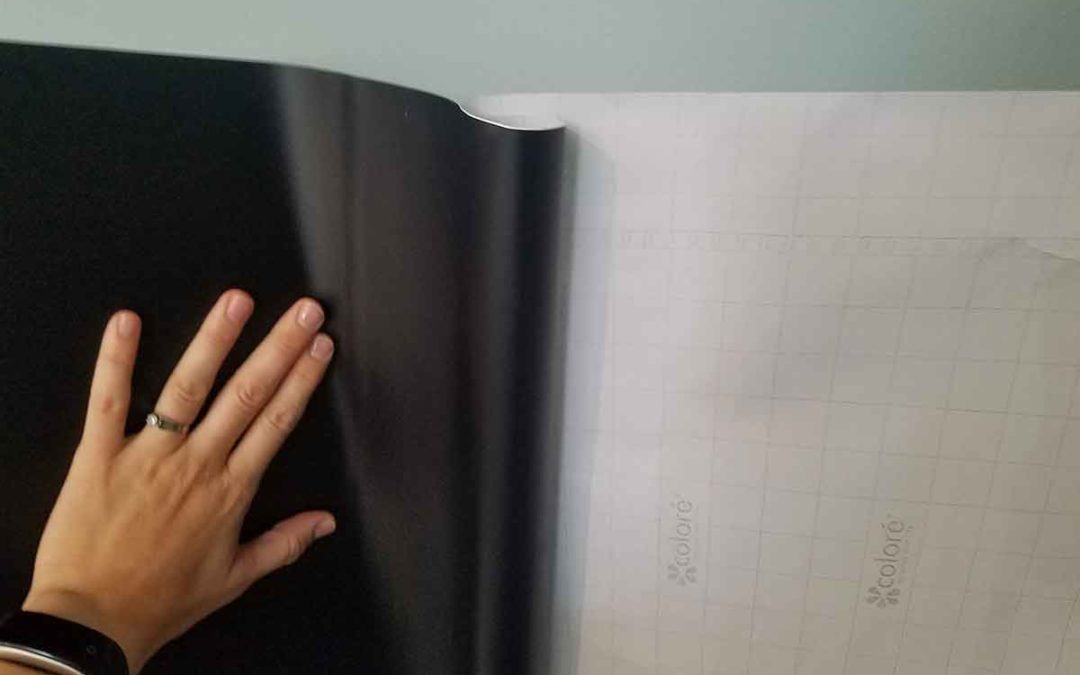
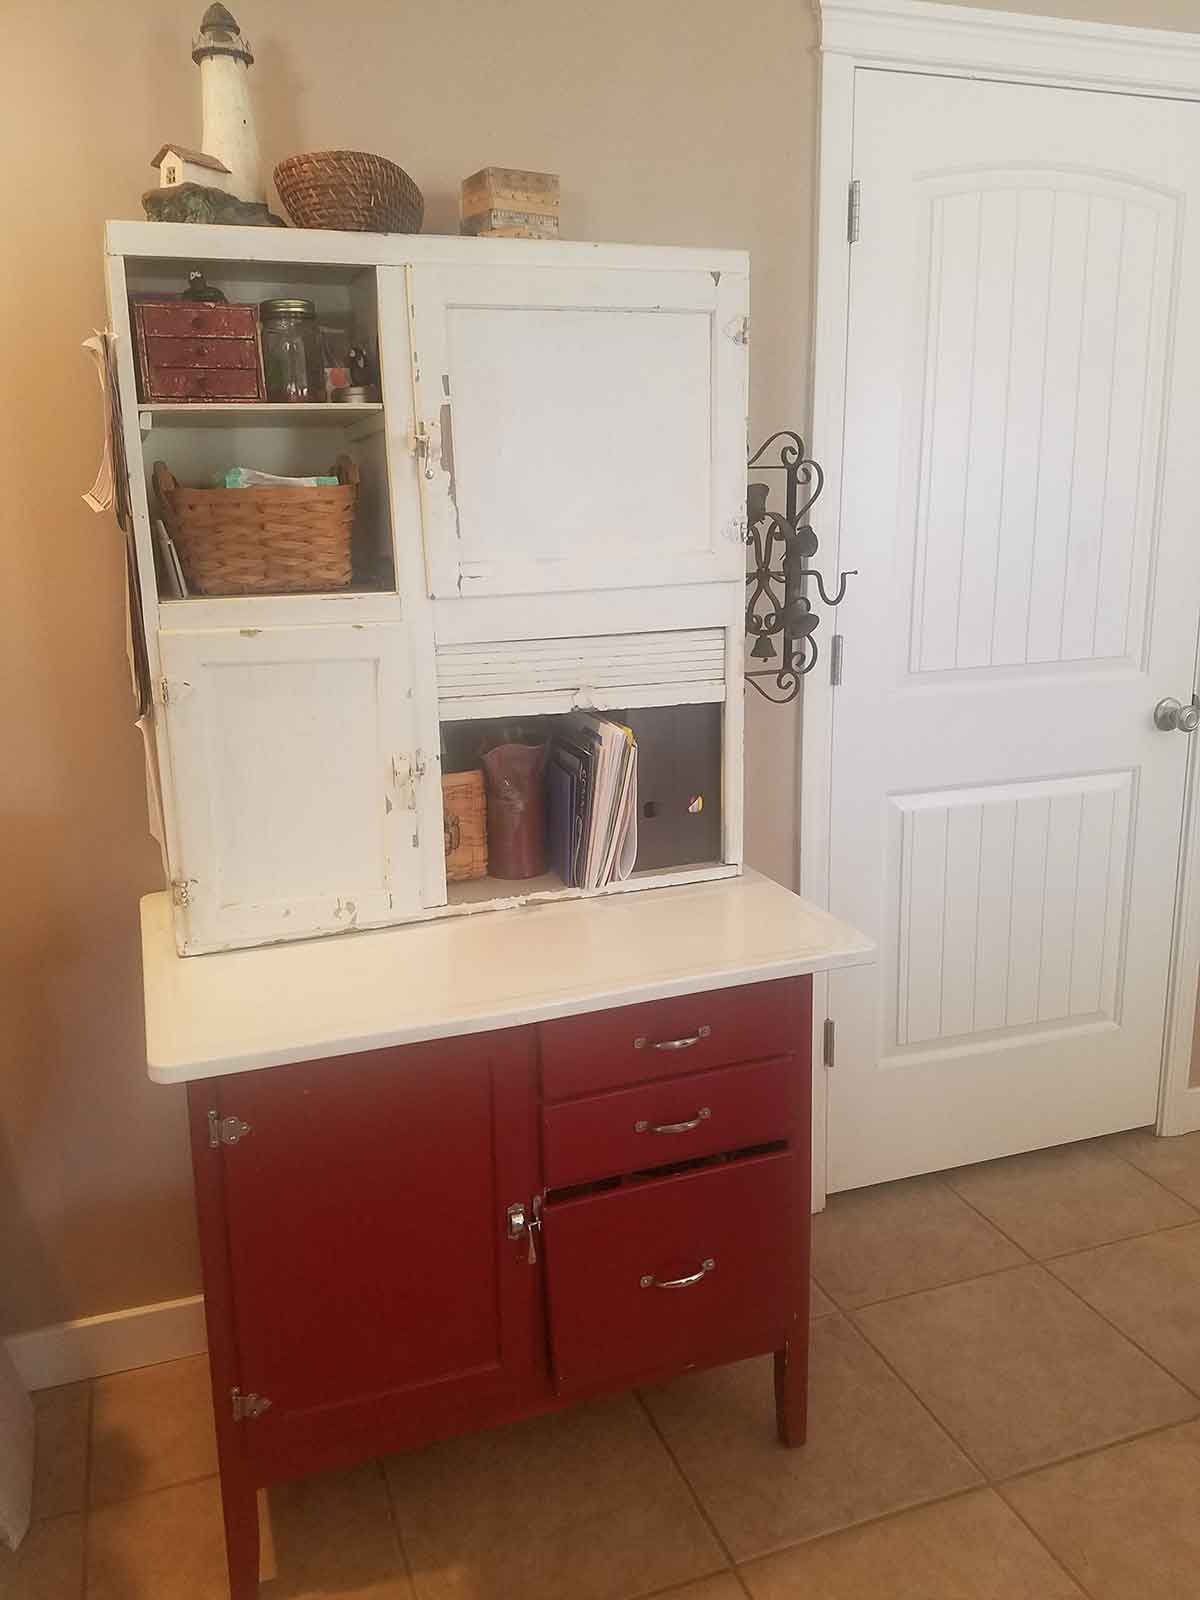
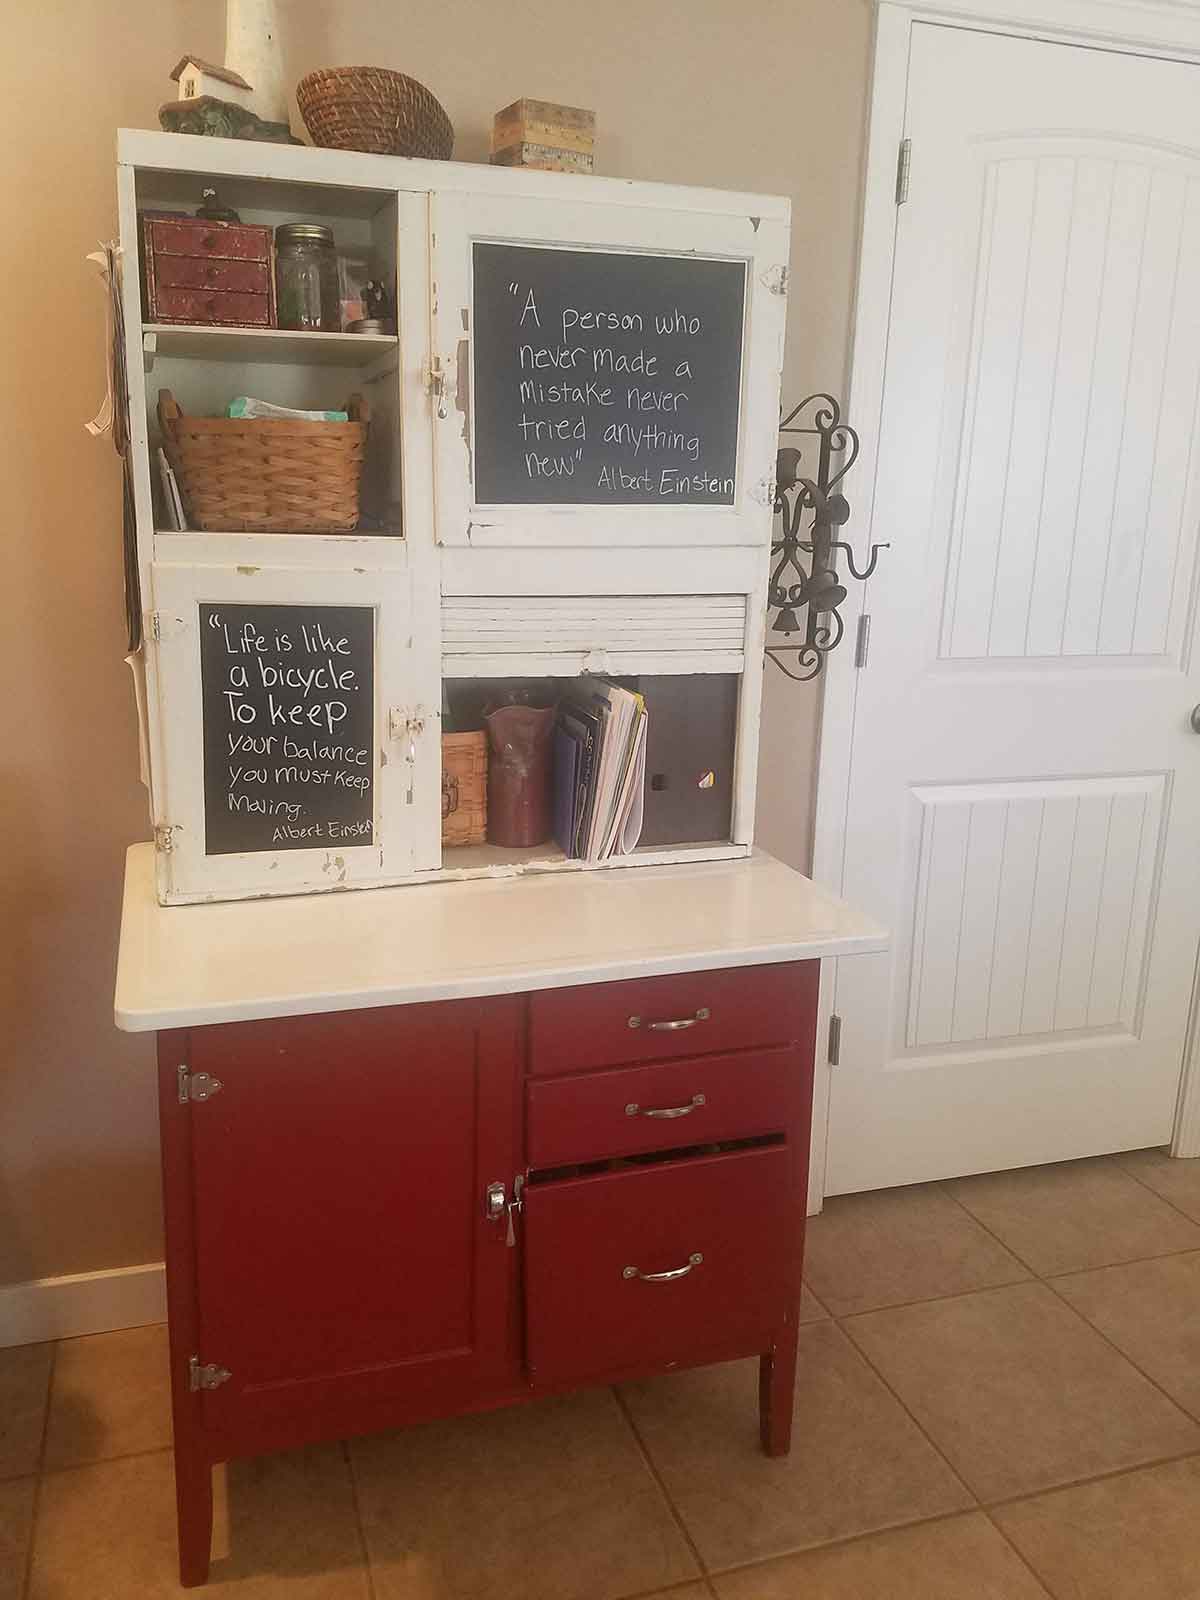
This removable chalkboard is a plastic like paper applied just like contact paper. It also works just like a chalk board as well except it is easily removable. I used it in the play space in our basement and on my antique Hoosier cabinet. Since it is removes easily, I didn’t have to worry about it changing the look or ruining the surface.
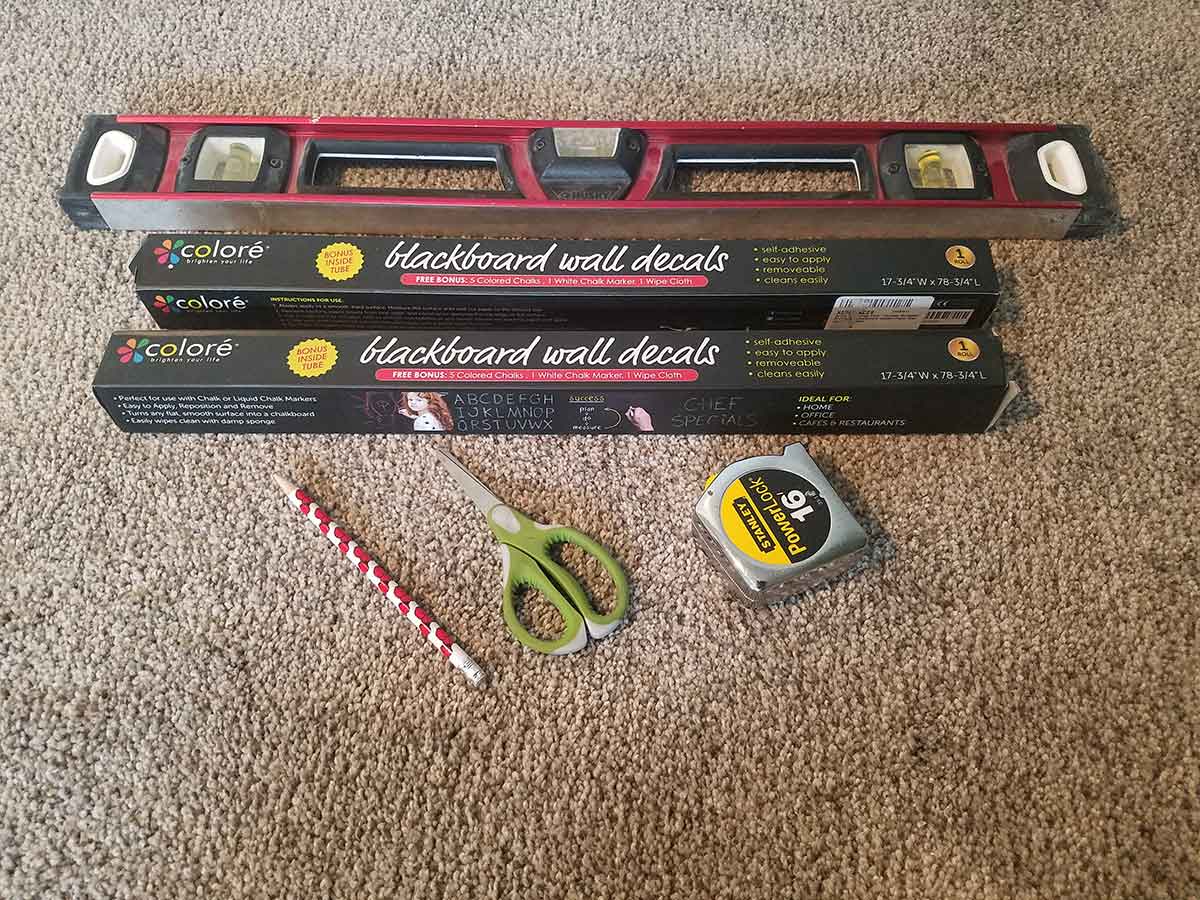
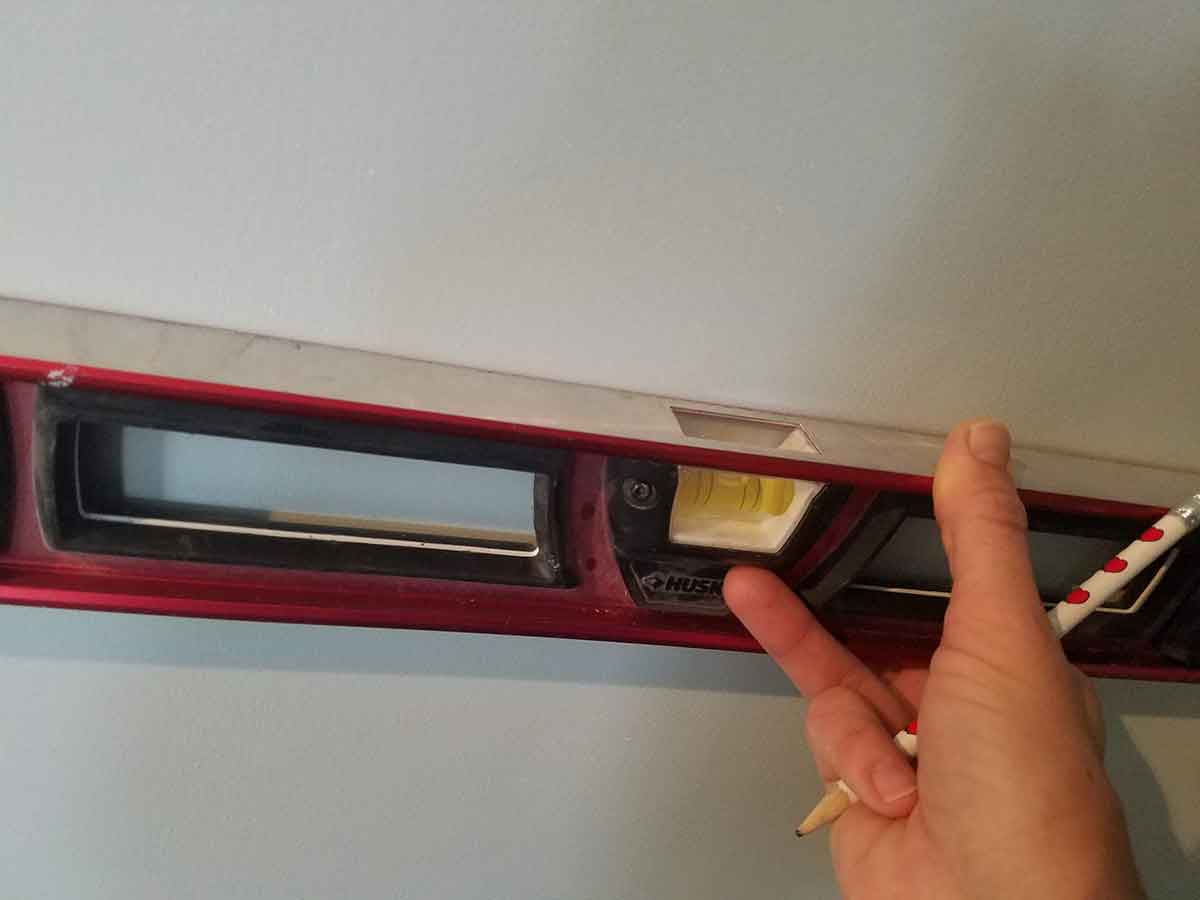
You will need the Blackboard Wall Decals by Colore, a level, tape measure, scissors and a pencil. There are several options from different companies for contact blackboard paper, but as of this post Colore was actually the cheapest and it worked well.
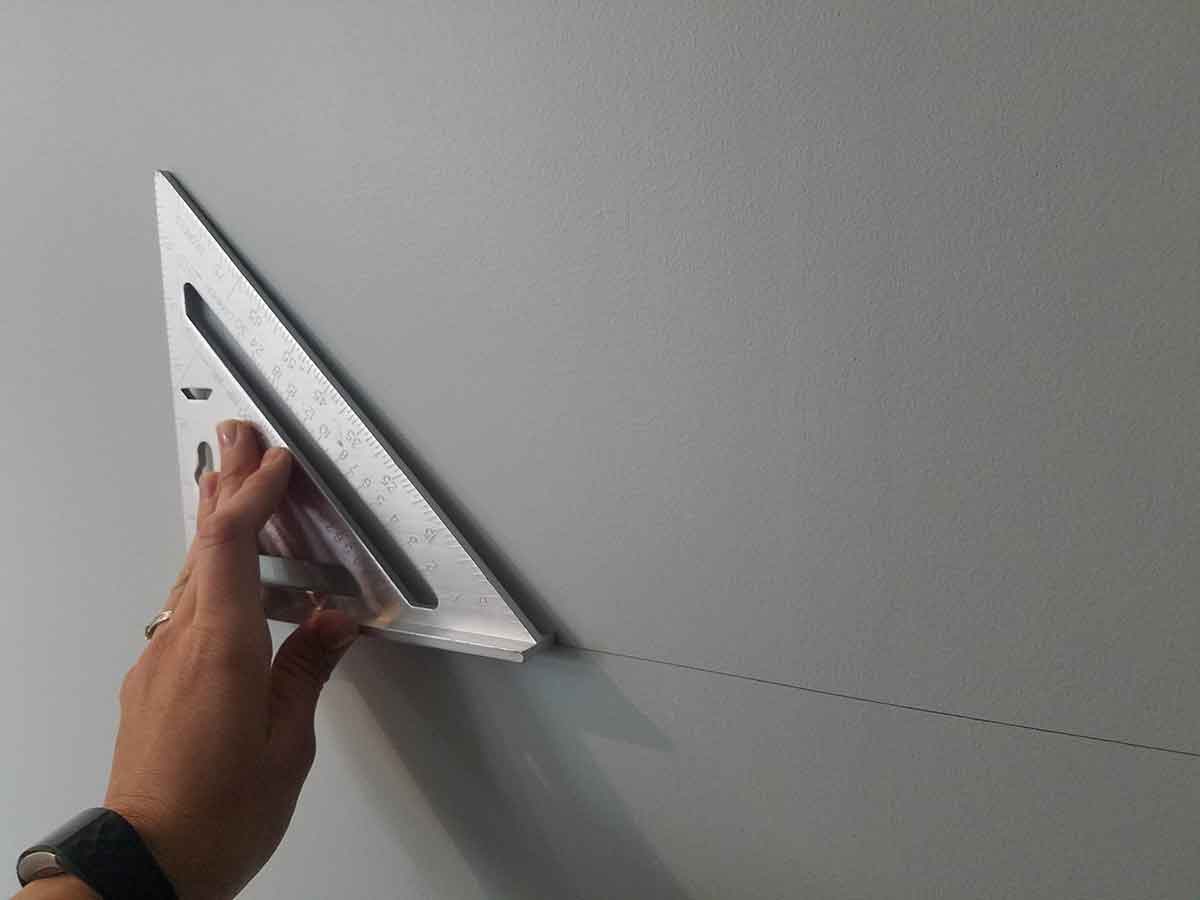
I used the tape measurer to decide how high to place it on the wall. Then I used the level to make sure both my corners would start at the same height. A square edge at the corners made sure I had the chalkboard decal going up at the correct angle.
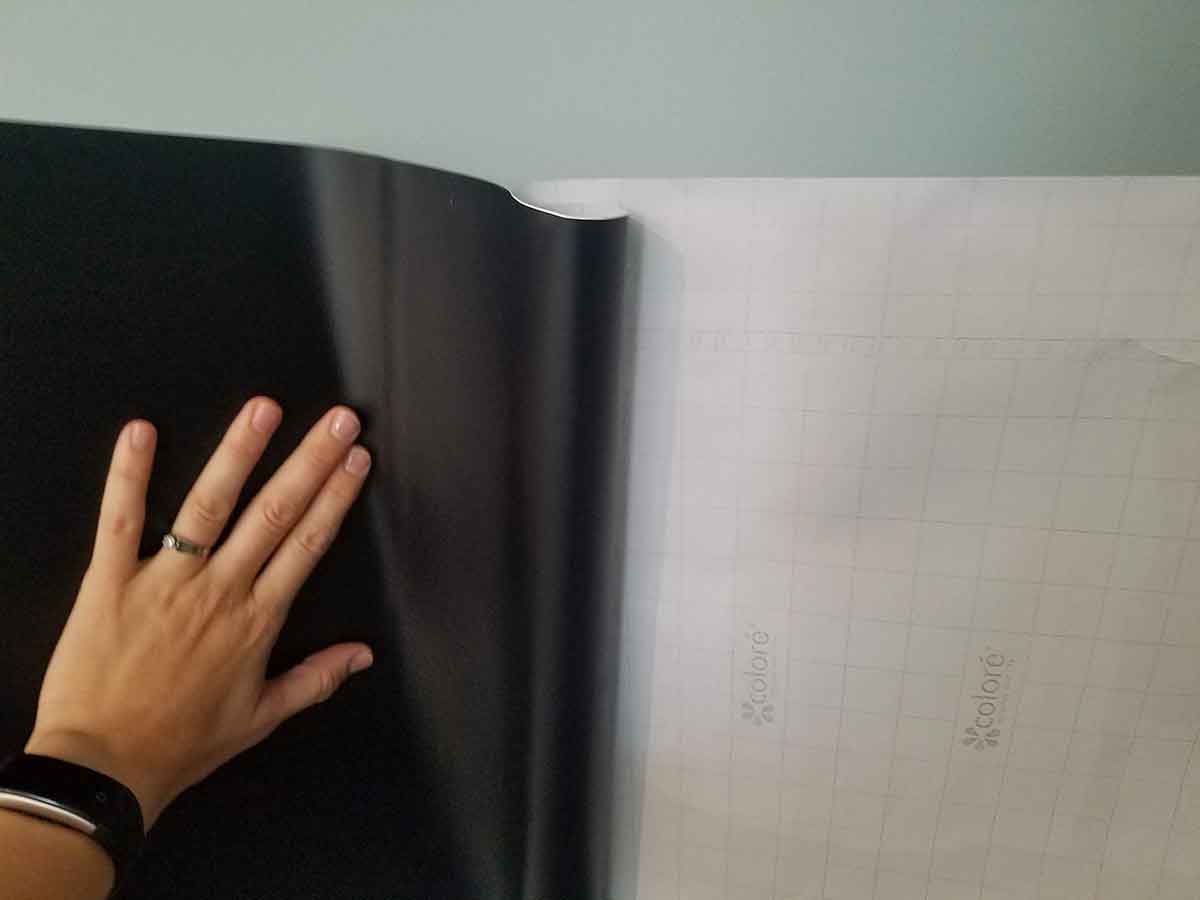
Start in one corner and smooth it out with your hand as you pull the paper backing off. There are also handy cutting lines on the back to help you get a nice straight edge.
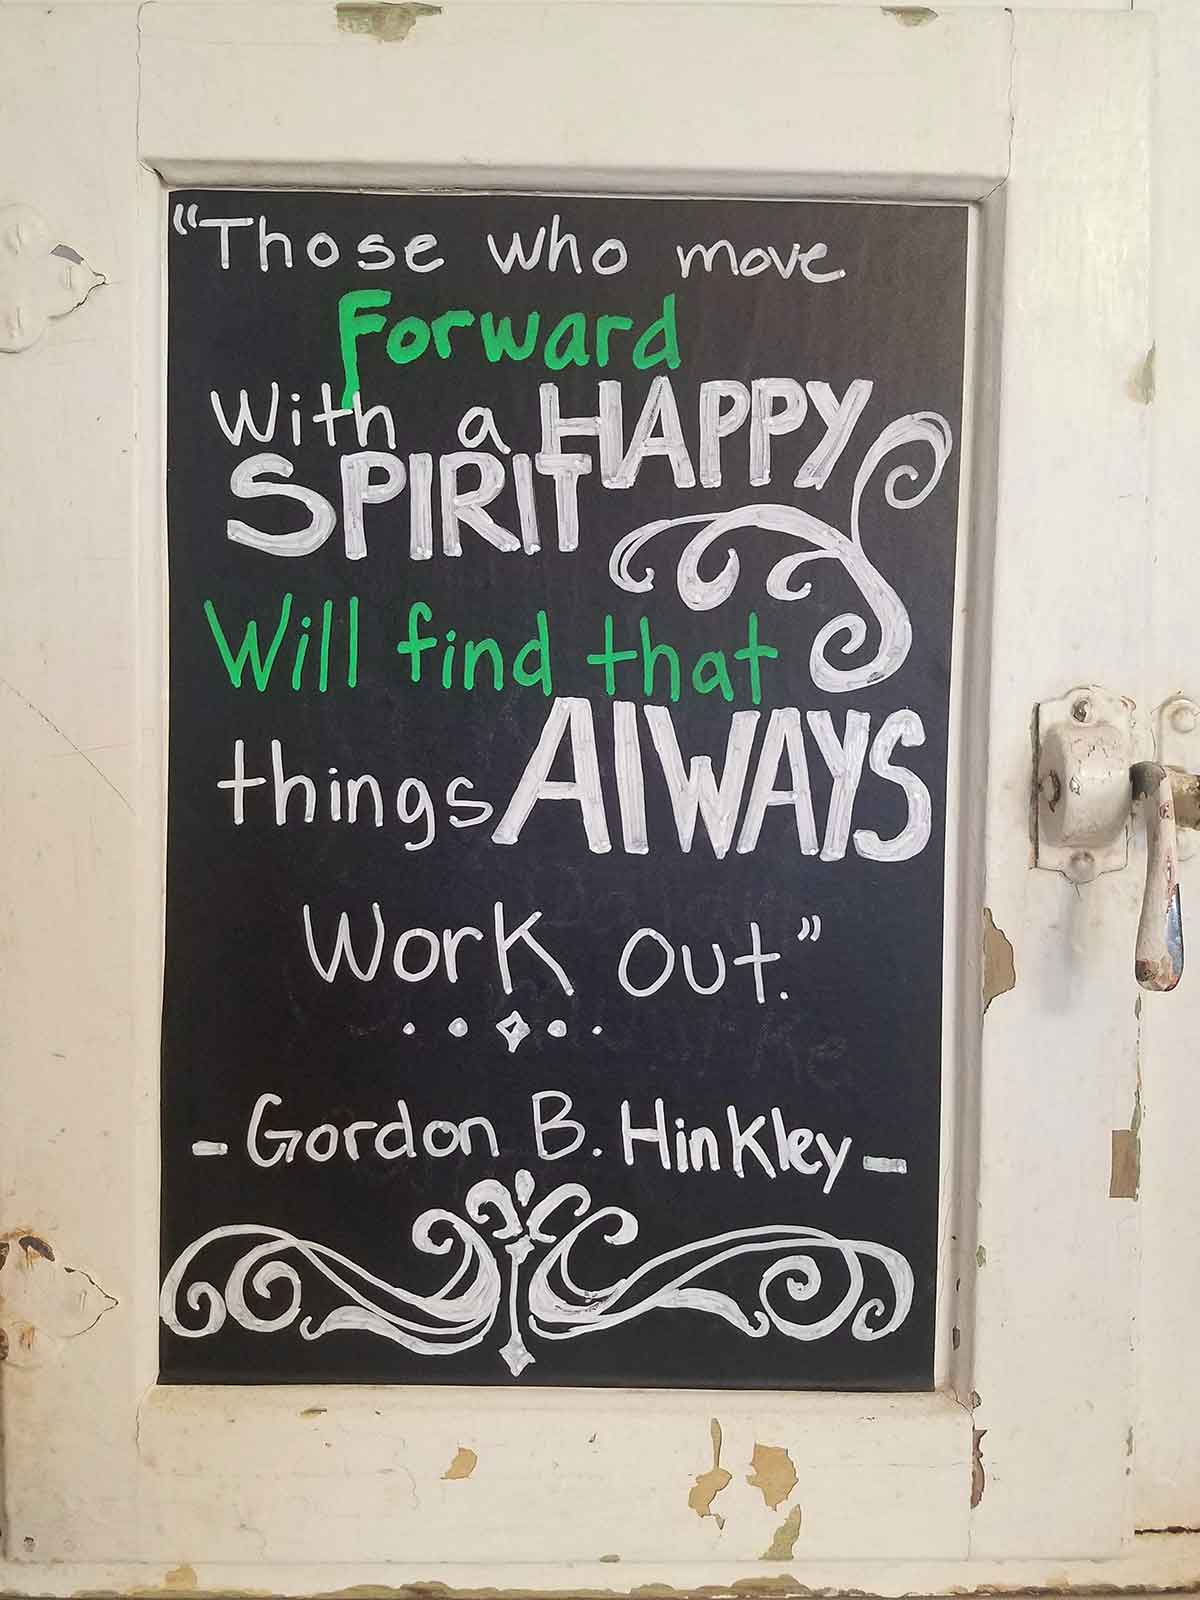
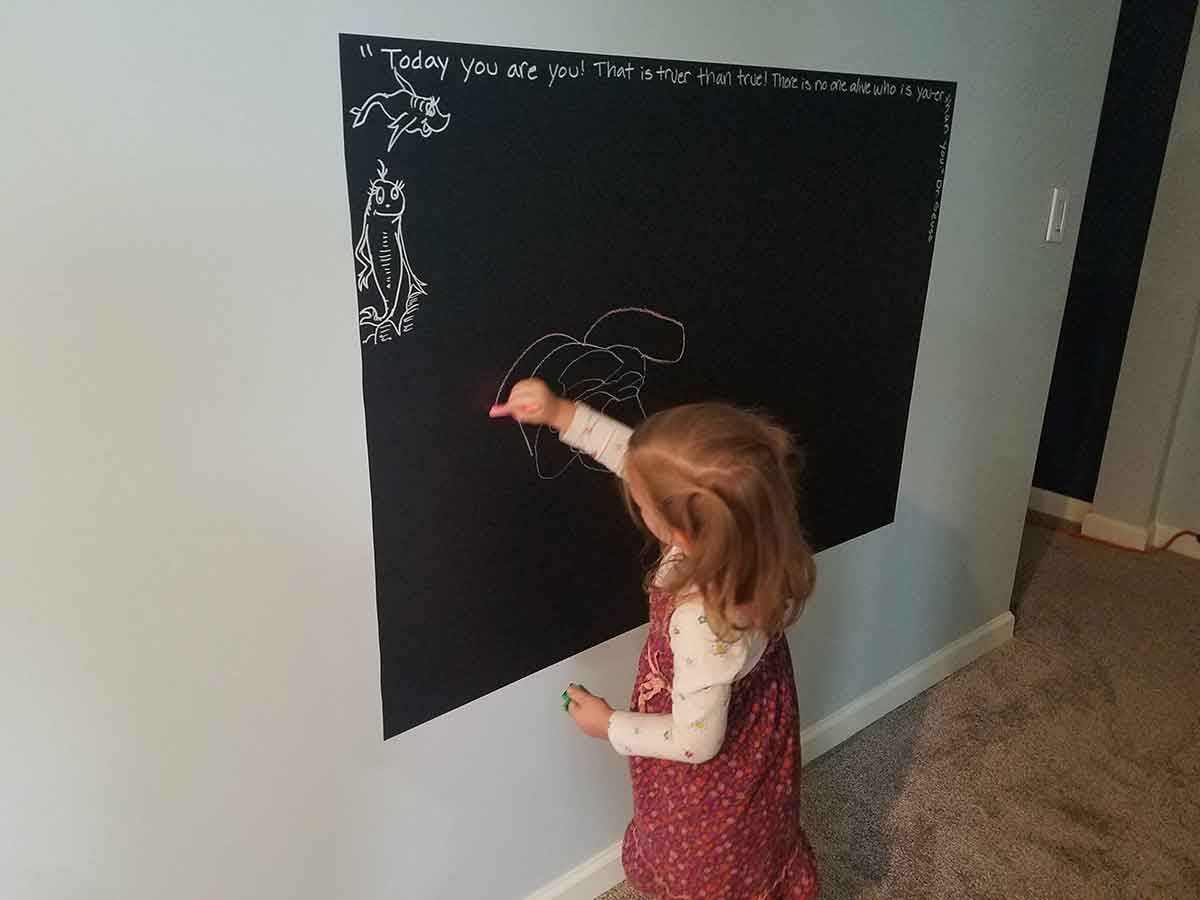
And Voila! You’ve got yourself a temporary chalkboard that works and can be taken down whenever you feel the need. Be warned that the chalk markers are much harder to get off than traditional chalk. I really like the look of the chalk markers, but tried to draw things with the chalk marker that I wanted to stay longer and let the kids draw with the regular chalk for easy clean up.
The chalkboard below was made with one and a half of the Colore box sets and I used the left over portions to change up my Hoosier Cabinet a bit. Hope you enjoyed the demo. I’ll keep you posted on my next adventure.
Until then, good afternoon, good evening and
goodnight! 🙂

by Natalie | Aug 11, 2018 | Furniture, Home Decor
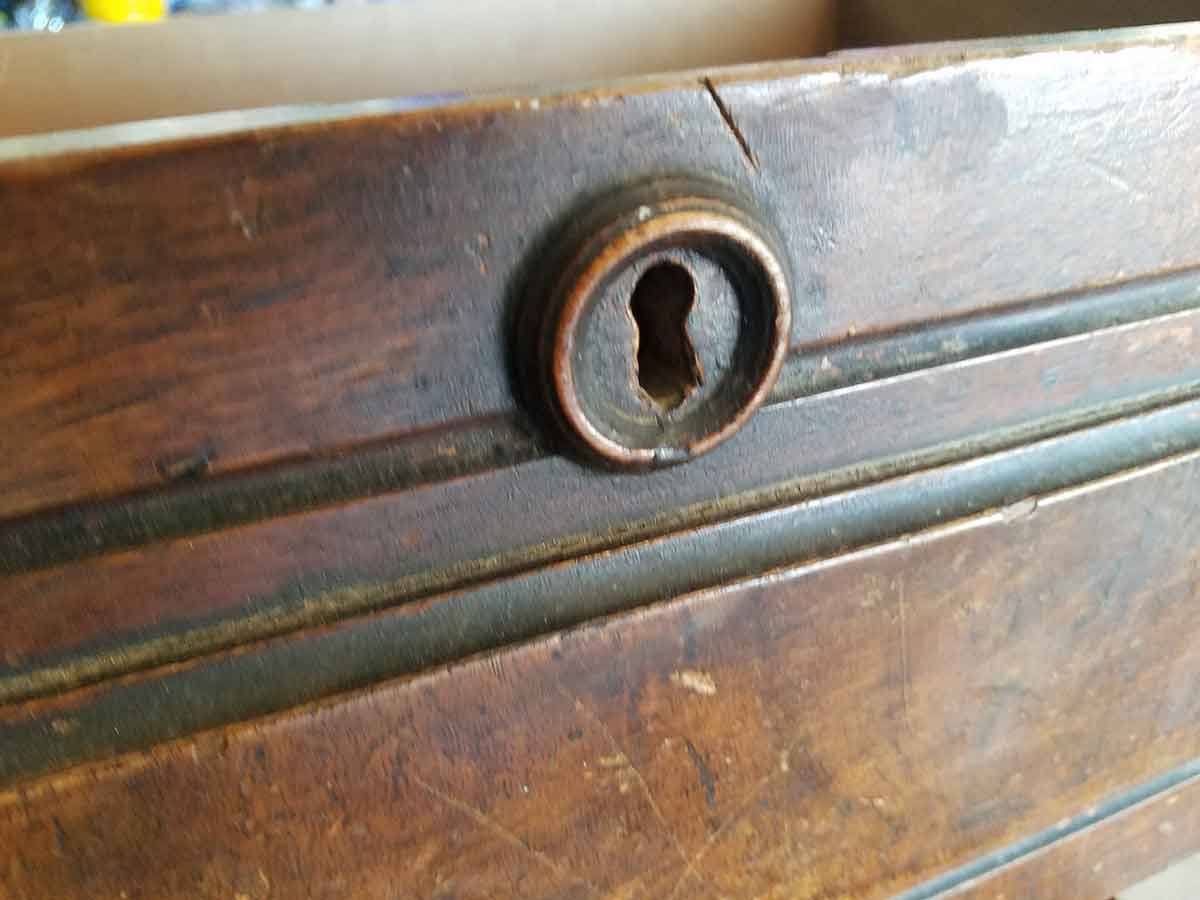
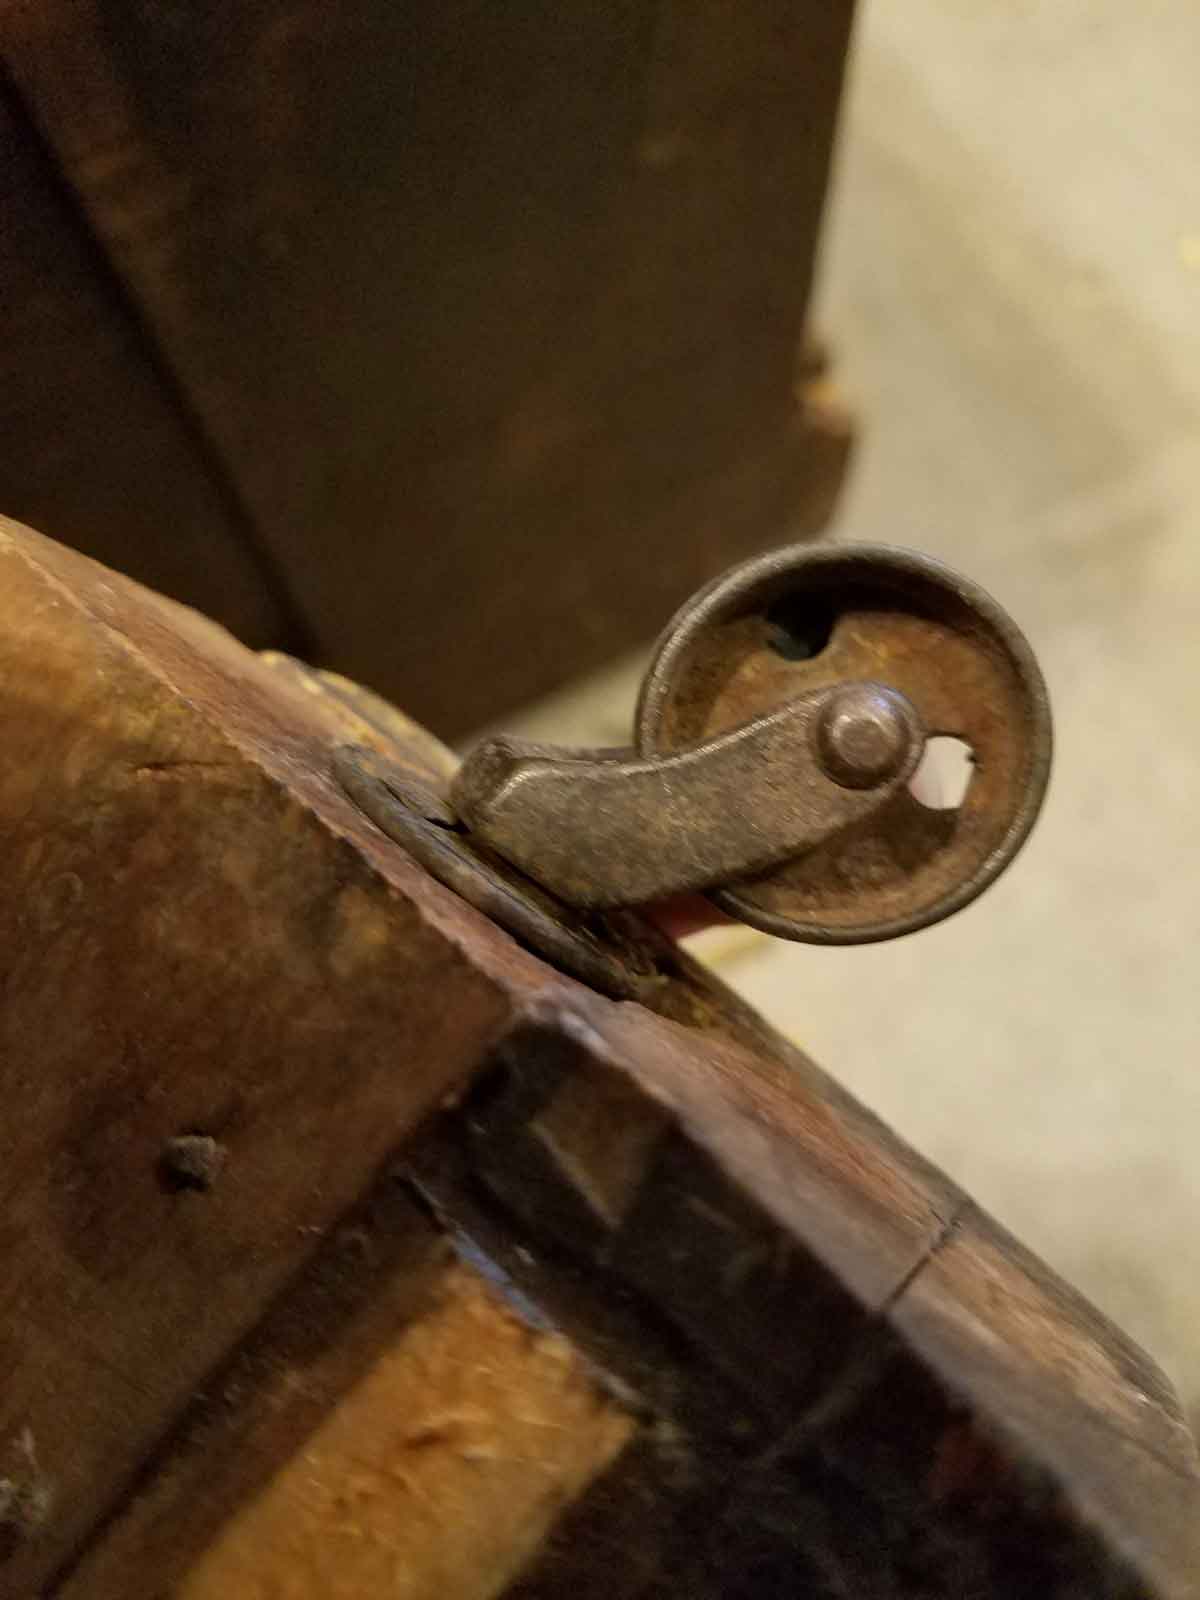
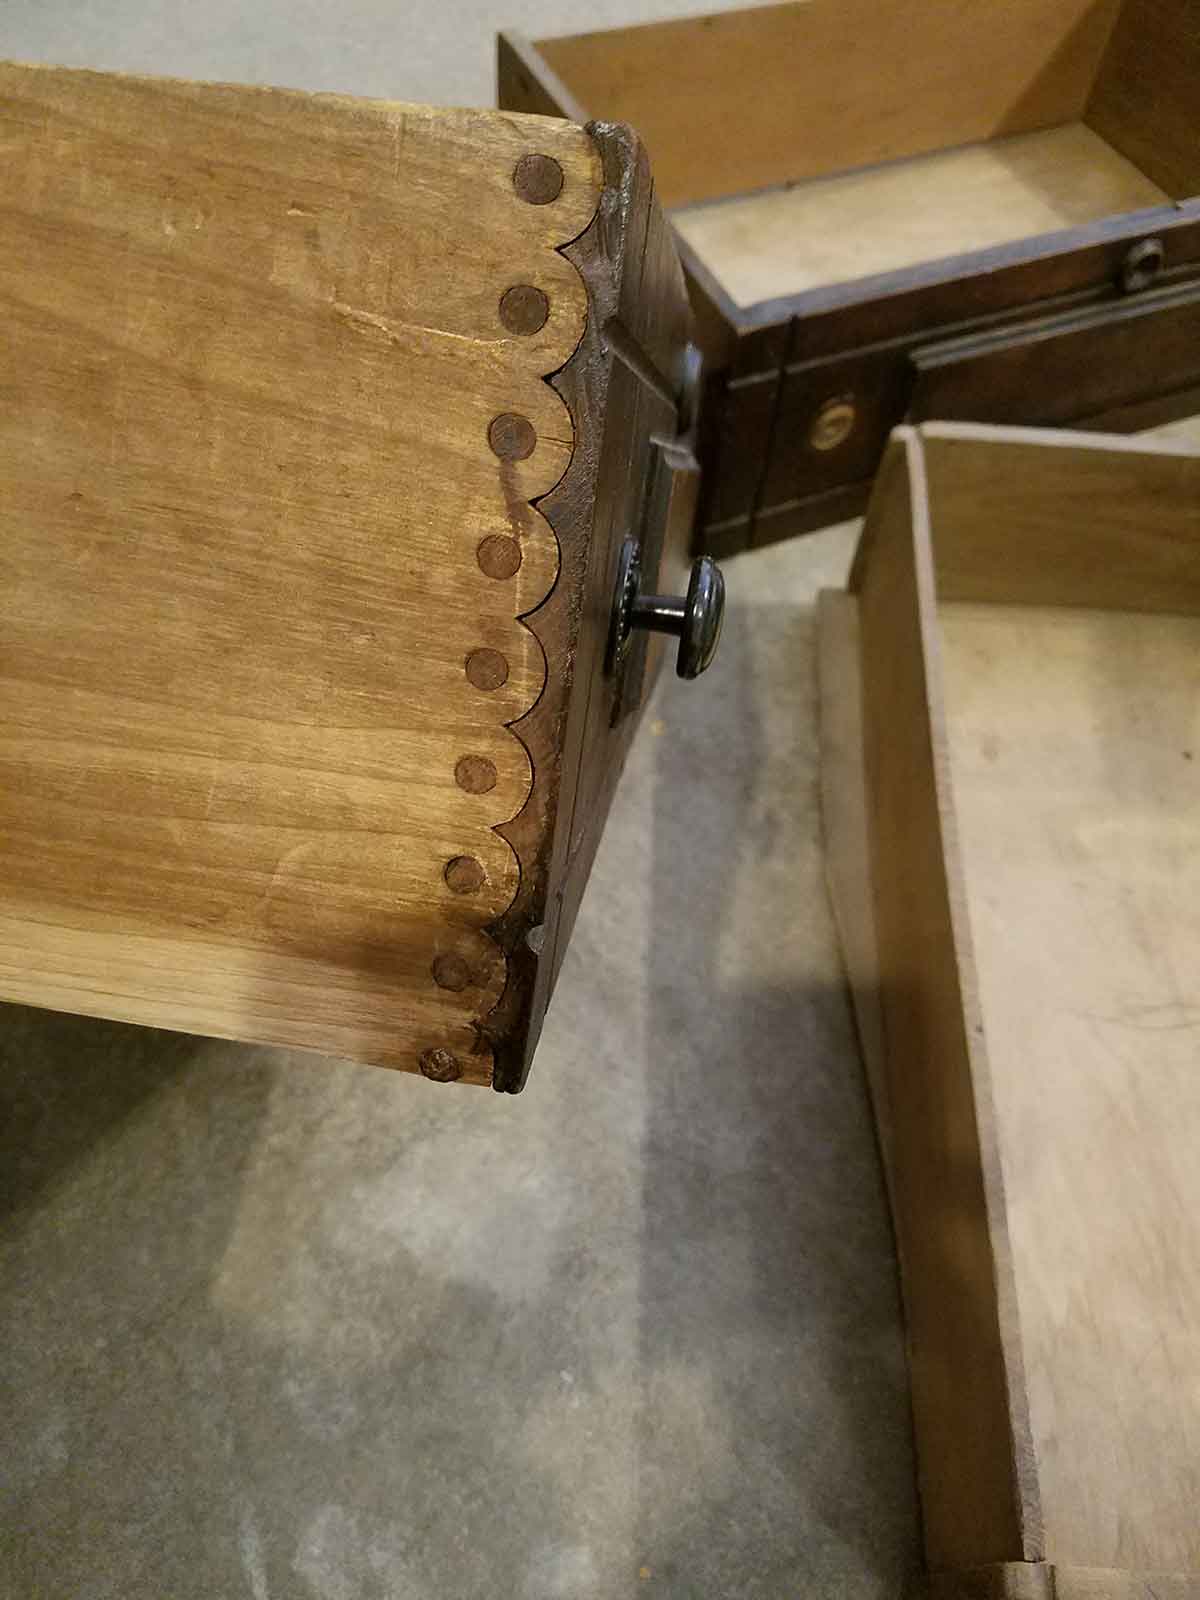
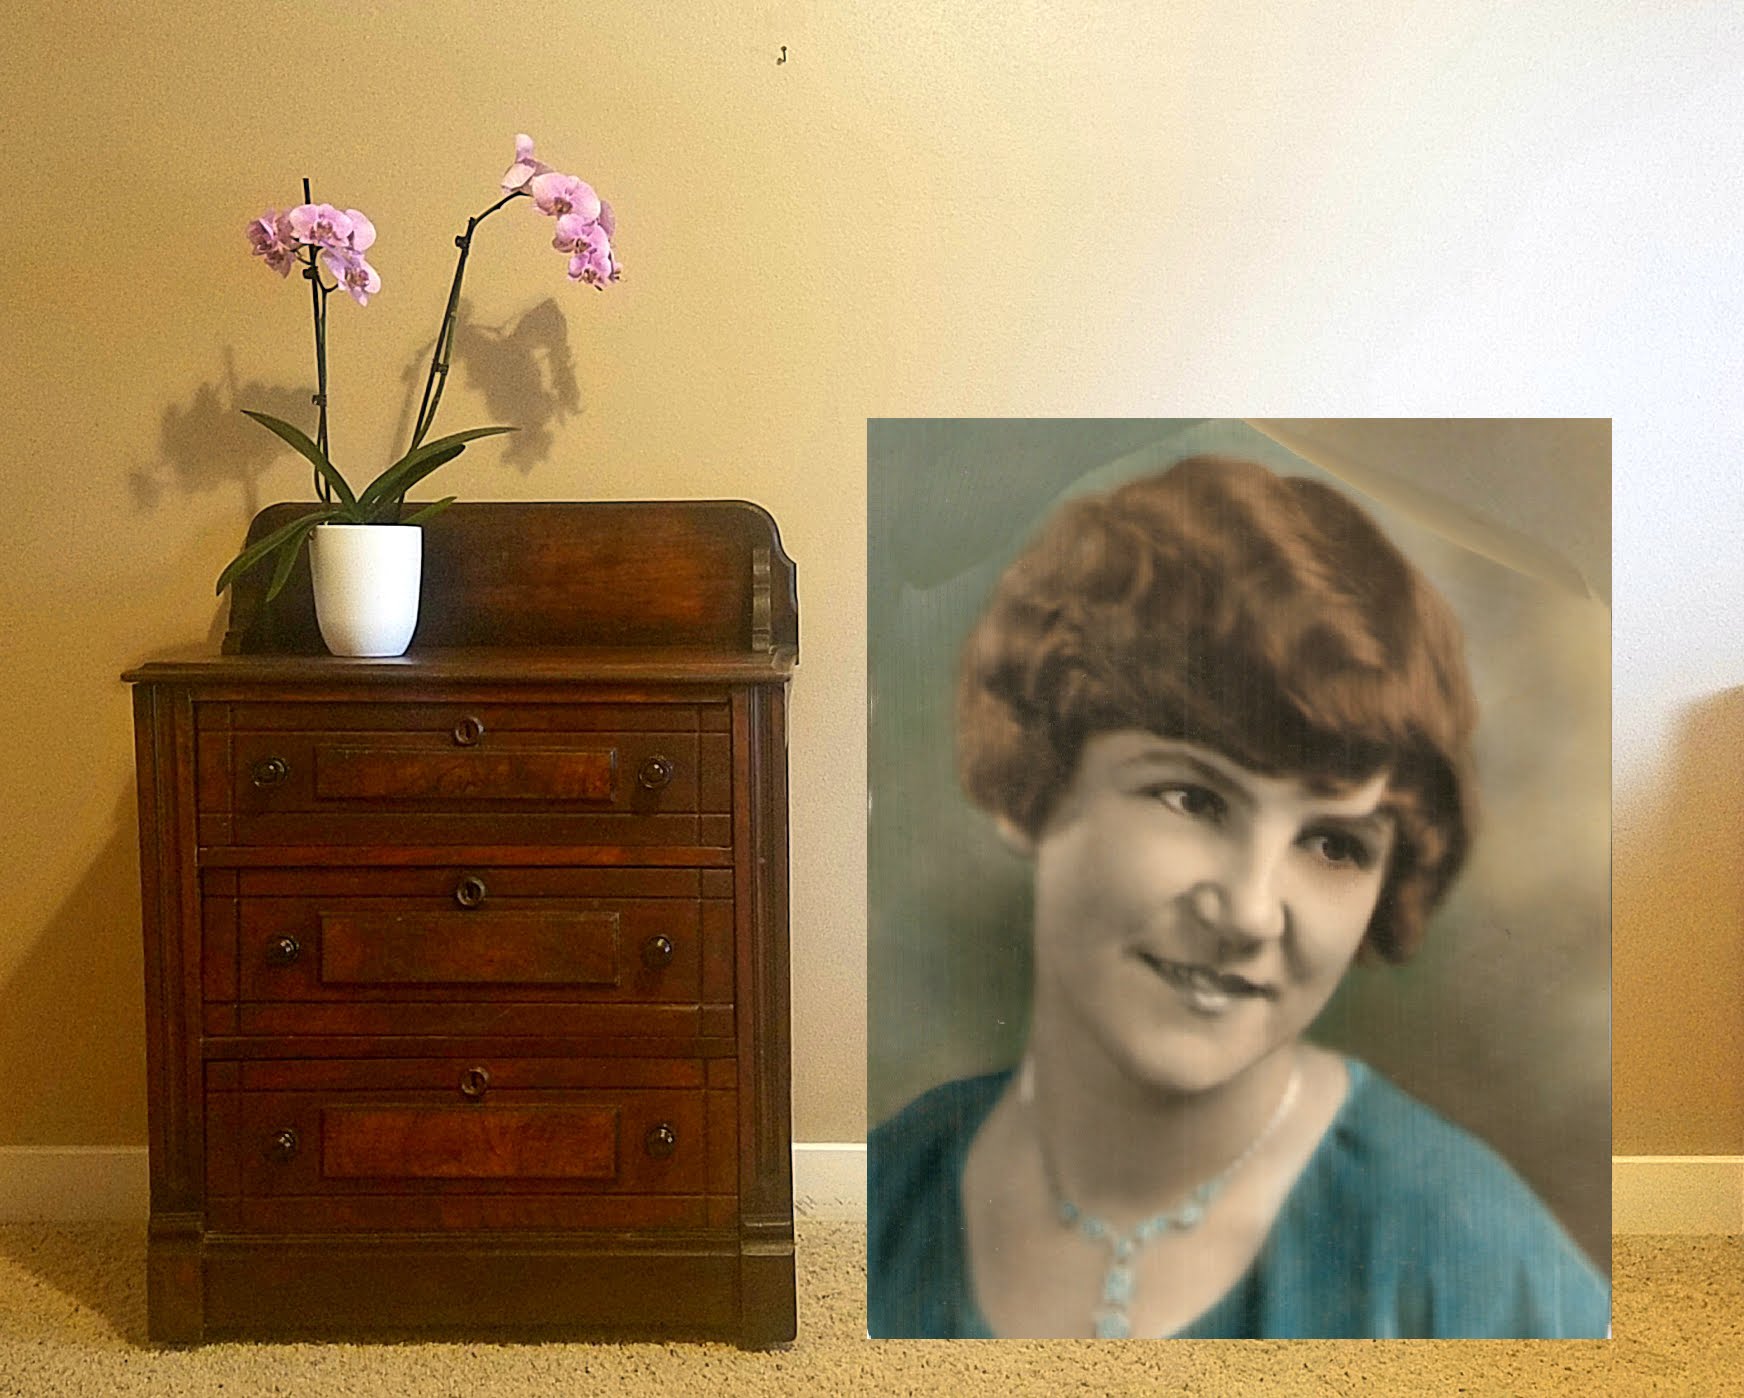
A few months ago, while visiting my parents, I spent the night in my childhood room. Many things had changed since I was young, but there was one piece of furniture I remembered. A little dresser leaning against the wall. A bit unassuming, it probably wouldn’t stick out to the average person, but as I looked memories came flooding back. Things I had cherished, things I had worried about and friendships I’d made.
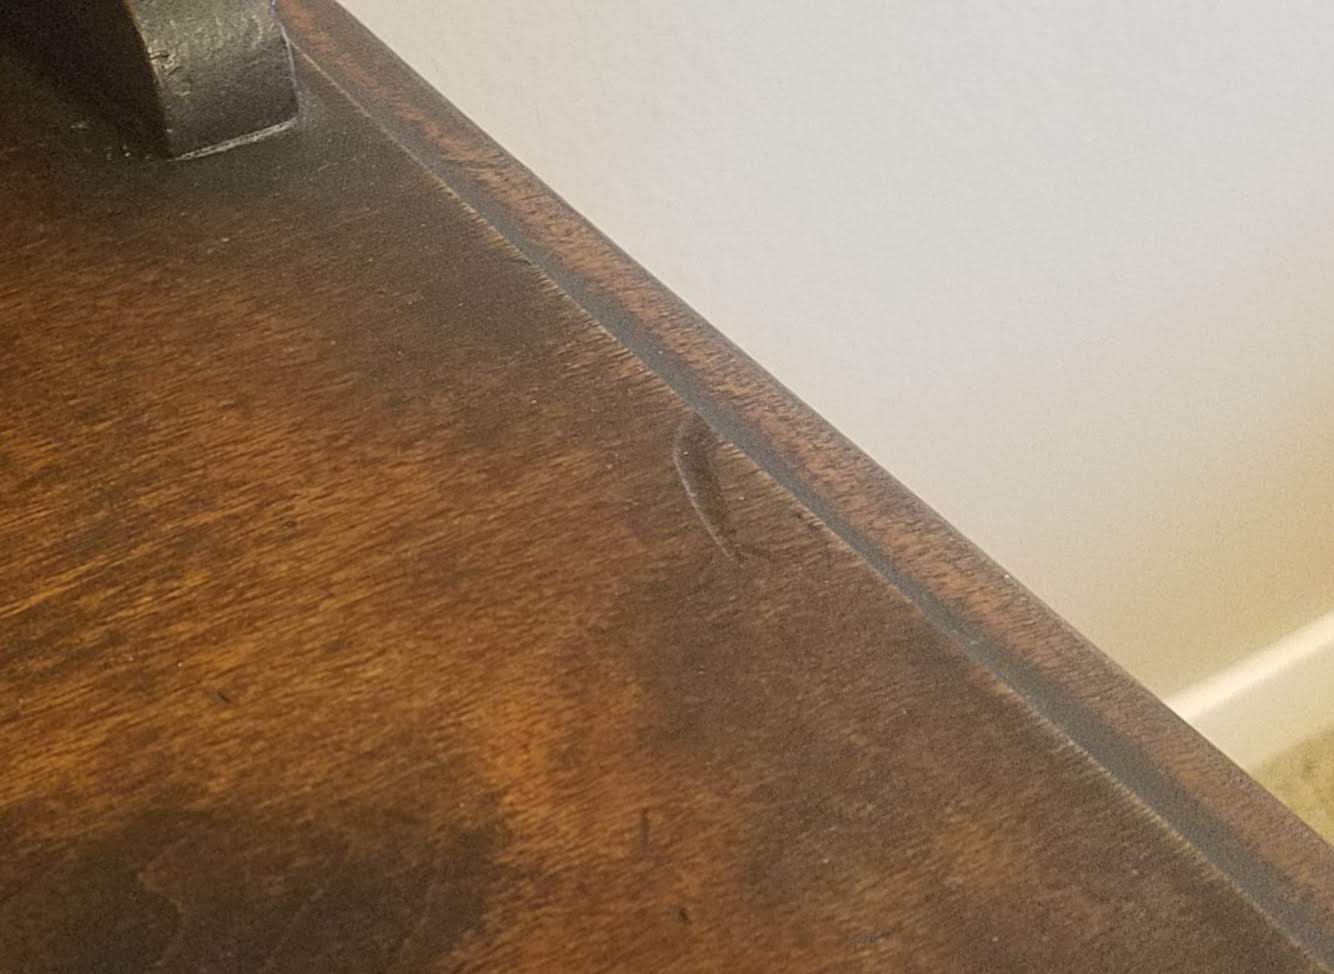
The little dresser had gone through many hands since I had last used it and the years were showing. Someone (perhaps me) had colored in the crevices with a green crayon. One wheel had fallen off the bottom and it now sagged on the floor. The sides had been roughed up by (not me, I would never do that 😉).
Suddenly, I wanted to fix it up and bring it back to where it once was. I asked my mom if I could take it and she said, “yes”!
Family Ancestry and a Water Stand
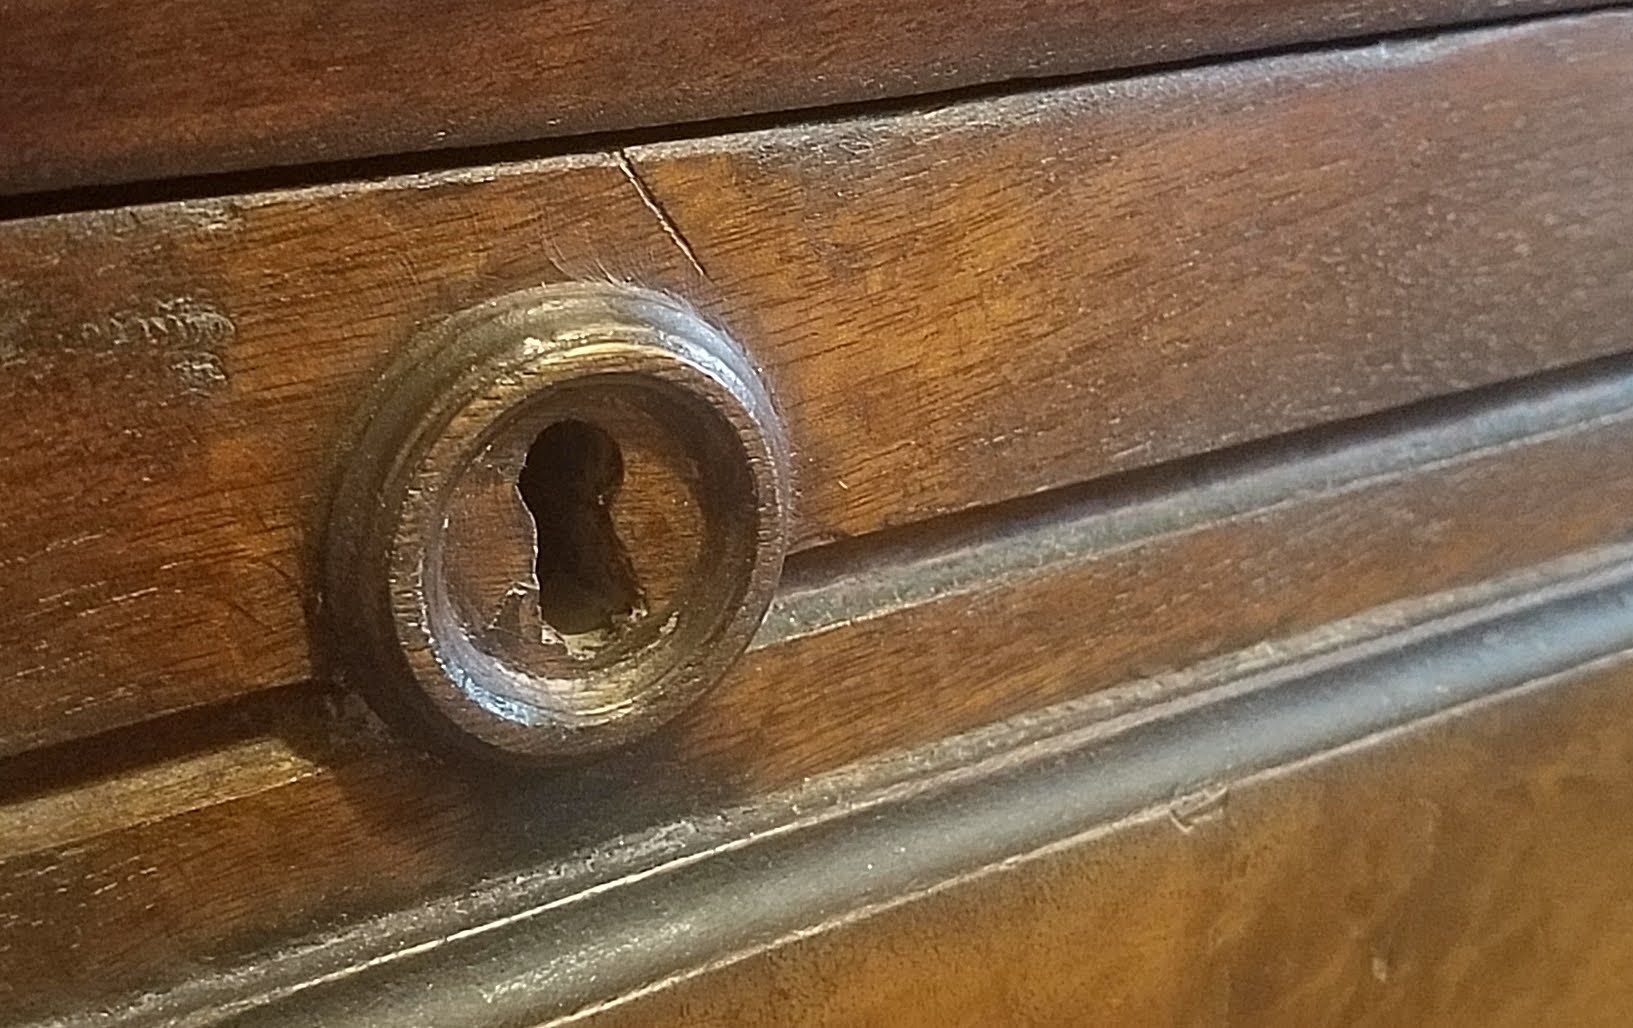
This dresser (or more accurately the water stand-now-used-as-a dresser) not only belonged to me as a child, it had also belonged to my mother and her mother when they were children. As I began to get it ready for refinishing I couldn’t help but wonder about who built it. With the detailed curved joints and routed edges. This piece, dating back to about 1910, had to have been done by hand, as many electric tools weren’t in mainstream use yet, but how was it done? The whole piece intrigued me.
Life Happened
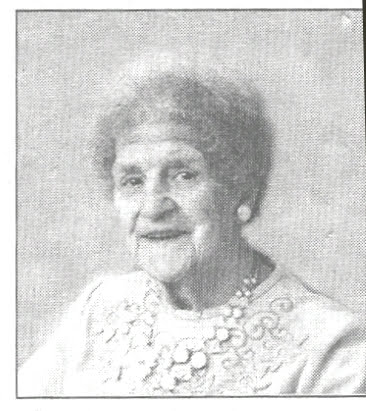
My grandmother was a hard woman from what I remember as a child, and I never talked to her much growing up.
As an adult I learned more about her life and found she had gone through her share of heartache and pain, enduring a history I likely never would. The wear on this little dresser seemed to be speaking to all it had witnessed during the lives of its owners.

Becoming a US Citizen
My grandmother sailed to America with her parents when she was 7 years old. Her father had wanted to come sooner, but couldn’t convince his wife to travel on the ocean, she felt it wasn’t safe.
Then the Titanic sank.
Titanic Sinking


My great grandfather hid every newspaper he could find, afraid they would never make it to America if his wife heard the devastating news. As much as he tried, she still found out, it was too big of a story to hide. She surprised her husband by saying, “They will be safer now. We can go.” They sailed on the very next ship.
The Big Move
So the great trip began, with packing and buying tickets, preparing for a new life and saying goodbye to family they would leave behind. Within a year after arriving in the states, both of my grandmother’s parents contracted Typhoid Fever. Her father died at the age of 38 leaving his wife a widow at 32, with 6 children, in a new country. My grandmother was 8 years old.
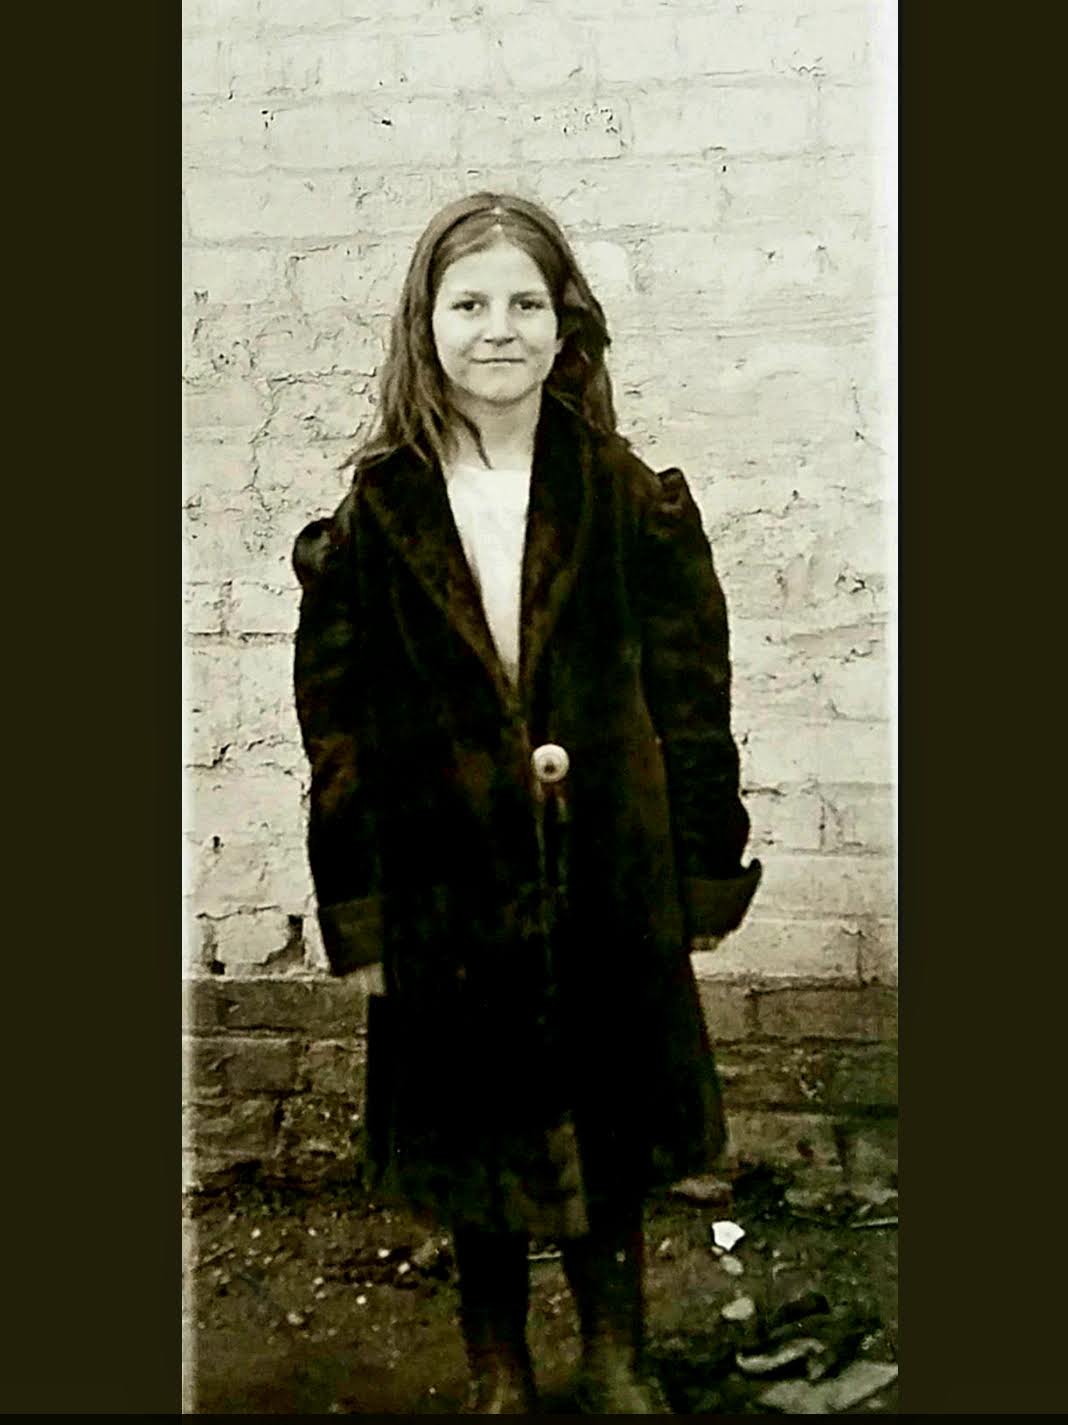
It must have been a taxing life trying to bring in enough to care for a large family. They moved in with my grandmother’s aunt who had also moved to the states and somehow paid the bills. My grandmother quit school as soon as she was able to start bringing in an income and help with the family. At the age of 16 she started working as a switchboard operator for the telephone company. Which I understand to be a pretty prestigious job for the time.
A Relationship Match
The new job must have given her a little freedom. She enjoyed dressing up and spending time with her friends. She loved jewelry and even had a few fashion wigs that were all the rage. She married one of the young men in her group of friends. A local baseball hero who wanted to be with her more than with any other girl.


The Great Depression
The great depression hit two years before they got married. I sometimes wonder if they held off getting married, waiting for things to work out. As the lean times rolled on. Perhaps they decided to make the most of it and start their life together on faith.
The depression left a lasting impression.
When my grandmother died she had boxes of necklaces and earrings most of them shiny, colorful plastic. It was cost effective and added that splash of color to make an outfit complete. More telling were the piles of money stuffed in bureaus and under beds.
A huge storage of food in the basement, mostly expired, gave hope of no hungry days ahead. Never using the food, they always bought new food to eat from their pantry, but the basement was there as security.
The depression hit at such a pivotal time. They never quite recovered.

A Life of Poverty
Poverty does something to you, it changes how you see life and reality. Much like the scars on the dresser, you can fix it up and bring back the color, but some things will never be the same.
A different perspective isn’t necessarily to be mourned. Even though scars remain, that can’t be sanded out, it adds character and history. A meaningful story, that might not have otherwise come.
Alzheimer’s and Sacrifice
My grandmother lived to be 96 years old and spent the last 10 years of her life with Alzheimers and near complete deafness. There were times when I would look down the hall and see my mother helping her to the bathroom or helping her get dressed and wonder why God kept my grandmother here so long. She clearly wasn’t getting anything out of life. Maybe, I wondered, it was to give my mother the opportunity to show how angelic she was, for it took an angel to do the things she did.
As I refinished her dresser and brought back the charm from its early days, I felt like I was reaching back into the beginning of my grandmother’s life.
and I remembered.
I remembered, that as my grandmother’s mind was being ravaged by the affects of Alzheimers and she would be thrown back and forth in time, reliving anywhere from five minutes to 90 years ago. There were times she would laugh and joke with me.
I began to wonder if maybe my grandmother hadn’t always been hardened and grumpy. I began to think maybe life had been hard and resulted in her currently, fleeting, hardened self.
So here I was thinking, as I sanded and glued and nailed pieces back together. Maybe my grandmother had lived that long so that I could also catch a glimpse of who she really had been. In a way, as the dresser began to take shape and show it’s true self, I began to see that my grandmother deserved the same respect.
The respect to regain and be remembered for who she had been.

by Natalie | Aug 6, 2018 | Furniture, Home Decor, Home Renovation, Uncategorized
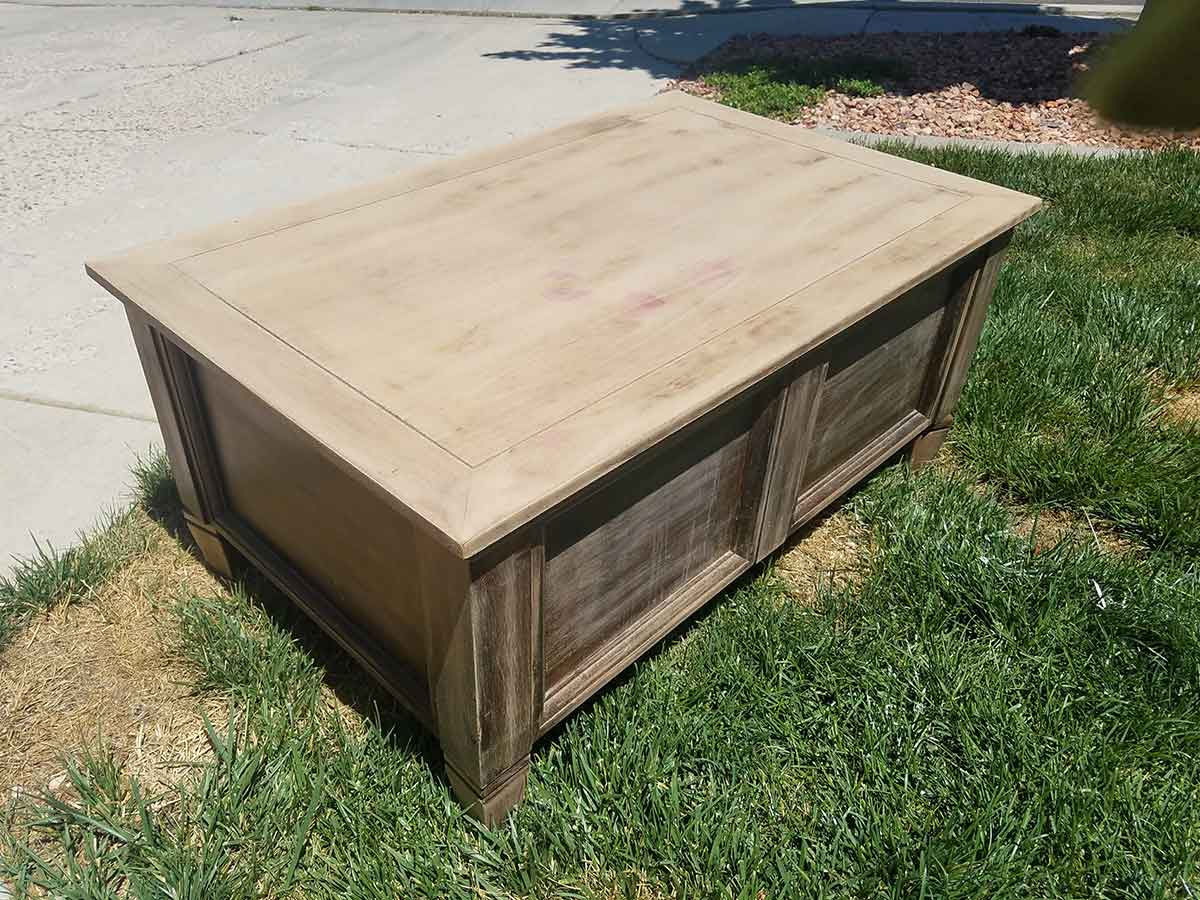
A few months ago our family room was beginning to feel cramped, messy and boring. Though I had ways for my family to put away blankets and toys, they were not following my well thought out plan. The basket meant for folded blankets was crammed with toys or shoes kids didn’t want to put away and became just another object taking space. Our coffee table, while great for putting up our feet, lacked much use beyond that and stood in the middle of the room horrible and brown, so so brown.
A professor of mine once said, during his lecture on strengthening relationships, that if you have a problem with something your spouse is doing, you may see it as his/her problem, when in reality it is your problem. Your problem, because most likely your spouse doesn’t care or is blissfully unaware that something is an issue for you. This is how I was beginning to feel about our messy family room. It was my problem and if it was my problem I was in a position to fix it.
The professor went on to suggest there was a solution found in the way you chose to look at the problem. For example one husband dropped his dirty socks on the floor every day and no matter how much his wife asked him to put them in the laundry he continued to leave them on the floor. The husband, while truly wanting to please his wife constantly forgot because he was so anxious to get into the shower after his long day and the laundry basket was on the other side of the room. Once the wife understood more of the story she in turn decided change her approach, because in the end she just wanted the socks off the floor and he wanted to take a shower. She decided to move the laundry basket just outside the bathroom and with the ease of laundry access, never had socks on the floor again.
I constantly look back to this story when I am trying to solve a behavior, sometimes it is easier to move the basket than it is to convince someone to change what they value. In my case, my kids valued “cleaning” up the floor as quickly as possible, more than they valued actually putting the toys away. So I changed my approach. I began to search for a chest that could double as a coffee table, but had blanket storage. I placed the collect-all-basket in a hard to reach place and made room for a few puzzles and games inside our TV console. Before you know it, the family room was back and though toys and books and random shoes still made their way into the room, there is no easy place to stash them. Clean up has become much more straight forward.
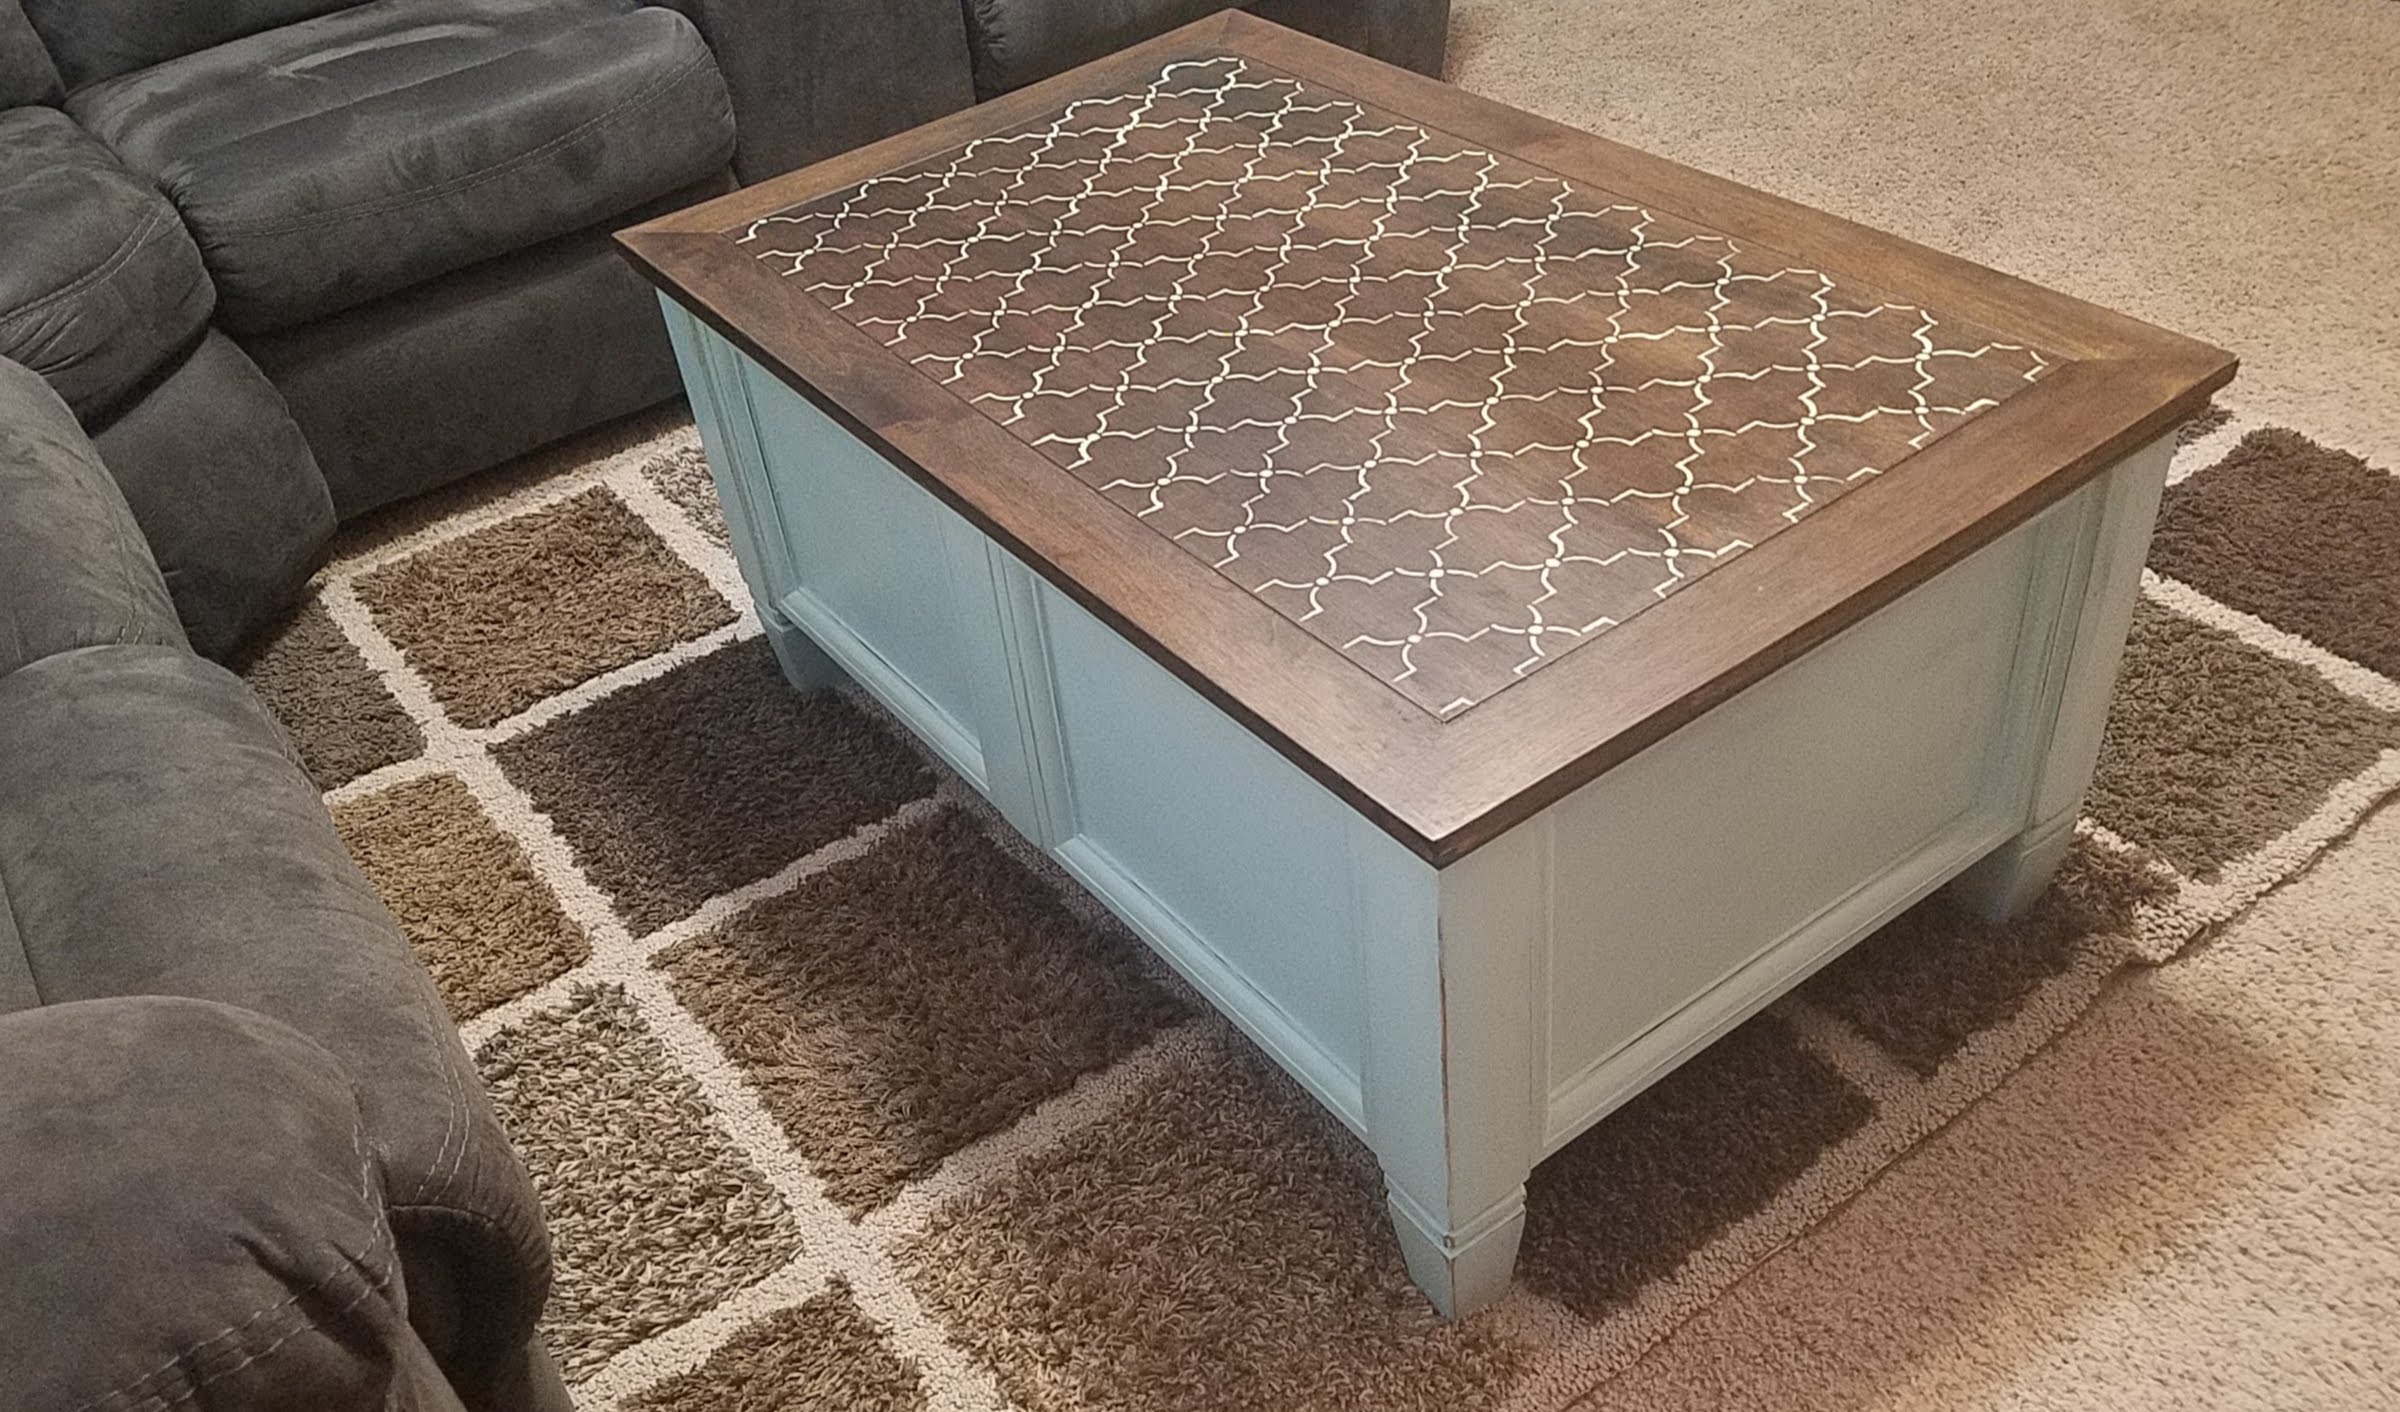
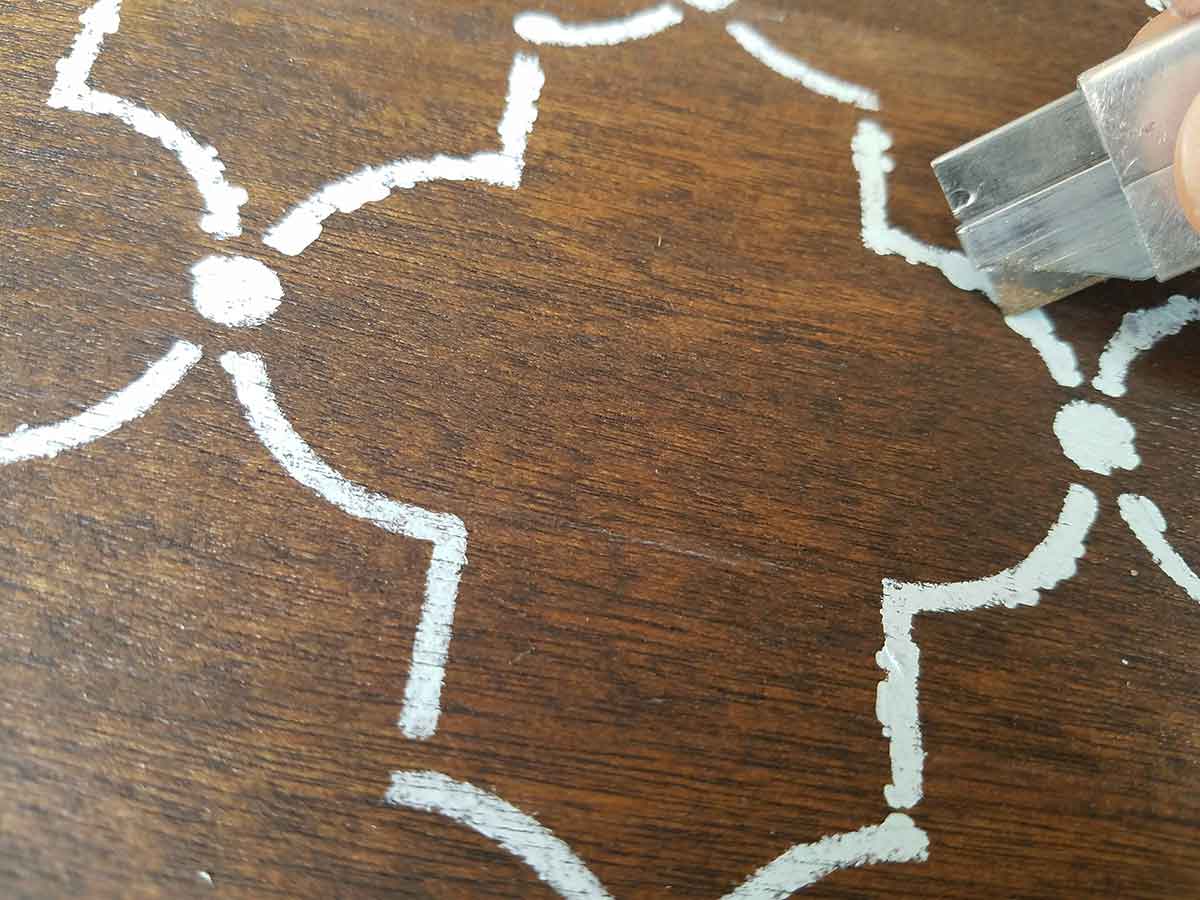
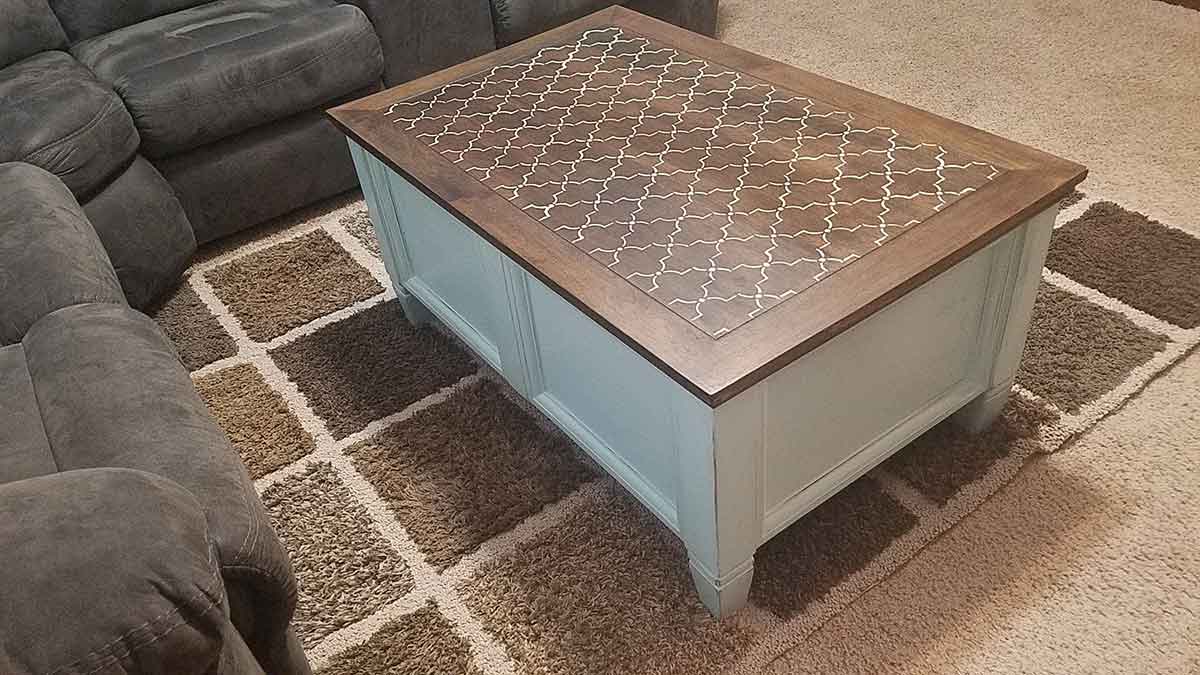
Here is the journey of my storage chest that started out looking like a little girls fingernail polish station, guessing from the princess cards and bubblegum pink puddles on top…I could be wrong. 🙂 The change was exciting, adding a pop of color to this very brown room was just what was needed, I love propping my feet up and admiring the stencil work. In the end, it was my problem, but with a beautiful solution.
The chest was in rough shape, but it fit the qualifications of internal storage and I loved the wood work on the outside. I thought that with enough washing and sanding I would be able to remove the pink goo.
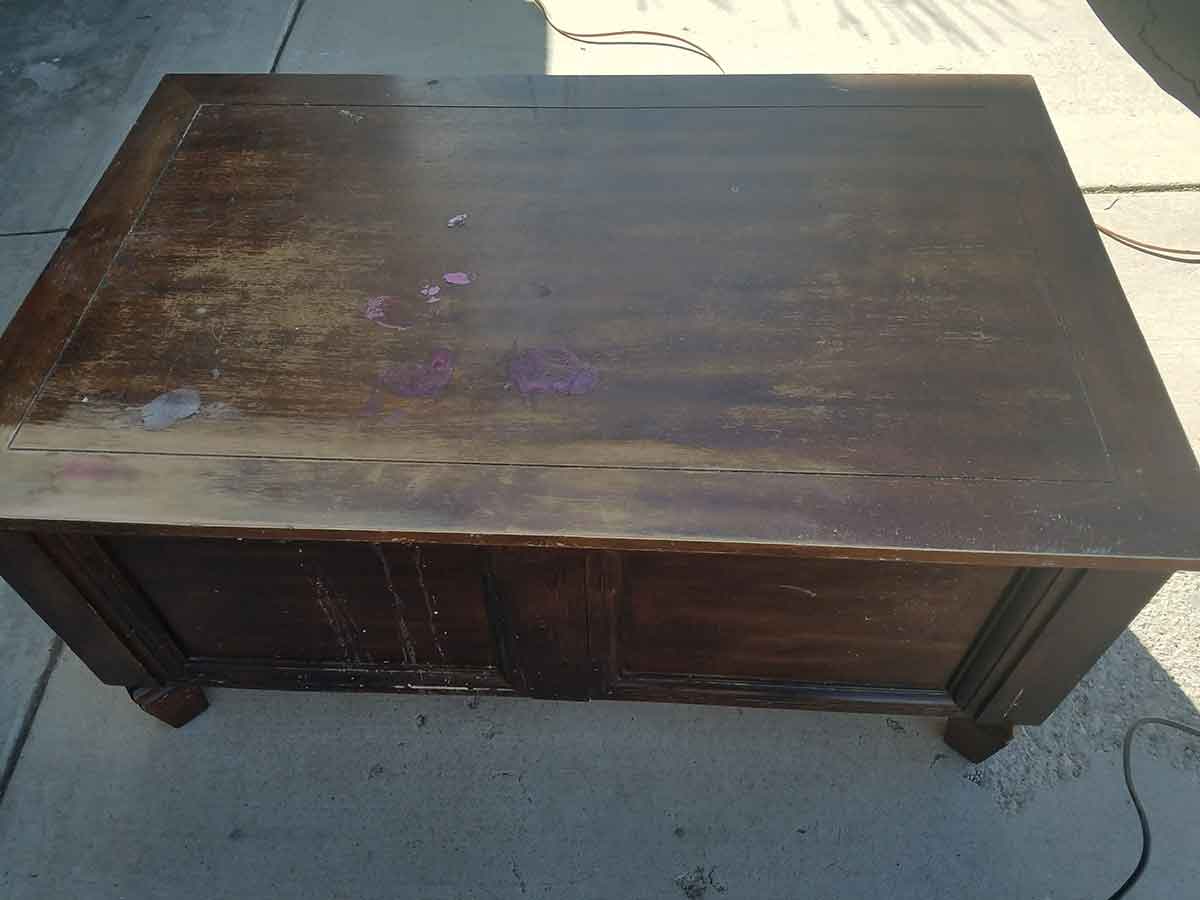
I was wrong. After dedicated sanding there was still a bit of a residue. I had wanted to have a wood tone on the top and add color to the bottom. I considered painting the whole thing, but I love to see a bit of wood grain. At this point I changed my design and decided I would stencil it, to draw attention away from the pink wood, if still visible after staining. I also roughed up the surface of the bottom portion to prep it for primer.
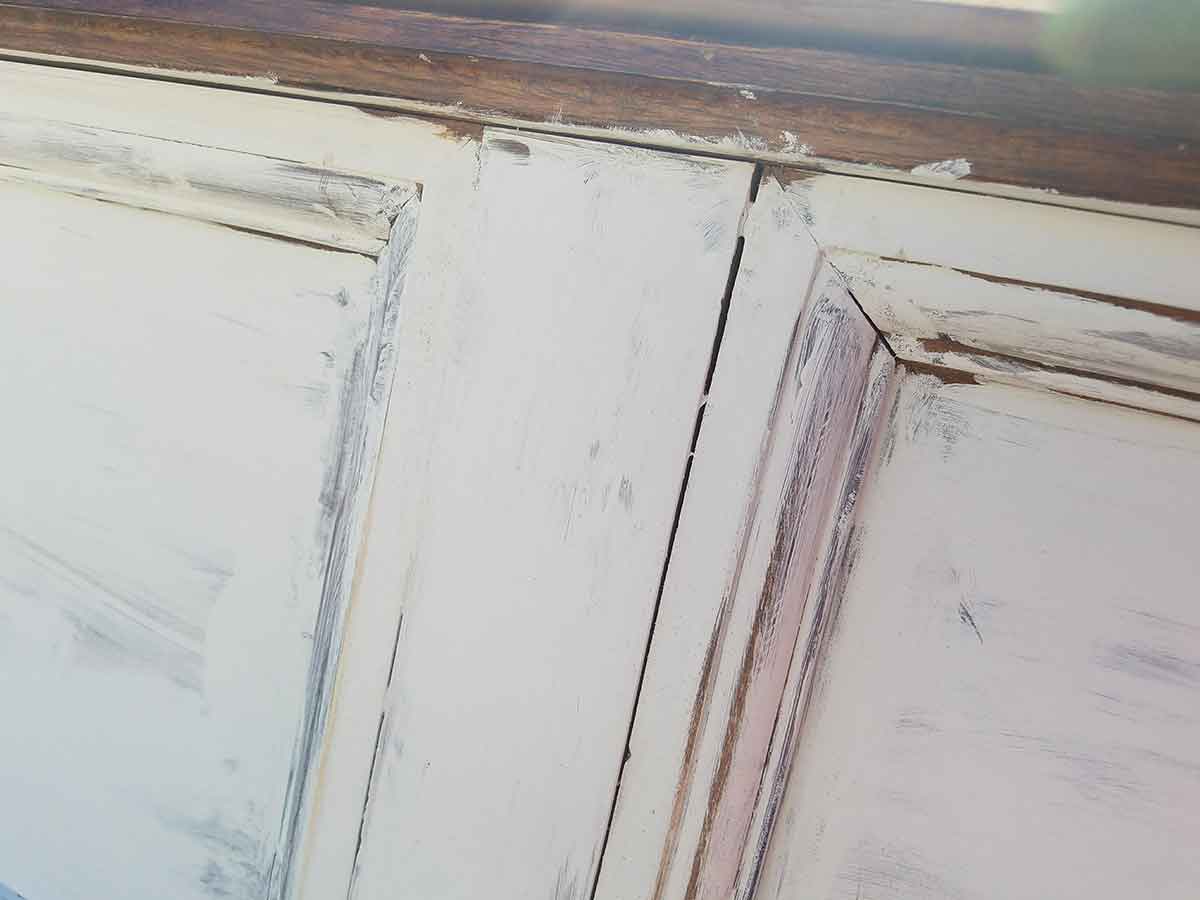
I like to prime pieces that I am going to paint for two reasons. One it really helps the paint stick to a roughed up lacquered surface and two…
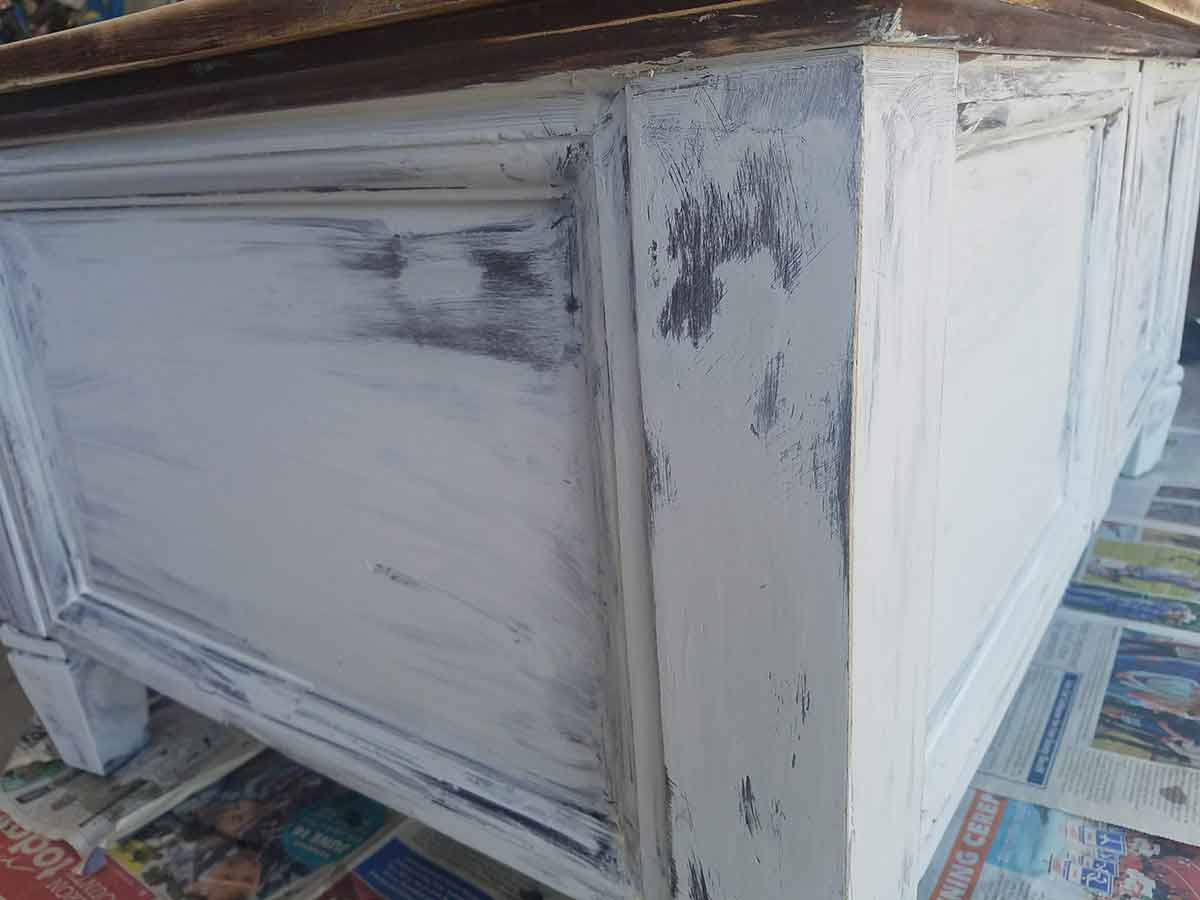
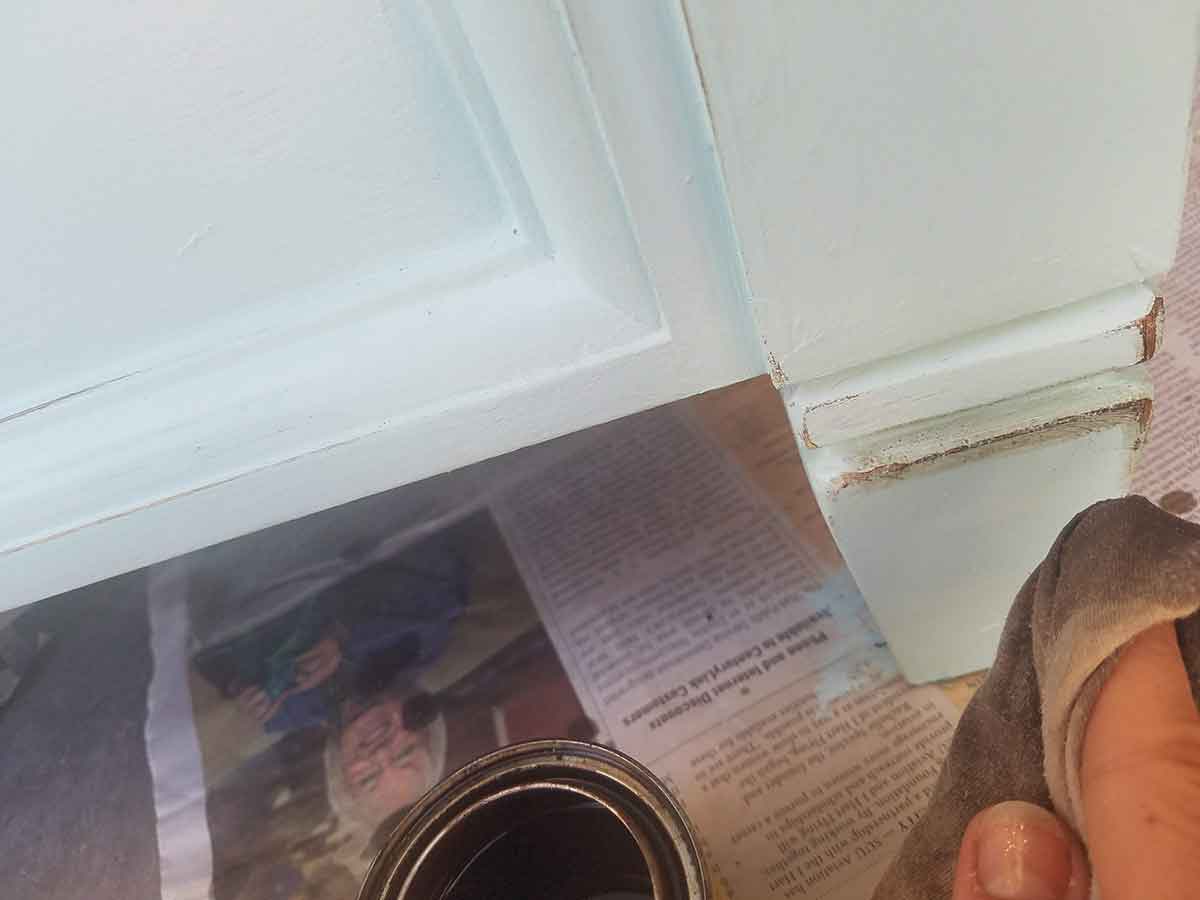
… it helps you see the gaps between the wood joints. At this point, I let the primer dry and then come through with caulk and fill in all the edges and cracks. Caulk is the secret to transforming a piece from looking amateur to professional. That and a good quality paint to give a nice hard finish. Caulk is also not difficult to use correctly once you know a few tricks (I will be posting on that soon).
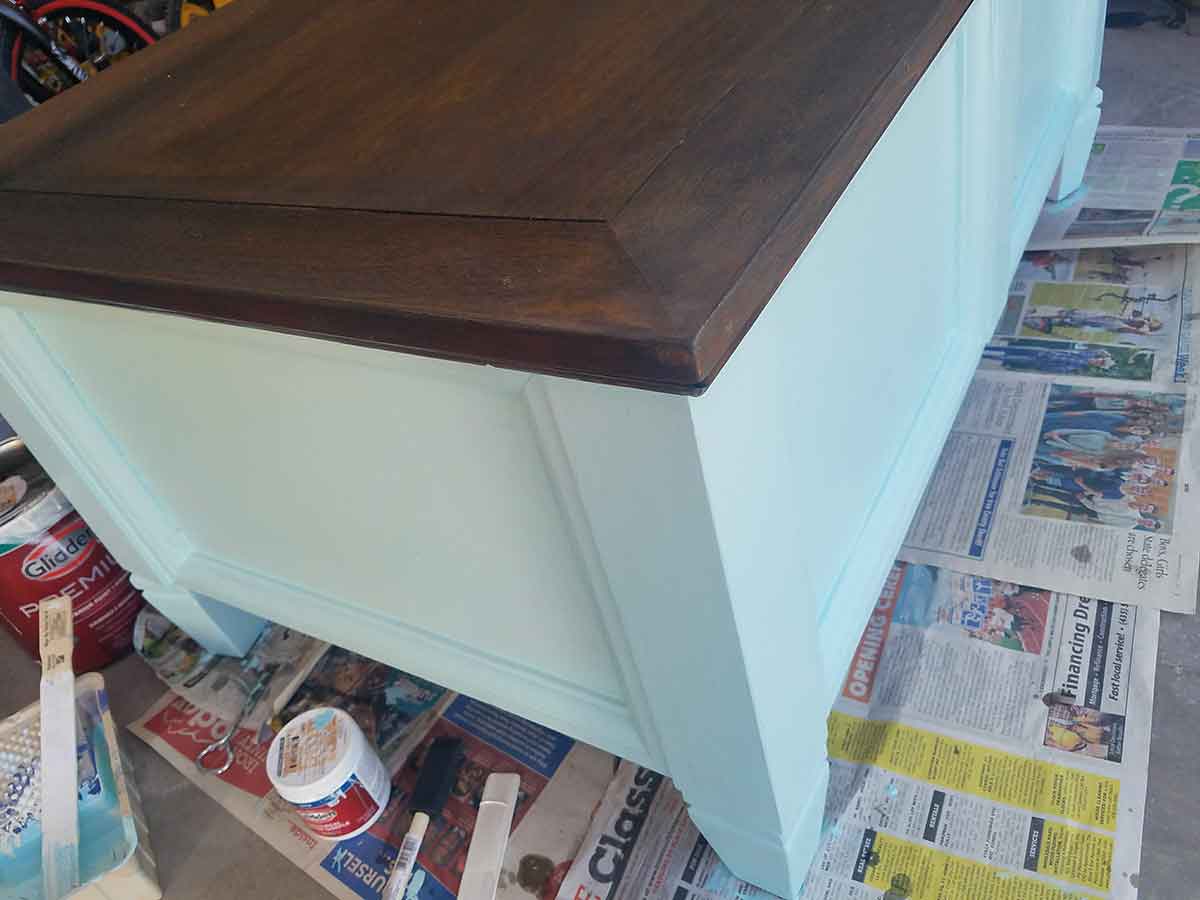
Apply the paint of your choice. I picked Glidden Satin from Home Depot, the original shade was True Turquoise. When painting furniture I like to get the paint samples. One or two sample sizes are often plenty to complete a piece and then I don’t have large amounts of random colors filling my space. I also feel more at ease with branching out to different colors or picking the shade that is just right for each item. This chest took less than one sample can.
In all honesty, I picked out the color and then worked on a different project. By the time I got back to finishing this I didn’t like the color any more –I know I was a bit shocked myself that I changed my mind so quickly. I added some trim paint ( Glidden, Satin, Raffia Cream) from our basement remodel and mixed until I had a shade I liked.
Here you have the finished piece and I guess I could have kept it this way (except for the pink stain on top that still showed through and the fact that this piece is totally boring! I knew I would be adding some character, but needed to let it dry.
Once the paint was dry, I sanded the edges of the feet and along the wood trim to give a little character. Then I came through with walnut stain and stained the wood so it would stick out a bit. If you ever go too far and don’t like the amount sanded off, simply repaint the section you want unroughed (that’s not a word, but you get the idea).
Stenciling furniture is much easier than stenciling a wall because it is smaller and in this case it was not on a wall with all the blood running from my arms. That was tough, I actually really liked this. It went fast and added great color and texture to my room. It also did a great job tricking the eye so you couldn’t really see the pink stain.
To keep the stencil in place while you work, spray with glue adhesive. I highly recommend Elmer’s glue because they are just better. I made the mistake of using the dollar store brand because I had run out of Elmer’s and I spent a long time scraping the horrible glue from the top of the storage chest. Just spray with Elmer’s spray let it dry a minute or two then lay down on the surface.
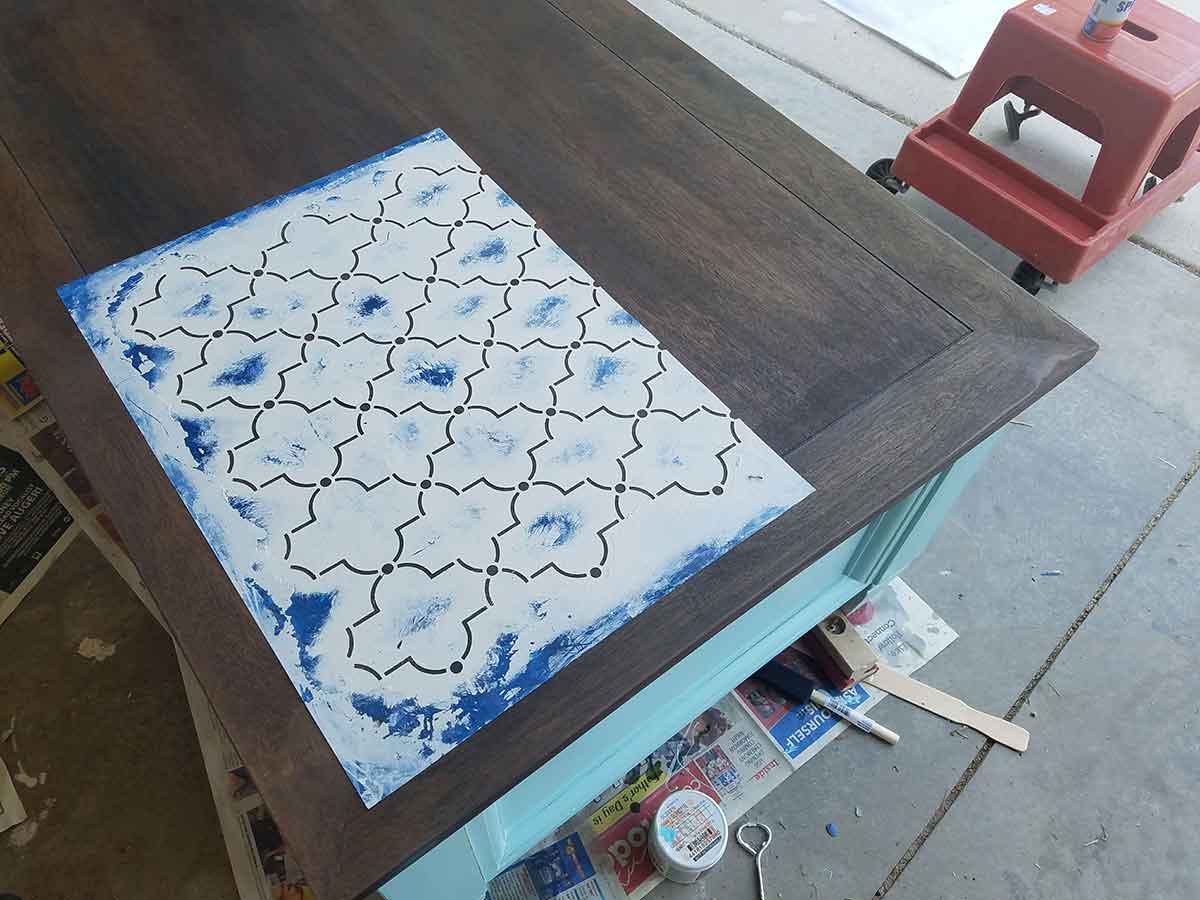
I like to use my trusty cheap brushes, they work really well for many jobs, including stenciling. Now the trick to getting a good stencil look and not many big blobs of paint on the other side is to keep very little paint on your brush at a time. Just enough paint to get the color on. Use a tapping motion and avoid strokes of paint as those pull the paint under the stencil.
And now for the moment of truth, how well did this section take? Wait a minute or two for the paint to dry just a bit to avoid a string of wet paint accidentally dripping in the wrong place.
It looks good, I’m happy.
Some sections didn’t fair as well. If you are a perfectionist like I am, a razor blade is an easy way to clean up any edges where the paint came through too thick. When stenciling a wall you can simply touch up with the contrasting wall color, no need to scrape it off.
When finished, I put on an outdoor/indoor lacquer to hold up to the wear and tear of a family all putting their feet up, after all, this is one of it’s jobs now. It has held of beautifully and protects from scratches as well and it holds a ton of blankets.
Until next time. Happy building, reusing, refinishing, recycling. Post below on your awesome home solutions and have a great week. Remember to subscribe for the latest projects at This Homemade Home or follow us on Facebook, Pinterest, Instagram or Twitter – whatever you want. 🙂

by Natalie | Jul 27, 2018 | Home Decor, Home Renovation
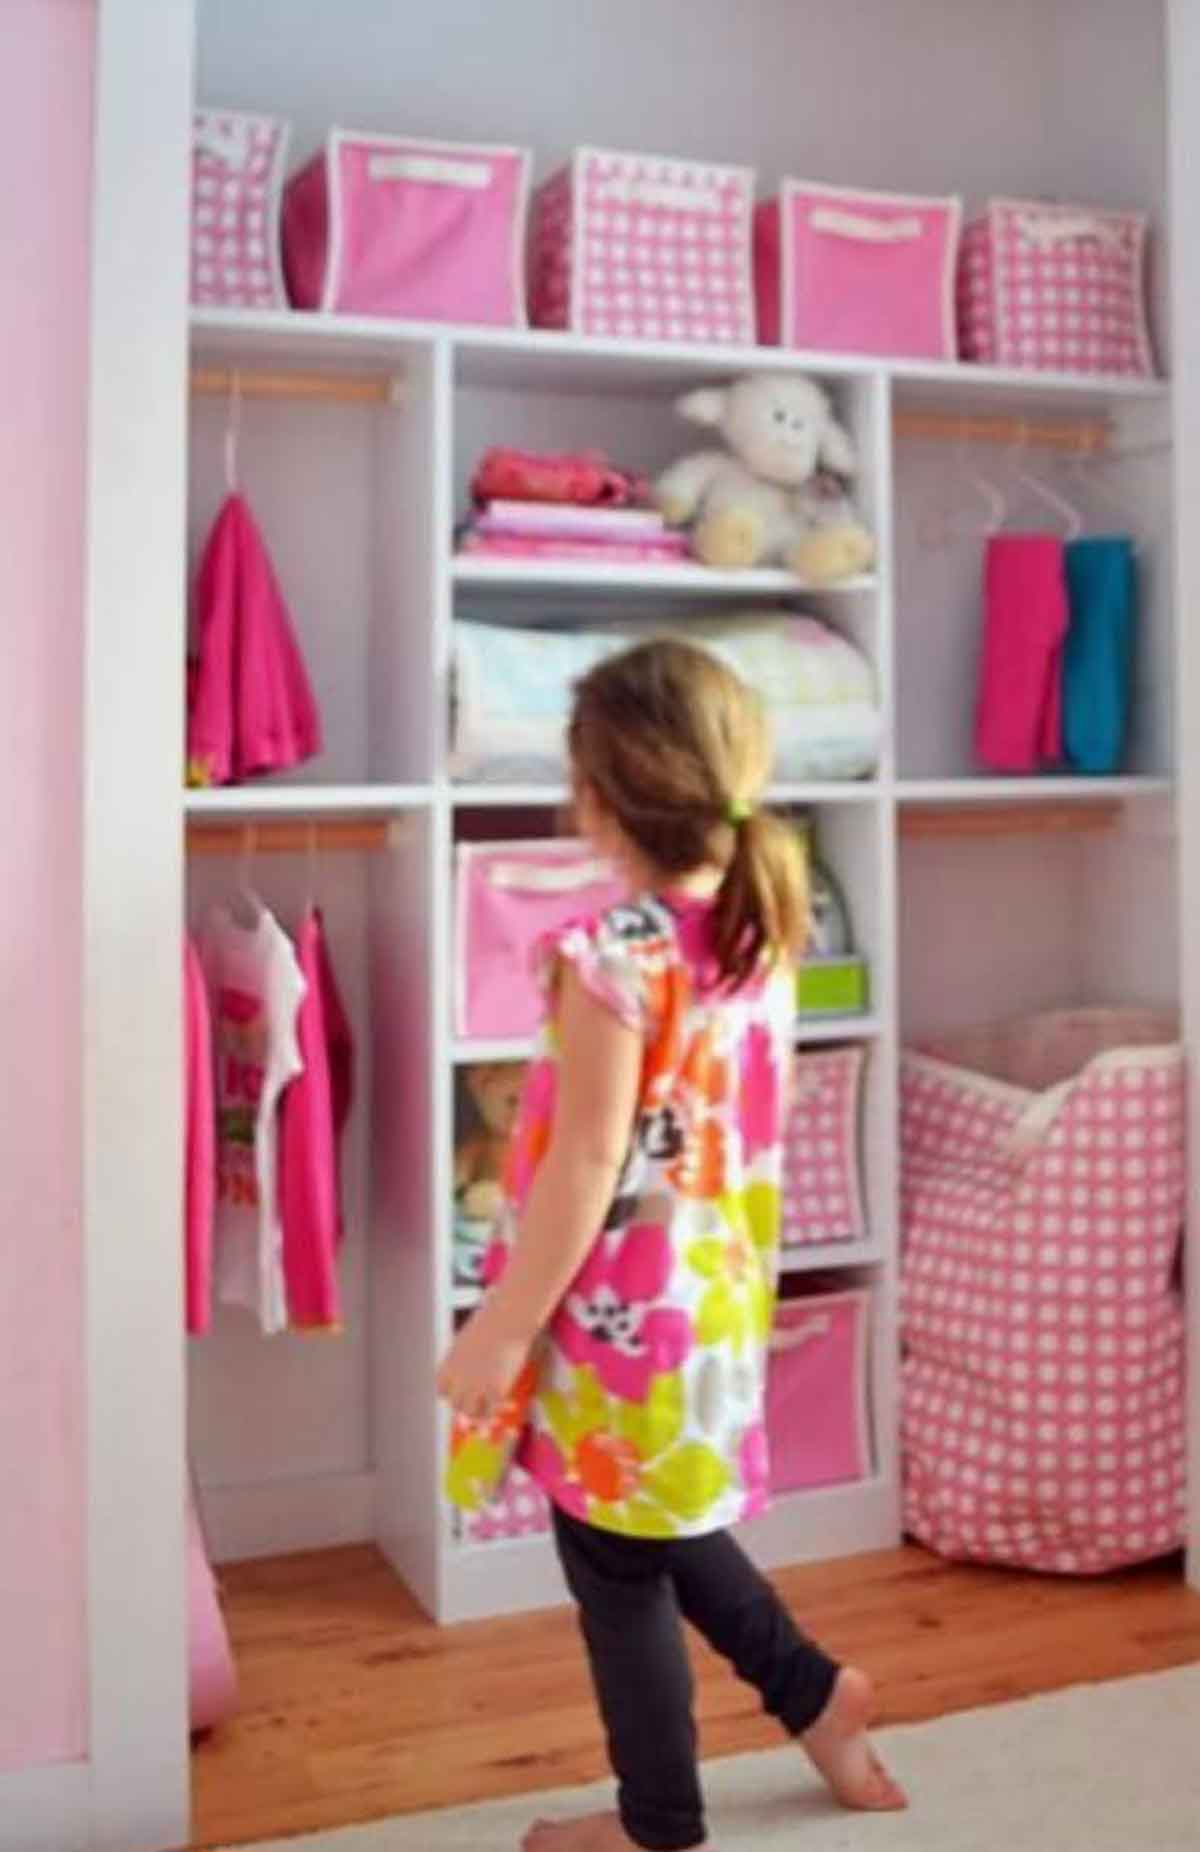
A friend asked if I would do a post on DIY closets. So here you go Alanna! I have built three closets and have a few tips to share, I hope you find it helpful. I am going to take you down the road I took as I began researching how to build an organized closet. First I would suggest you look through several layouts to see what you like, what meets your needs and what looks possible. Below are 5 closets you can build yourself and is a great place to start your search. There is a bit of sweat equity, but it is doable. I will also give explanations, links and videos on how to accomplish each one. Note, these are not all my closets. My closets are full of clothes and I’m not in the mood to empty them to photograph, but I will show you how to get each look and you will feel amazing when you are done.
Tools needed for this project
Glasses
Pre-drill bit
Drill
Circular saw
Stud finder
Level
Pencil
Materials needed
1/2″ x 3″ boards for supports
3/4″ Plywood for shelves
1 1/2″ screws (long enough to get through the plywood, drywall and into your supporting stud)
Trim for plywood edge (optional)
Clothes rods (I like wooden ones)
Rod Holders
Wire Shelves (optional)
Closet Brackets
Metal Plumbing Pipe (if you do the pipe closet)
Pipe Cutter (if you do the pipe Closet)
Closet #1 Why not start out with an Anna White, she is after all my hero and most of her designs are straightforward to build and beautiful. Two of the three closets I built were to encourage my children to hang up their clothes and have no excuse for putting them on the floor. Anna has step by step instructions so I won’t spend much time explaining here. Anna used screws to tighten the shelves into place from the outside of the shelf, she also made adjustable shelves with shelf pins, but you could make yours permanent if you wanted.
Closet #2 Another great option is to consider a floating shelf as found here at buildsomething.com.
To get this look you need a support boards screwed into studs like this. The shelf is then built onto this support board with another support board underneath the shelf where it is floating off the floor.
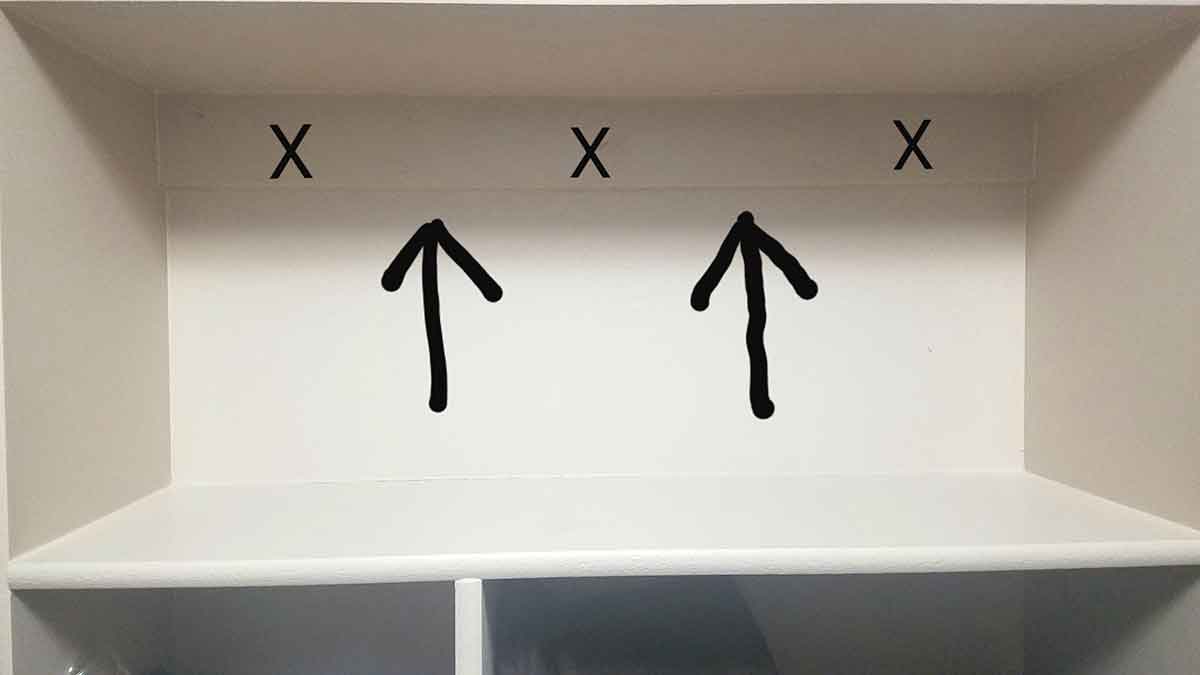
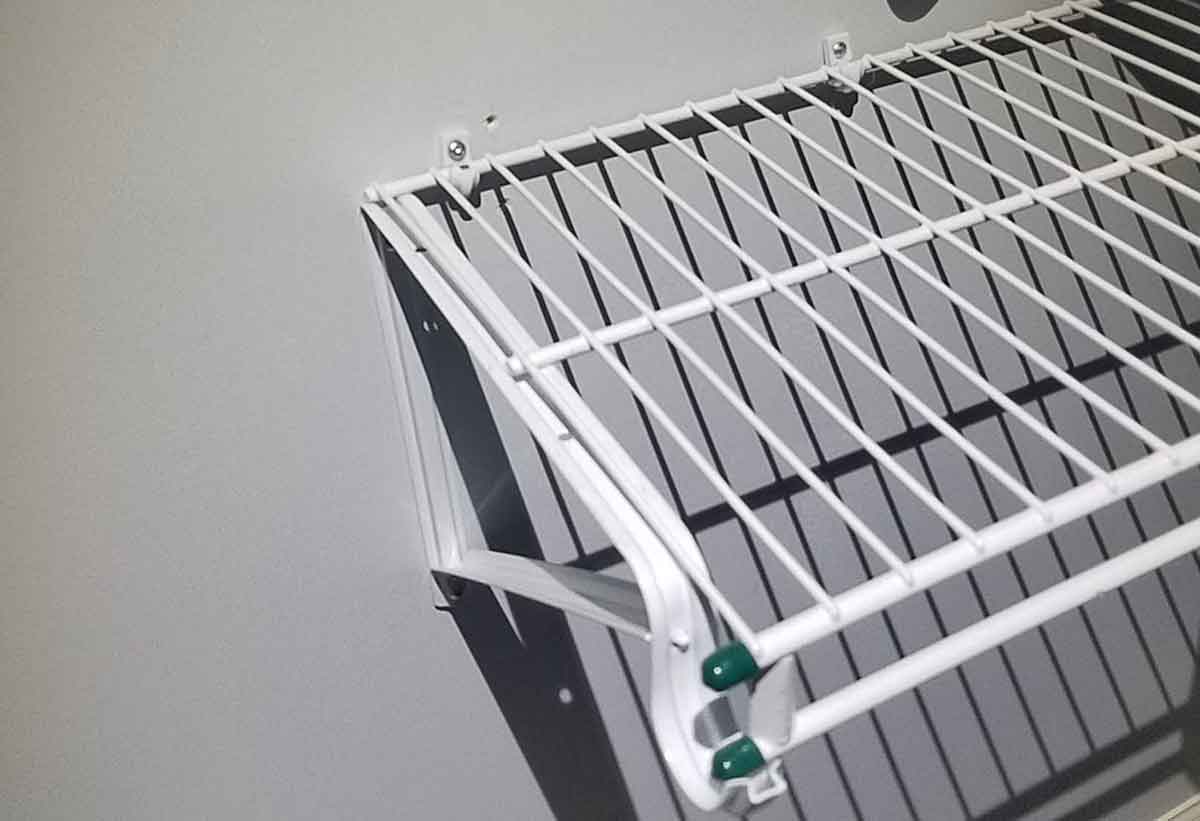
In fact support boards are needed in all the areas pointed at by an arrow. This allows you to add lots of clothes to your clothes rod, lots of stuff on your closet shelves and not have a disaster. This photo (minus the arrows) is found at garymkatz.com I can’t provide the exact link because I could not find it! So sad, but it was labeled with their website and I want to give them credit.

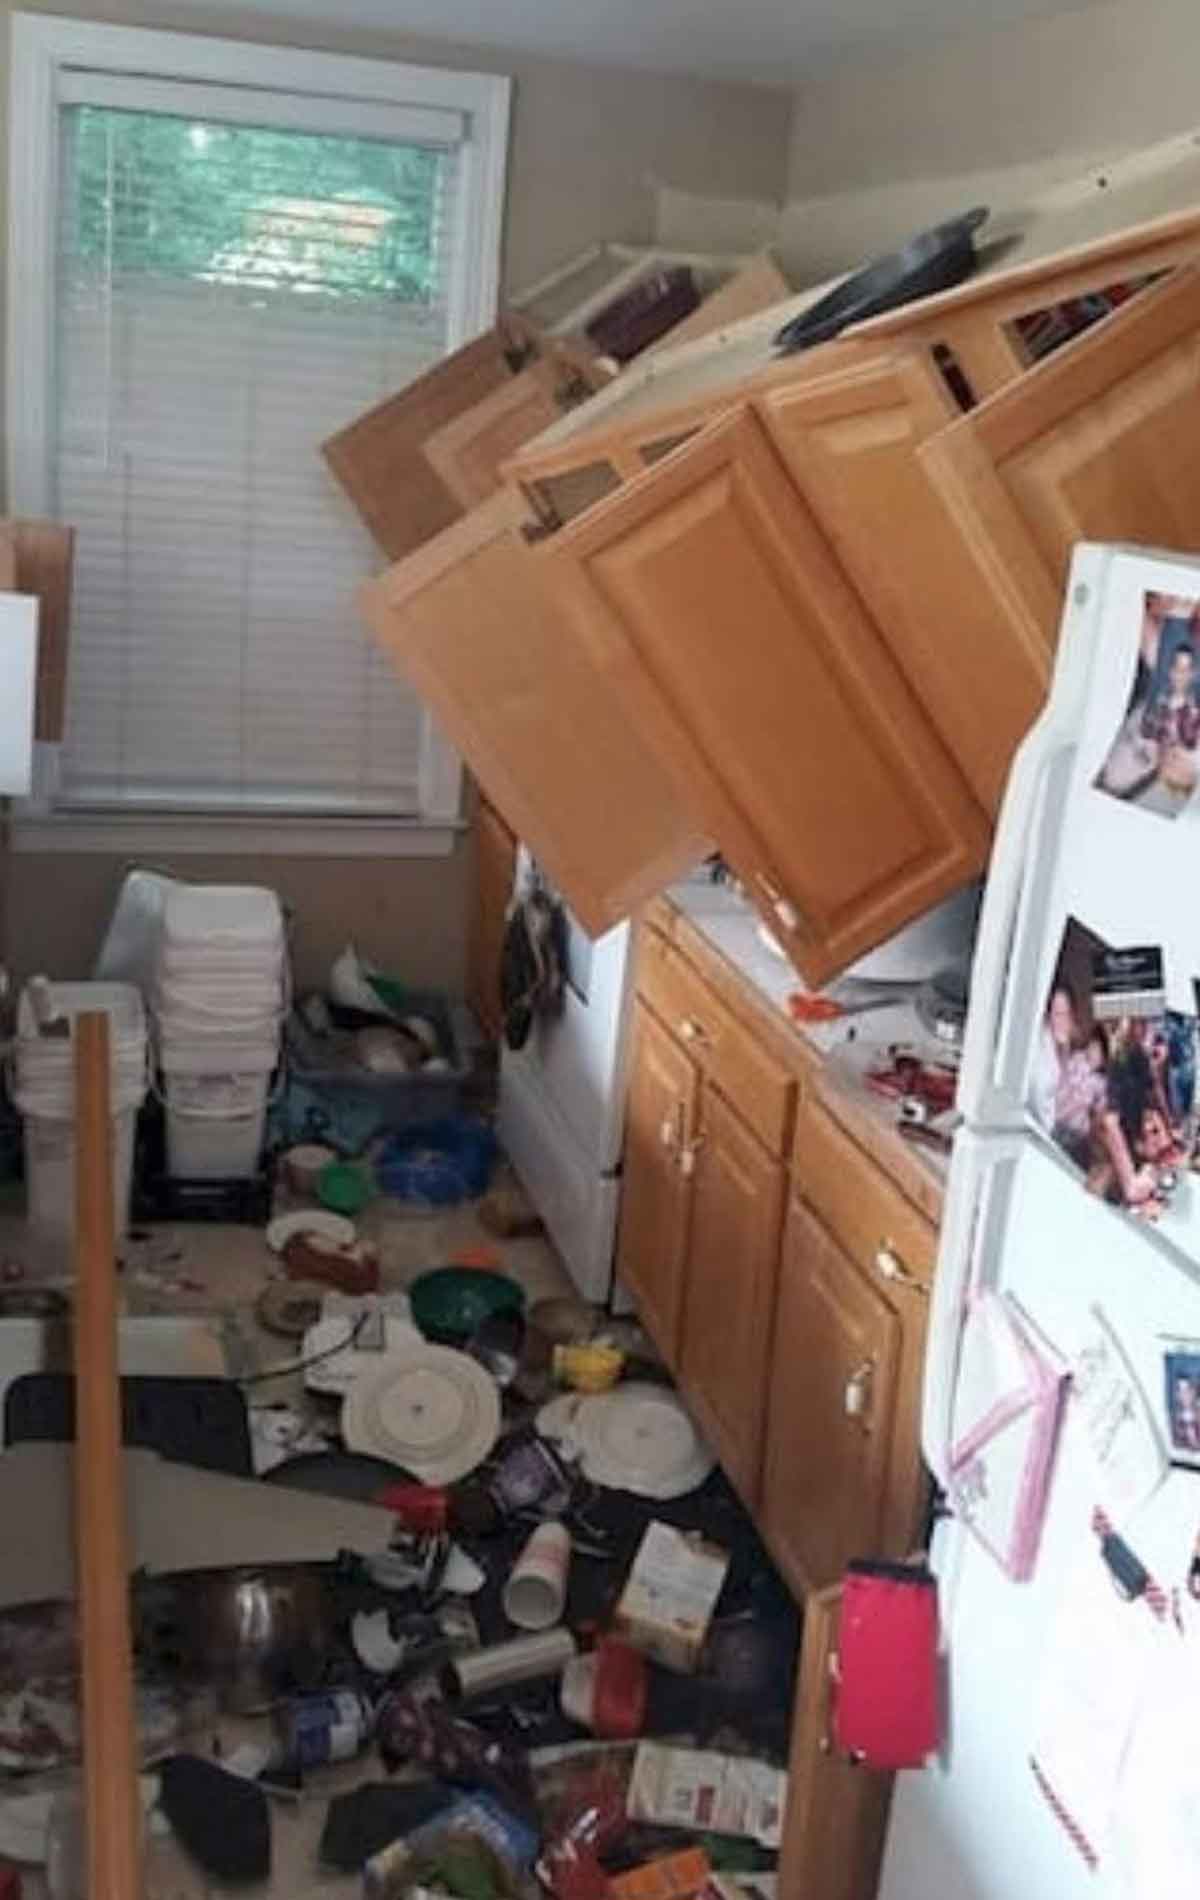
And this is what I mean by disaster. Find those studs and secure your support boards and shelves well.
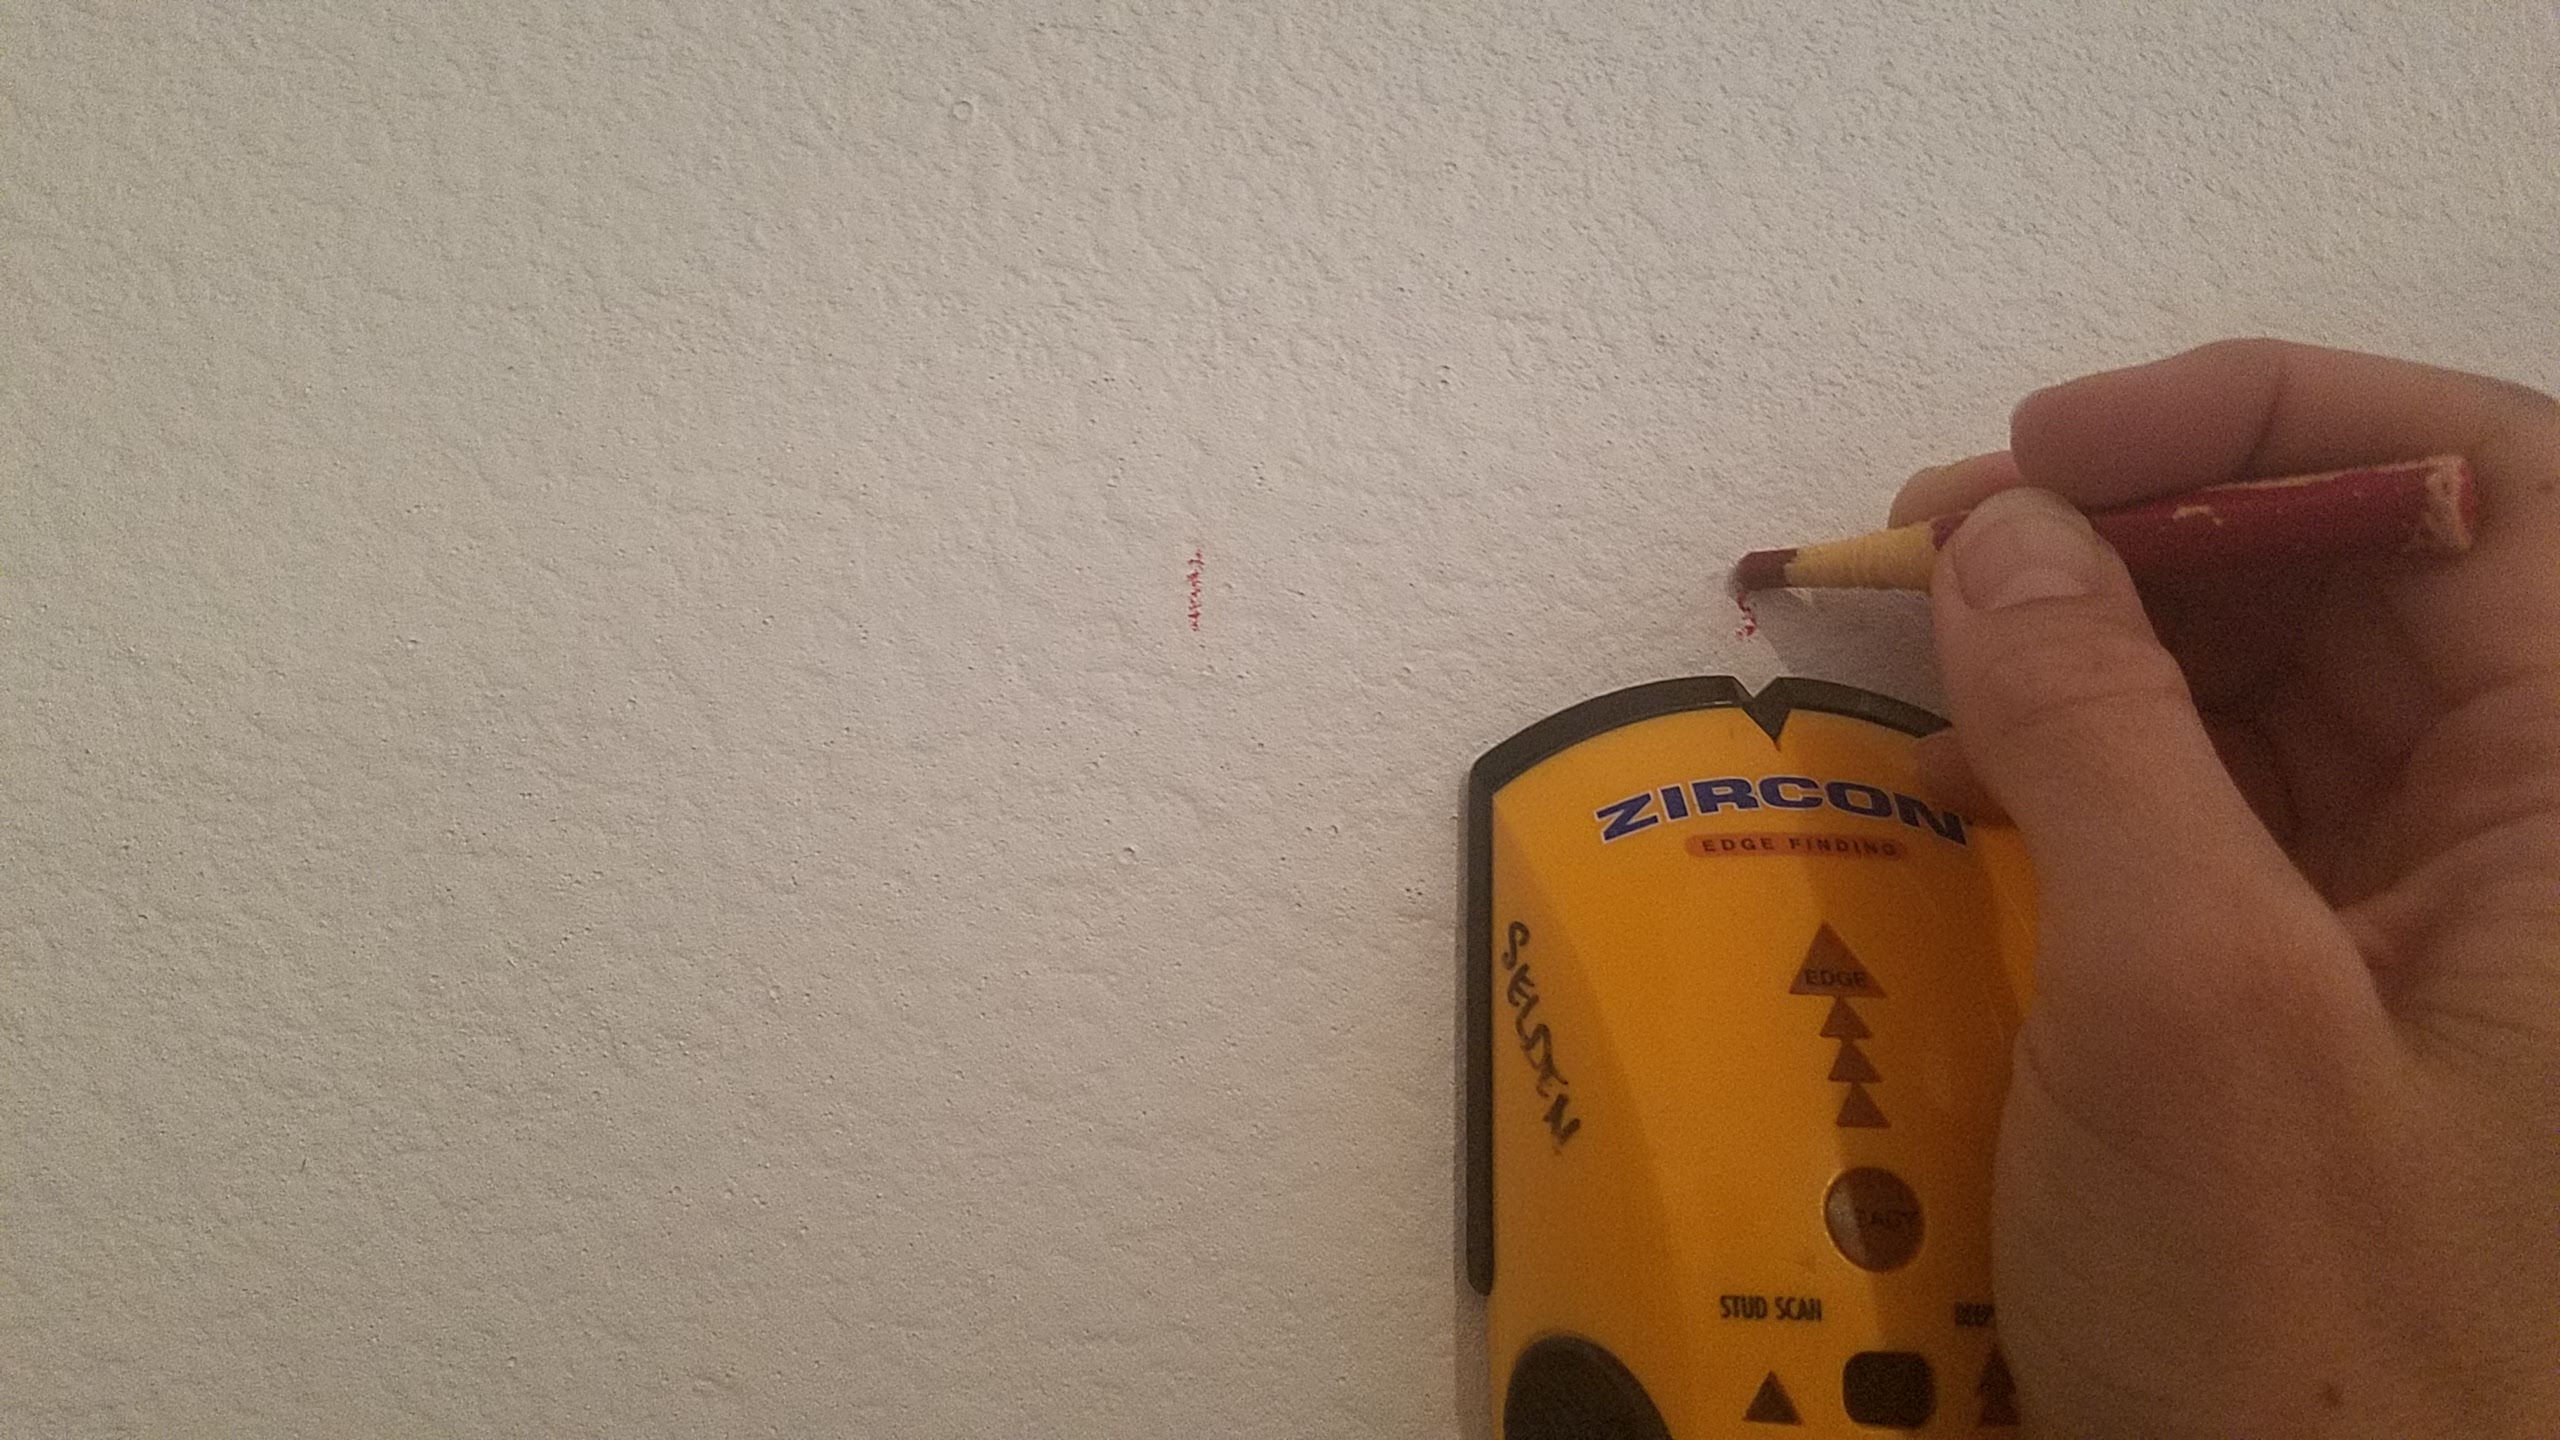
How to find a stud – as in a 2×4 behind the wall, I know what you were thinking 😉. If you are using a battery operated stud finder – first, hold down the button on the side of the stud finder, move from left to right, when it beeps make a mark. Now move from right to left, when it beeps make a mark. It should look like the picture below. This is an estimate of where the stud is. Place your screw between the two marks.
If you have a magnetic stud finder simply move the stud finder back and forth feeling for a magnetic connection to a screw in the stud. When found it will stick to the wall like a magnet on the fridge. This method is much more accurate as it actually finds a stud, where the battery operated at times may find a wire, the exact thing you don’t want to drill into. I have the battery operated stud finder, that is breaking and had to borrow one. When I read reviews the magnetic stud finder was highly rated, I think that will be my next tool purchase.
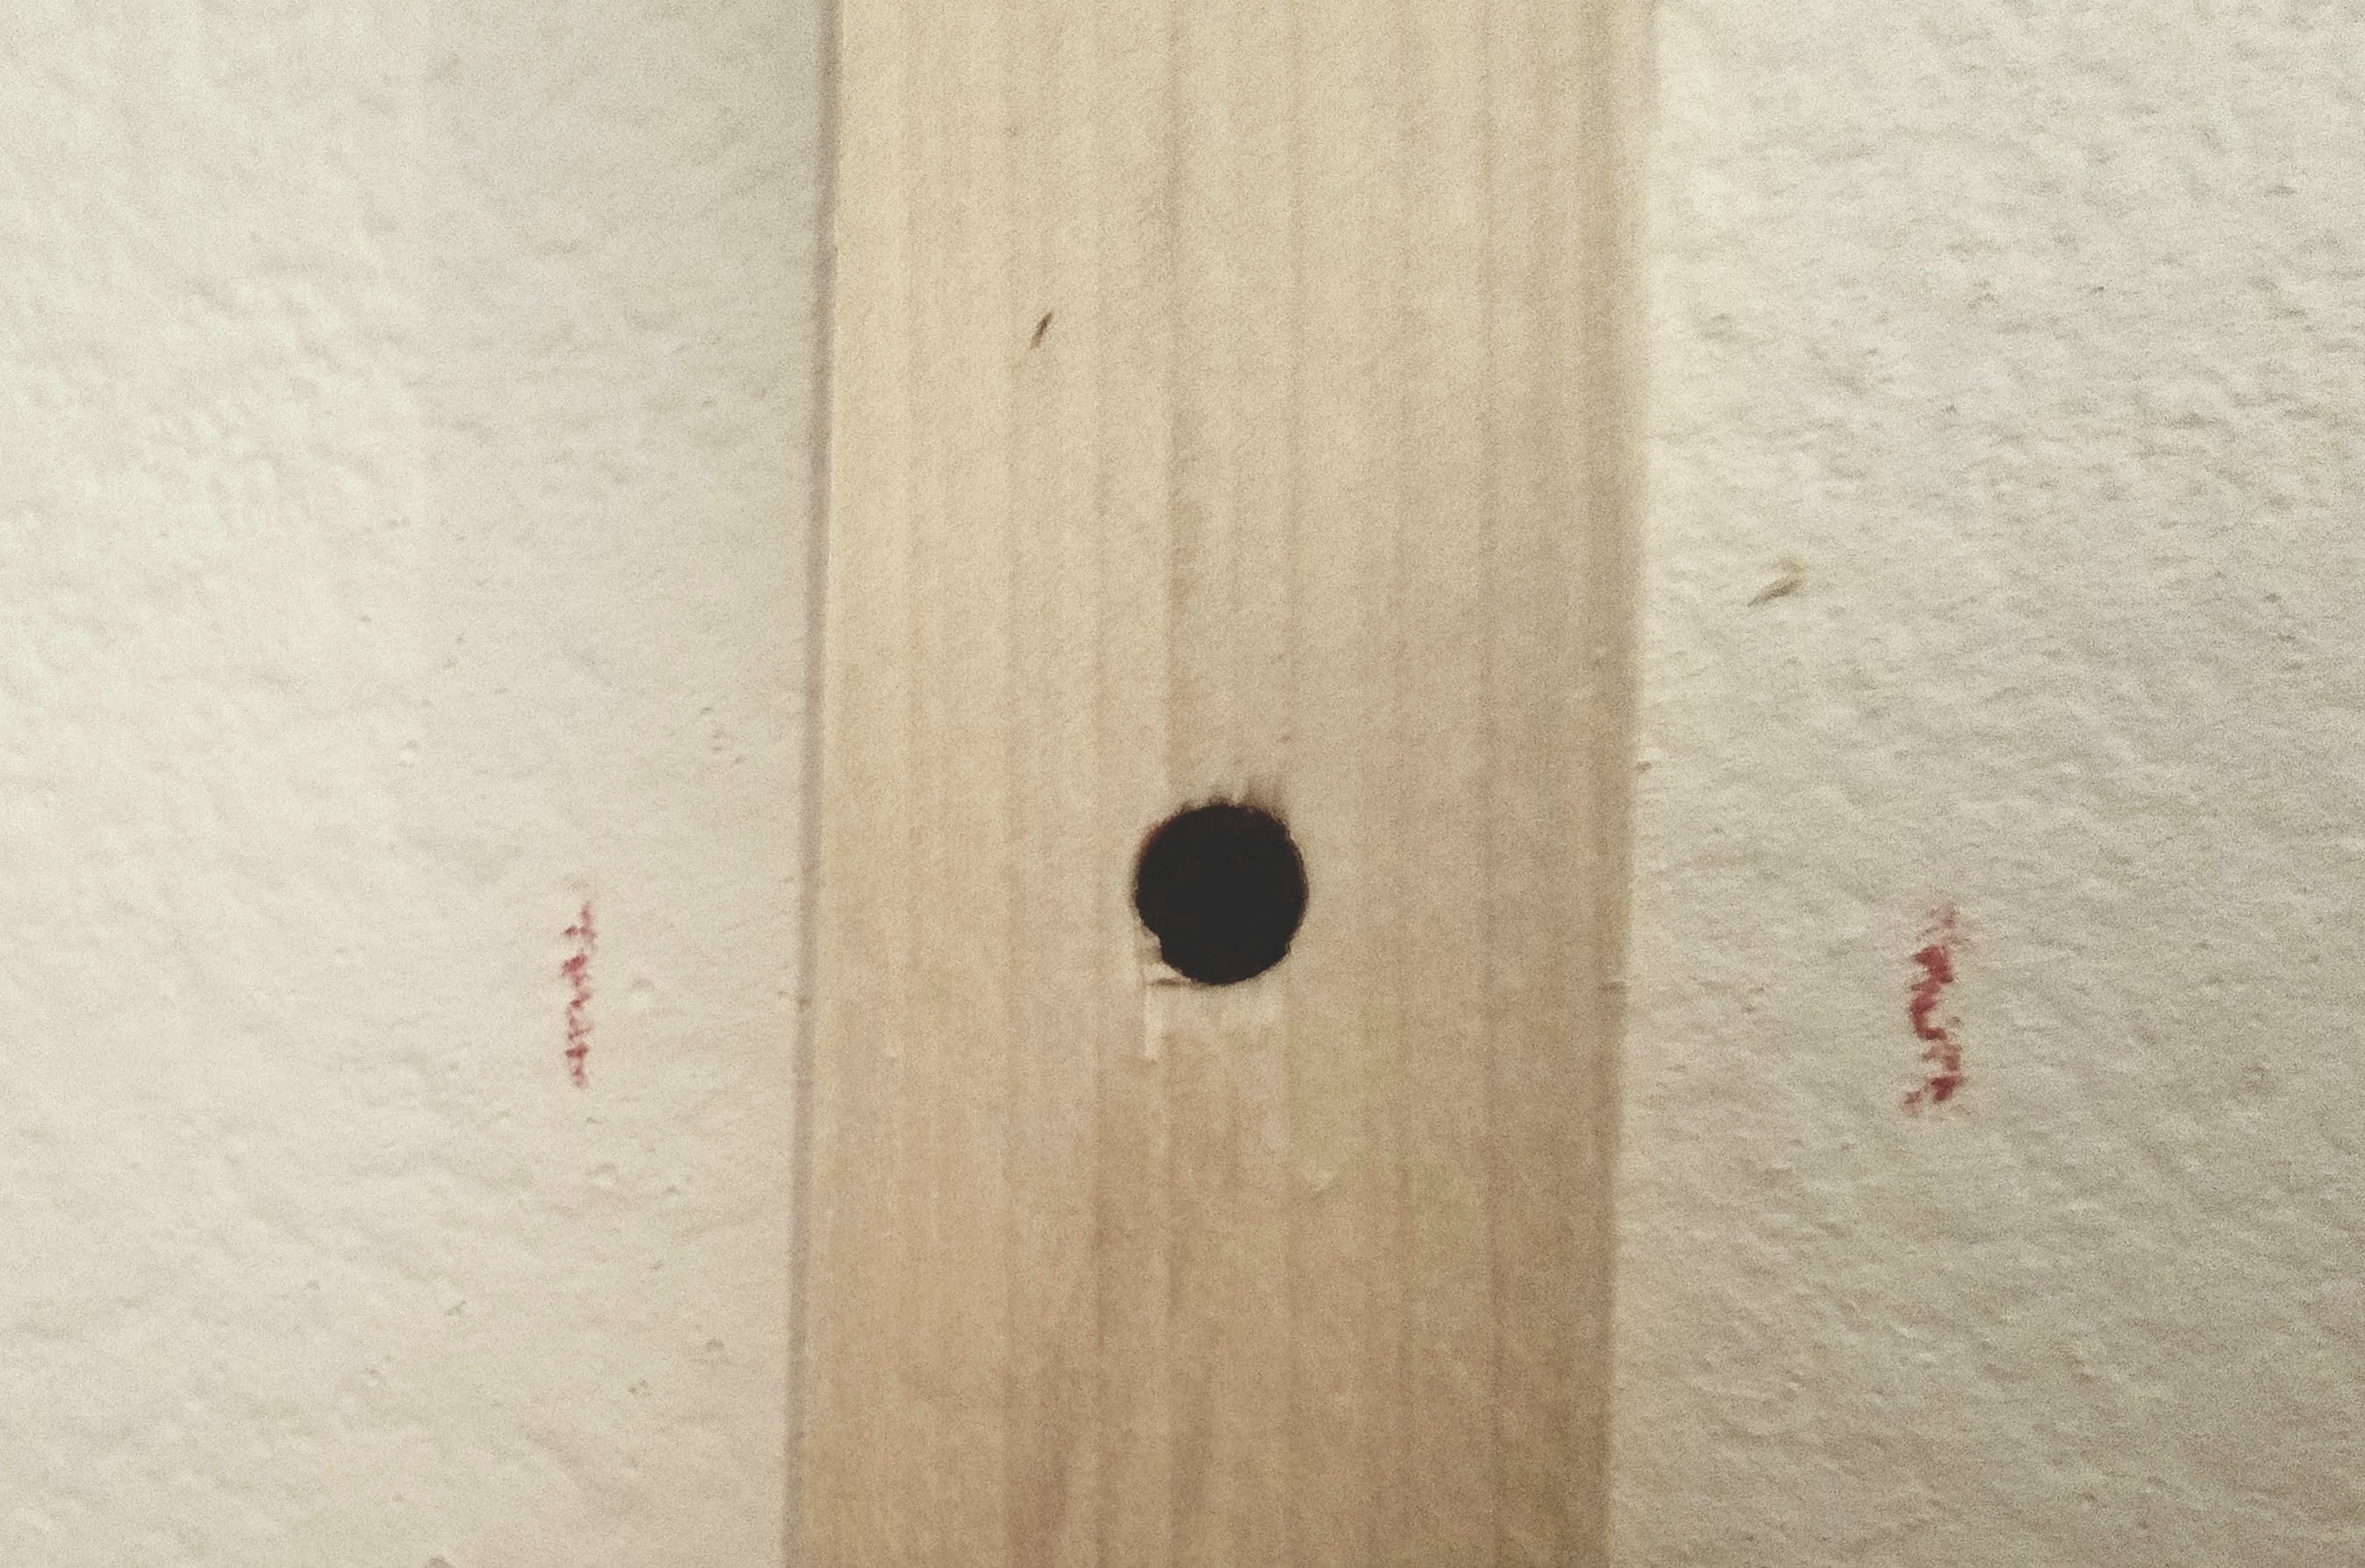
You will know for sure that you hit the stud because the screw will give a bit of resistance and pull into the wood. Remember to pre-drill to avoid split wood. If you are covering a large section of closet, 4-6 feet, it’s ok to miss a stud here and there, but make sure you have at least 3 studs secured to your support board.
Closet #3 I love this look from Mysweetsavannahblog.com, its modern and and sleek, but calmed down by the cedar plank walls and ceiling. To cut plumbing pipe you will need a pipe cutter. You are then able to get this whole look. Check out thisoldhouse.com for a great tutorial on how to cut the pipe.
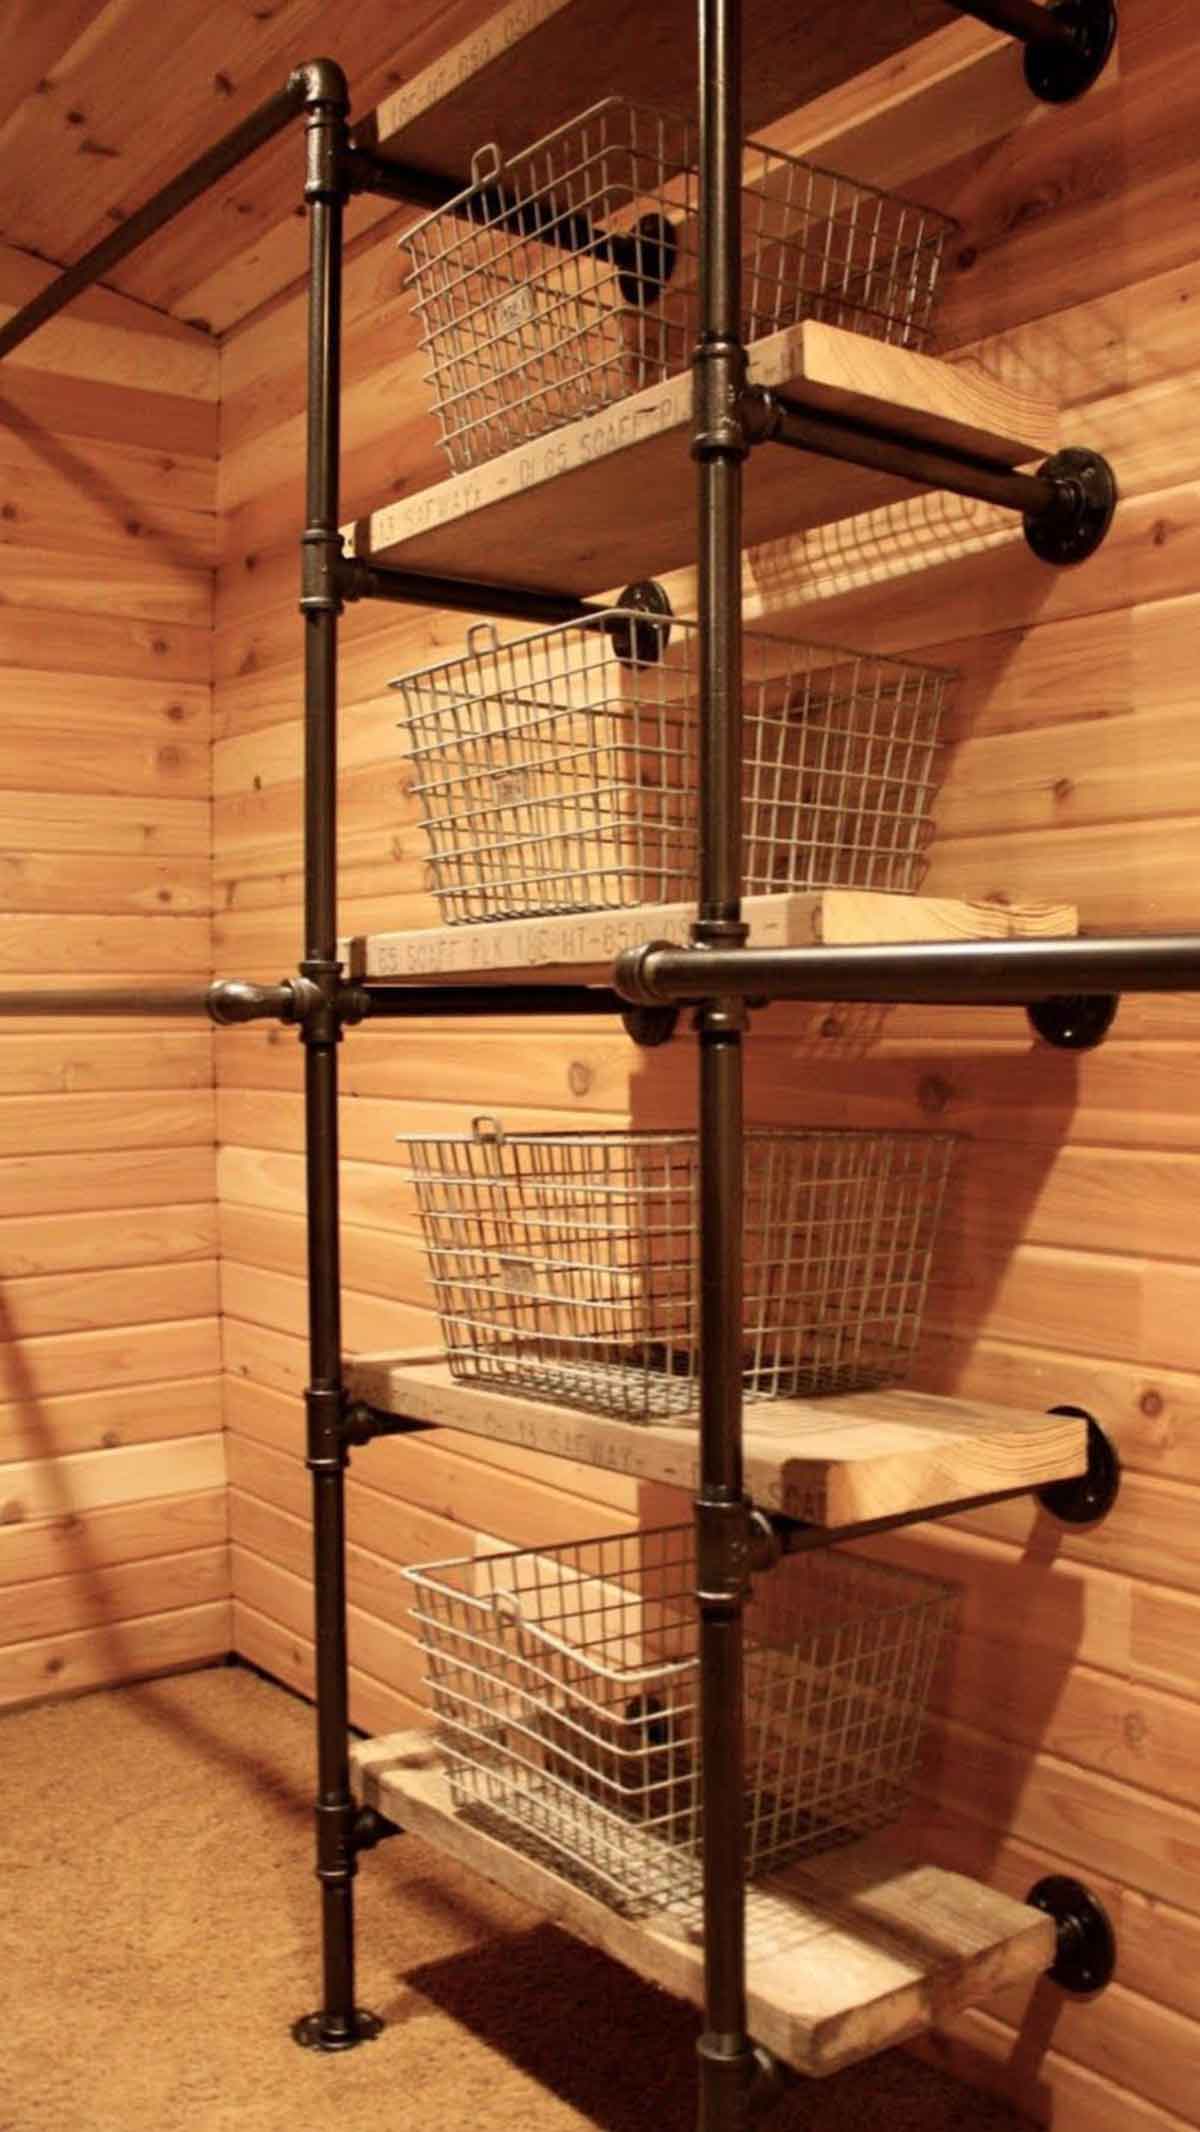
If you really want the ceiling and walls too, the pieces hook together tongue and groove like you see below. make sure you use a level or right angle because the boards can quickly tilt at an angle, by the time you notice they’re already nailed into place and it’s a pain to fix, not that I’ve ever done that 😉 , I’m just trying to save you time.
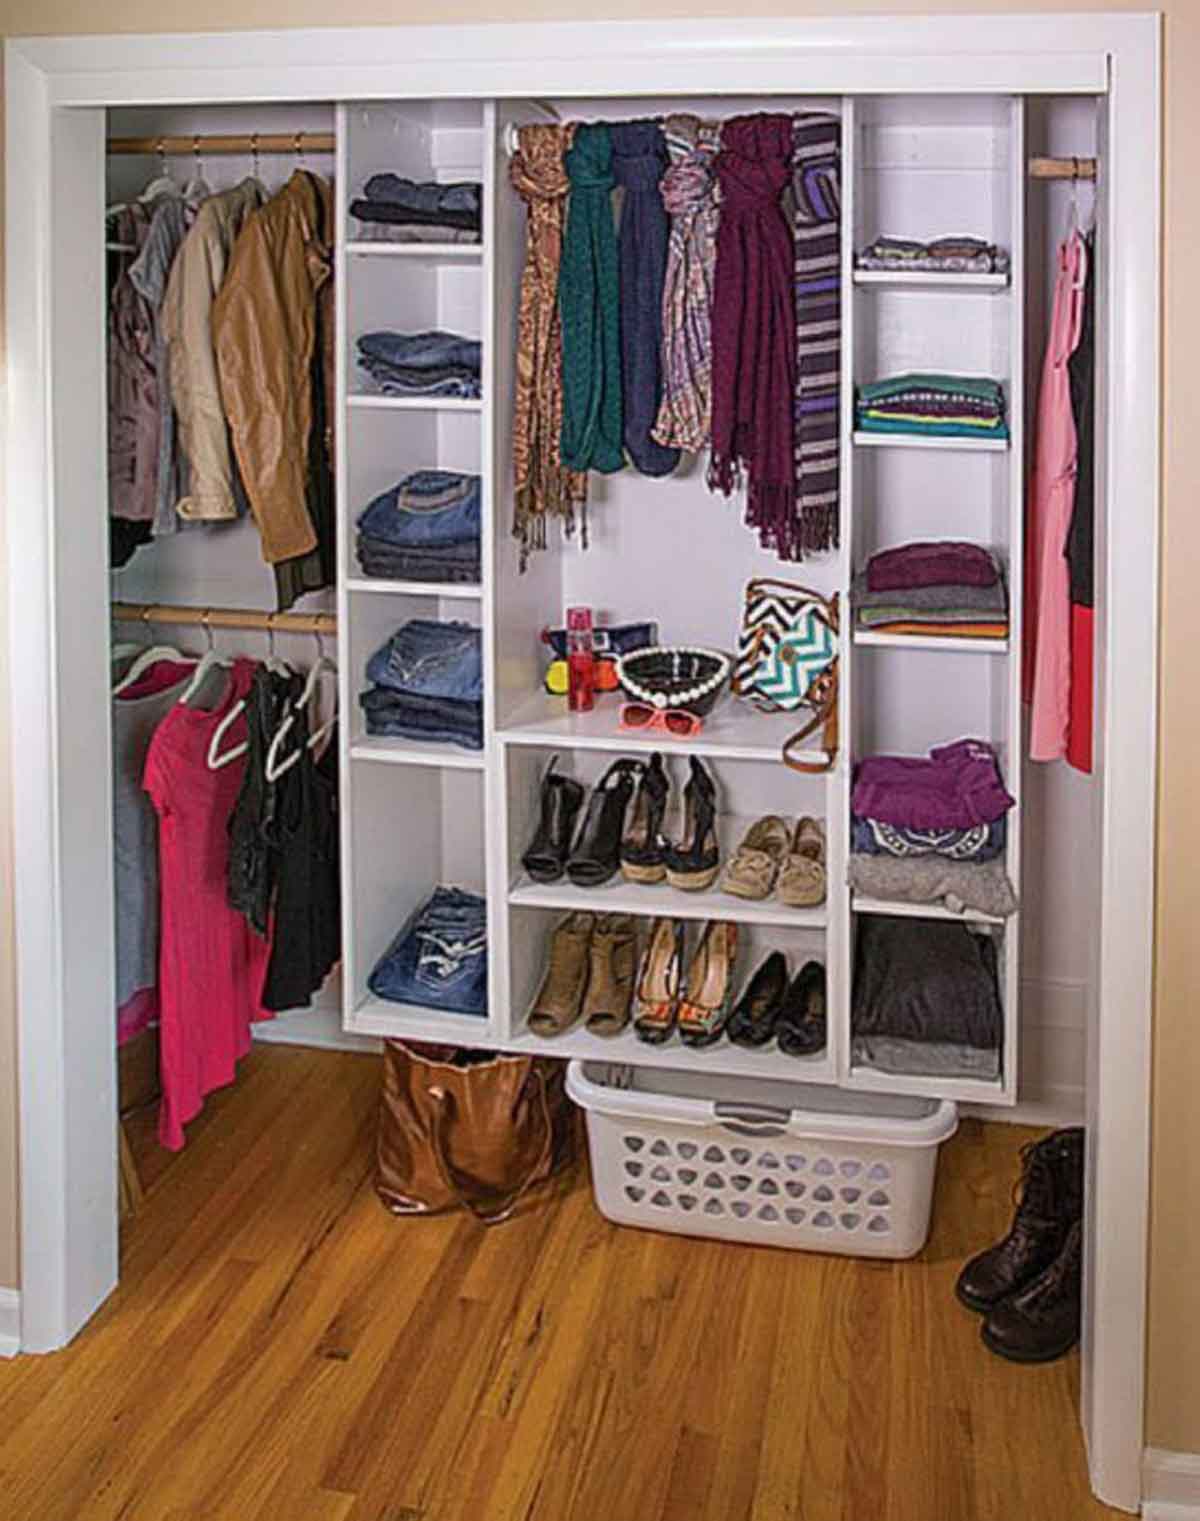
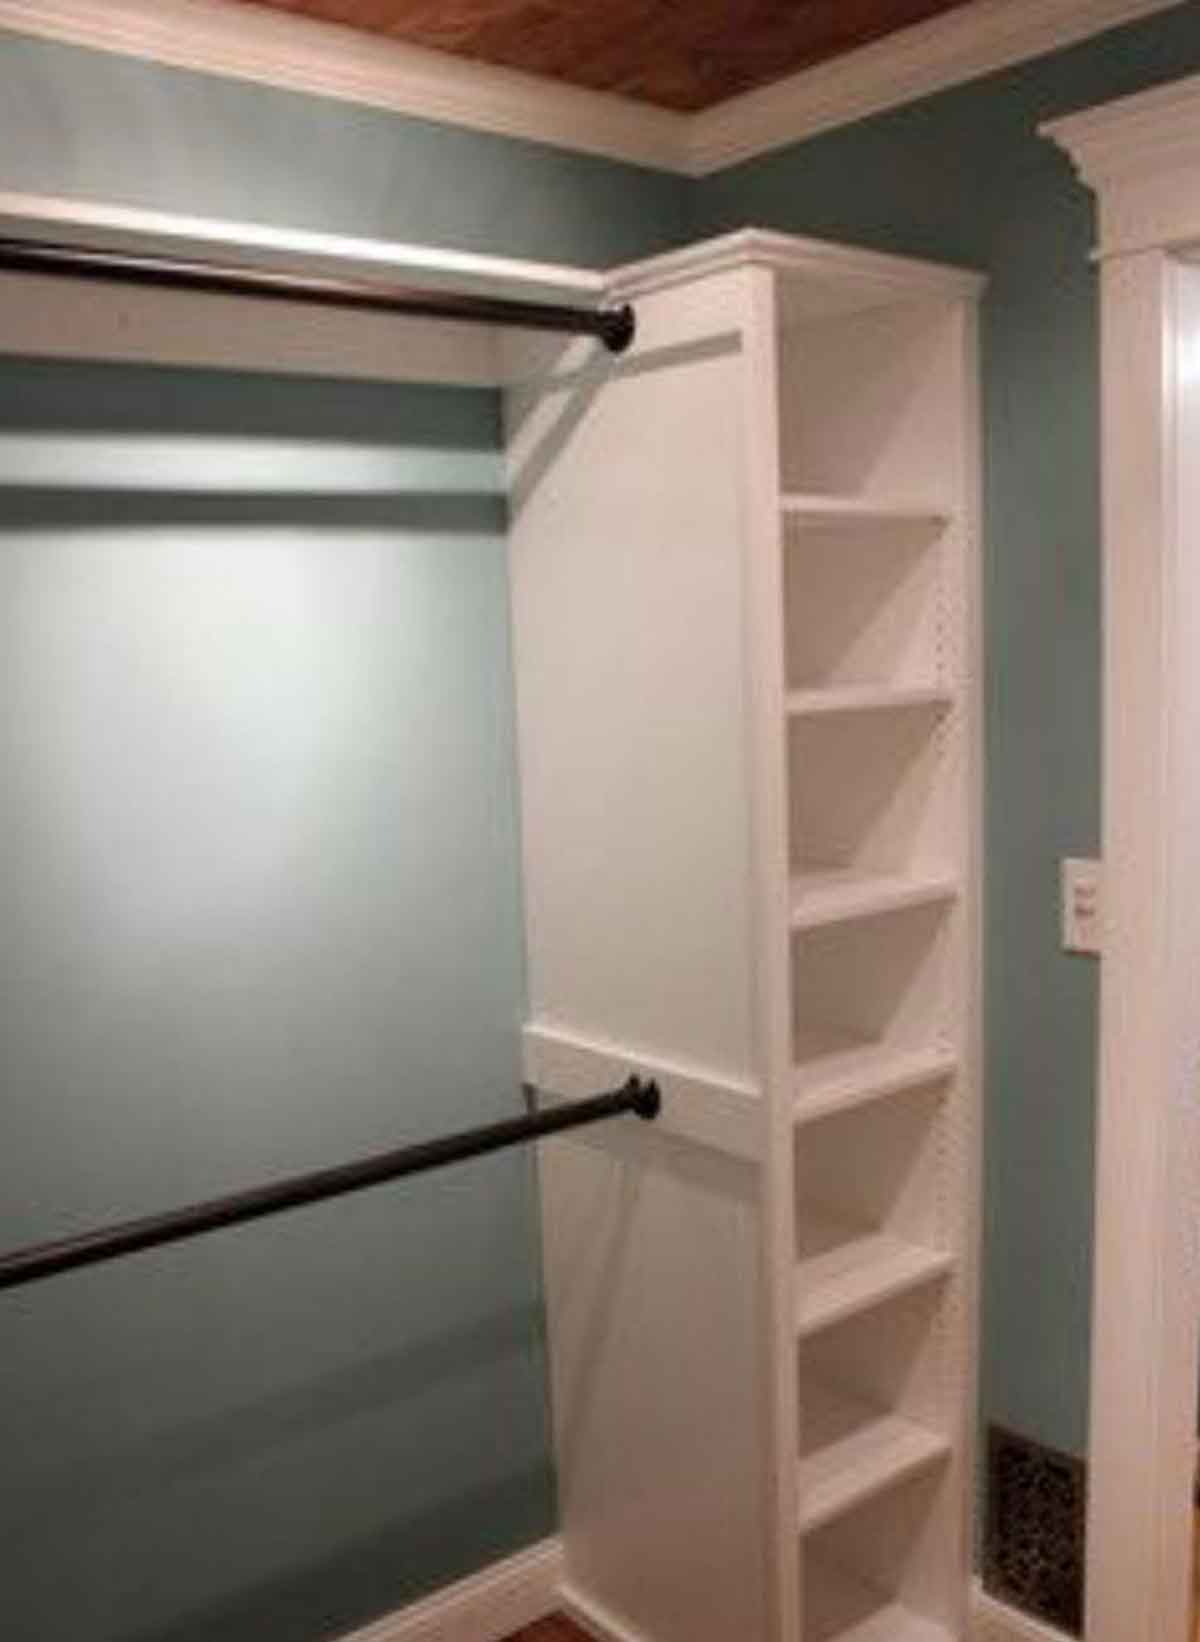
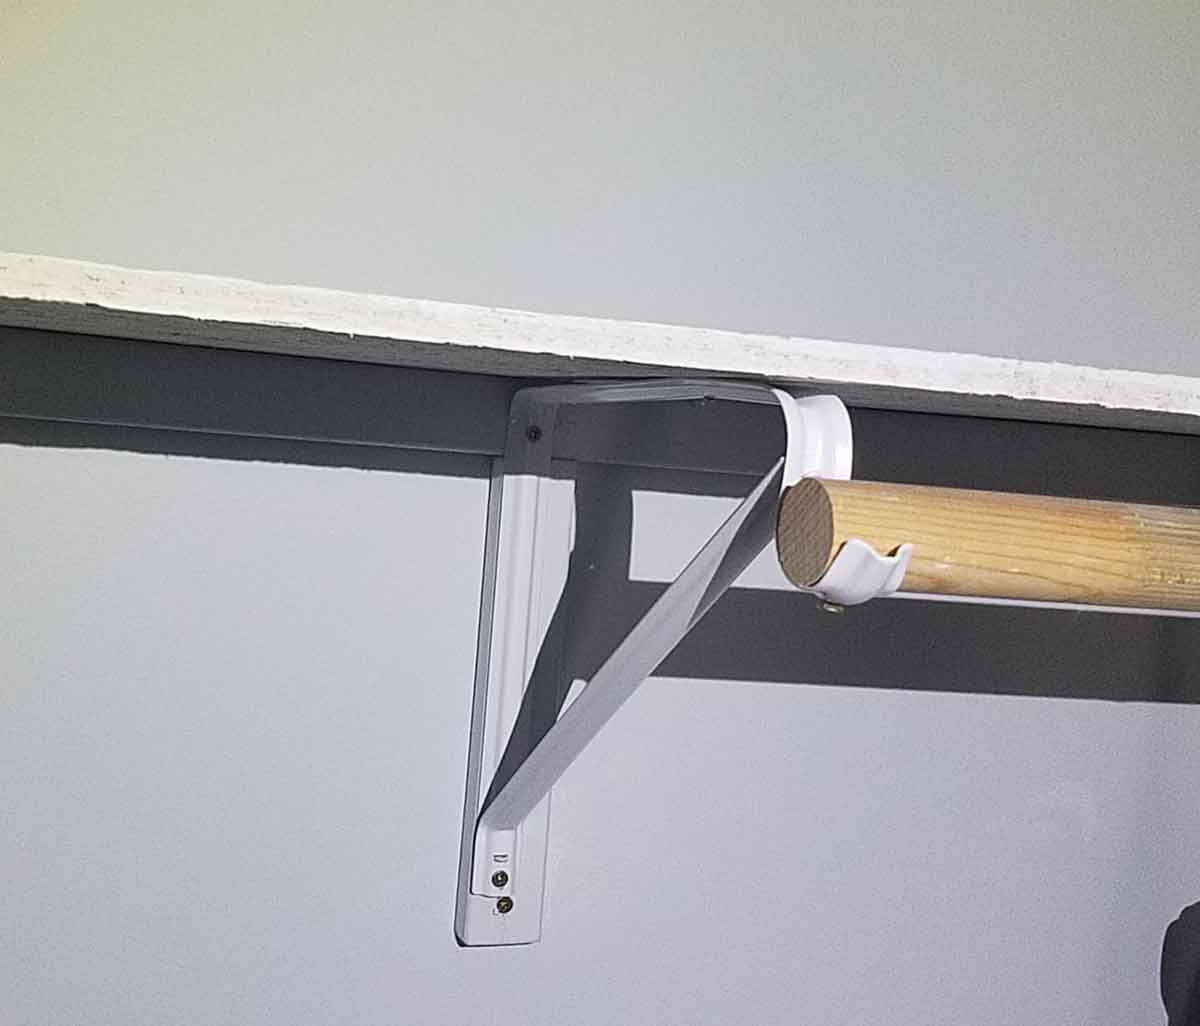
Closet #4 This design found on Houzz, is a great example of reinforced clothes rods. Put a hanger with a shirt on it and give a few inches, this is how far from the wall you should place your rod holder (about 11 1/2″). I like to make sure at least one end is in hardwood or the stud. You can see in this picture that a piece of wood has been fastened to the shelf to hold the rod in place.
To install the rod holders make measurements and screw into place with the opening facing up. Then simply cut the clothes rod to size and slide into place.
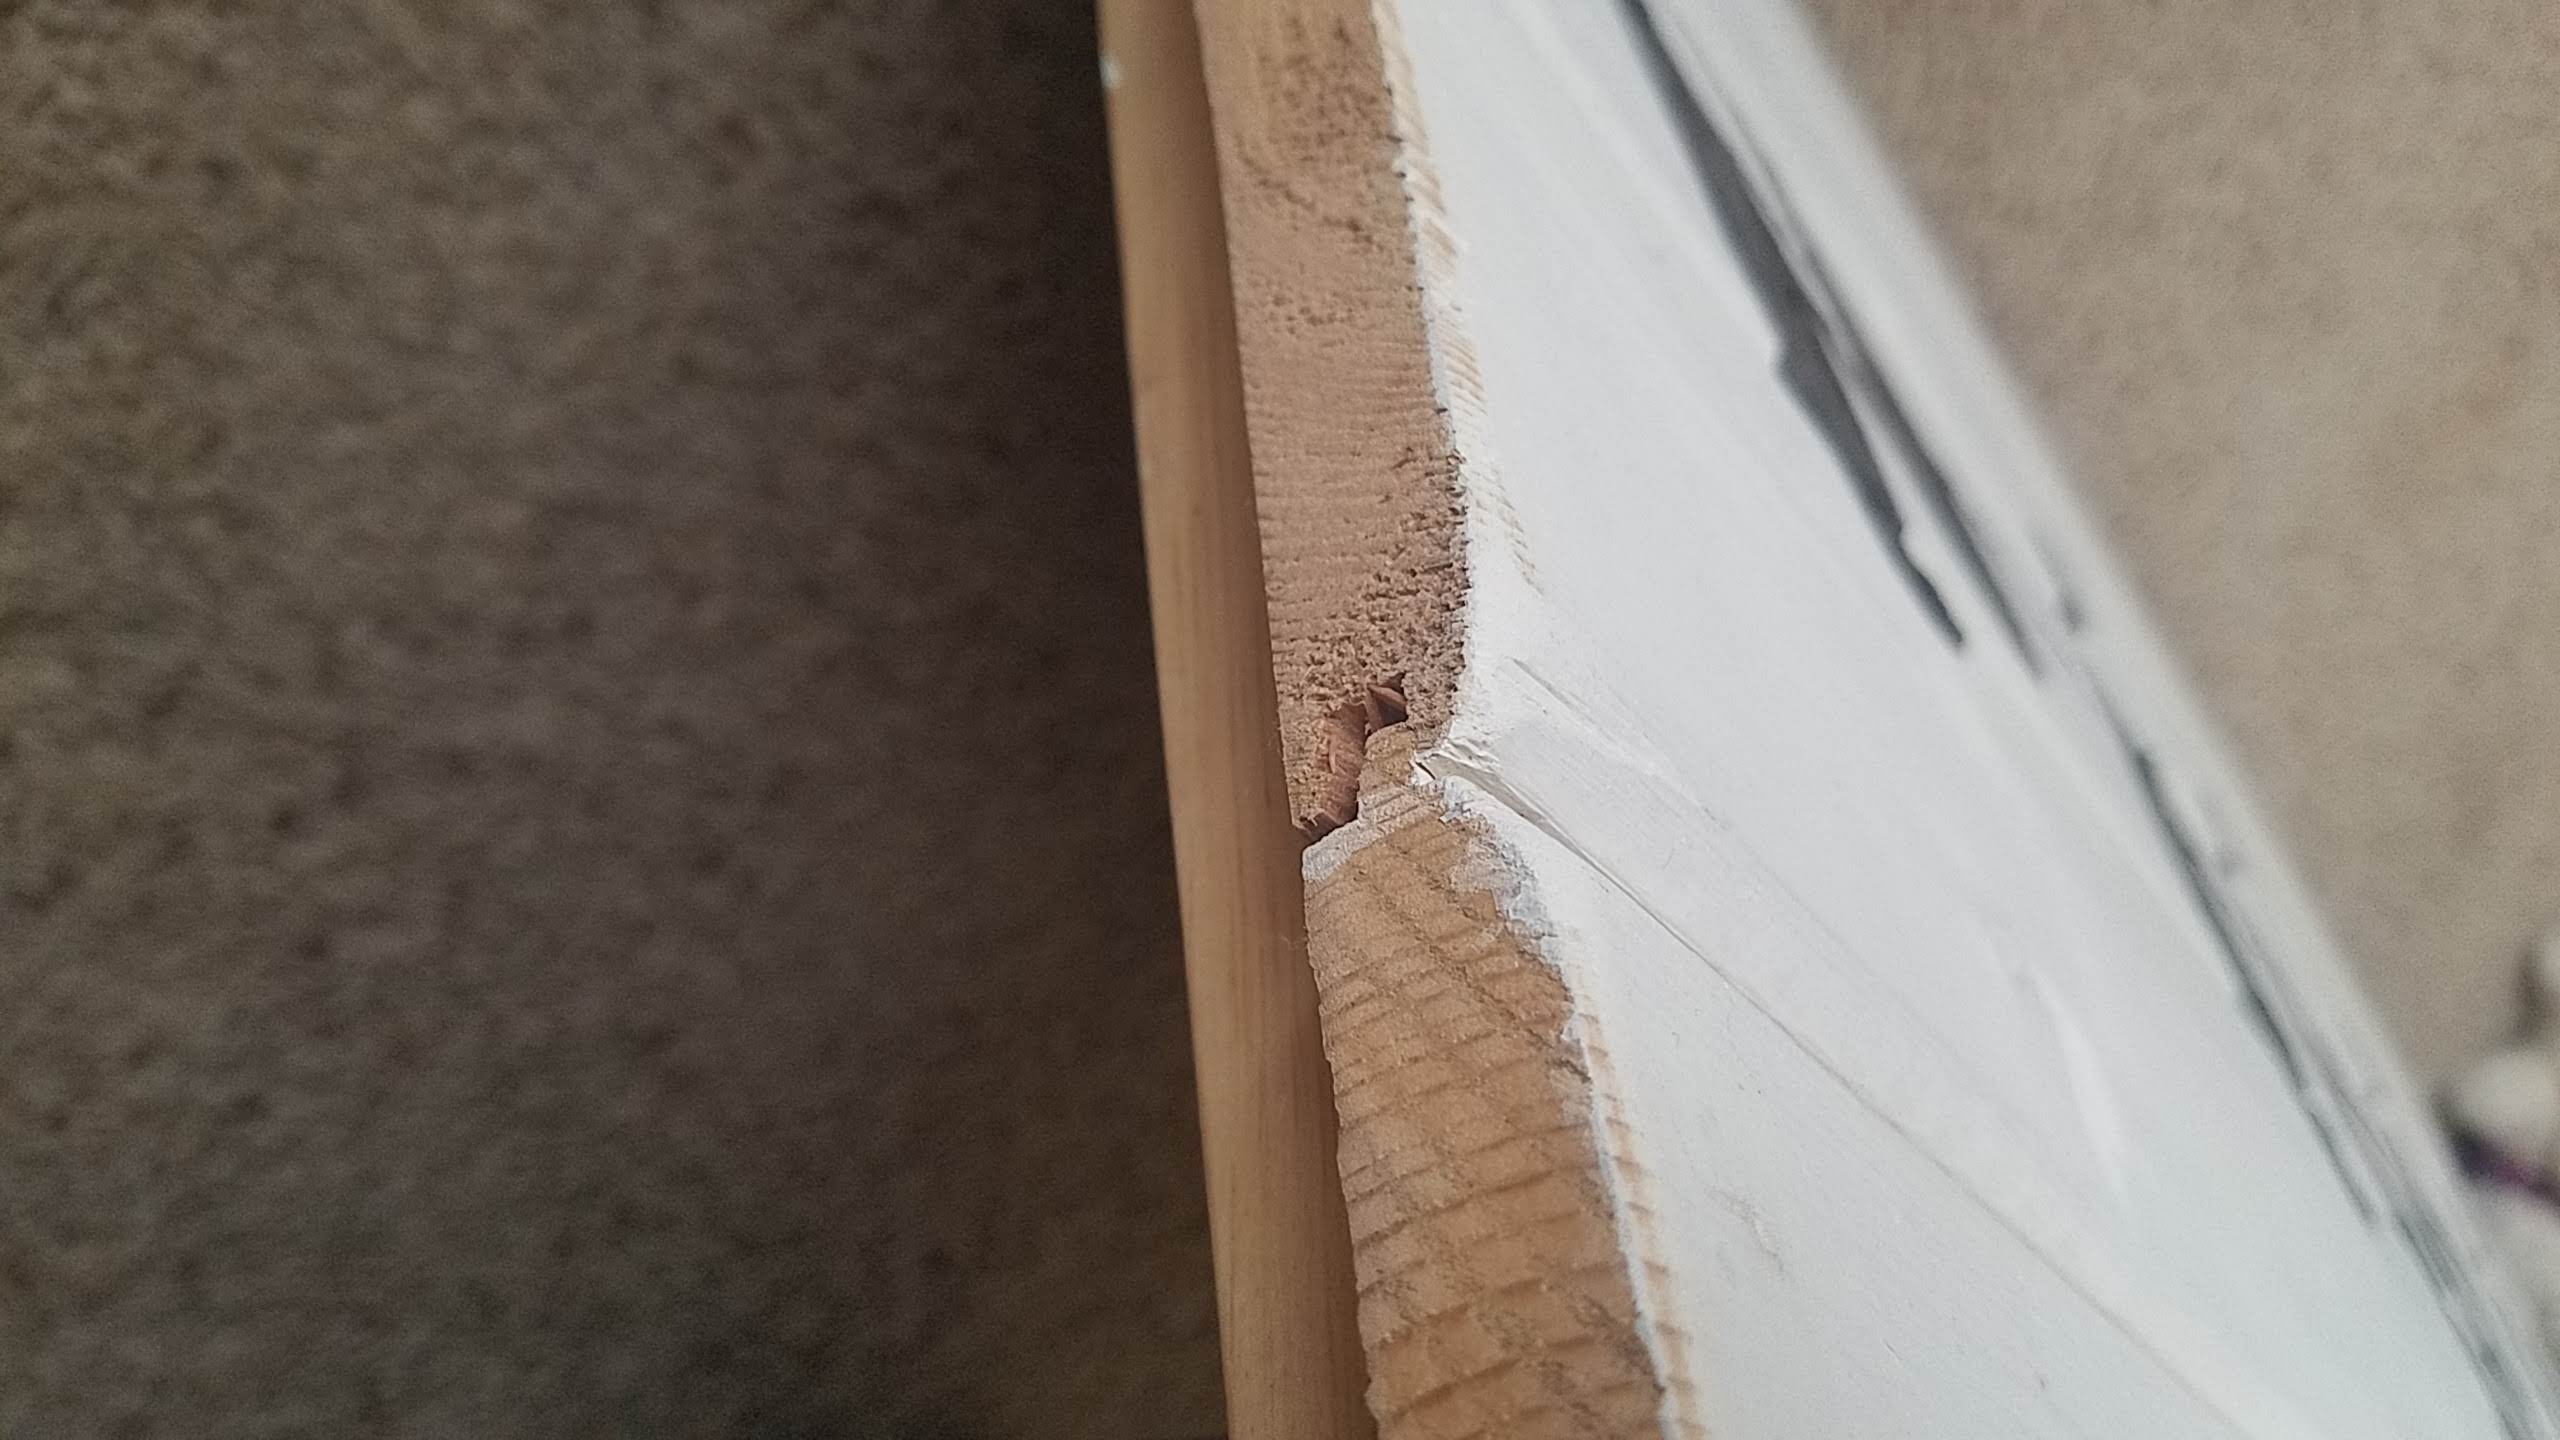
For shelving that is below eye level, I like to install metal, wire shelves so you can see what you have without having to bend down. Check out your local ReStore to find wire shelving to do our earth a solid. I found these at the ReStore, and washed them up then spray painted them to give a nice new shine. Cut to length with a hacksaw or bolt cutters. I would suggest you use whichever tool you can access. A hacksaw takes a long time, but bolt cutters cost a lot for a tool you may never use again. For added convenience there are many options online for wire shelves if you can’t get to a ReStore. Notice that there are plastic support clips along the wall. I tried to get these into studs as often as possible (like the hole there in the wall where I missed the stud and readjusted? ha ha, that happens, I’ll fill that in with caulk and no one will know, except for you of course).
I also used these closet brackets to support the shelf and hold clothes rods. Notice how I have screwed the closet brackets into wood and not just into drywall, this gives better support and makes sure it can hold the weight of the clothes and what is put on the shelf. If possible I try to place my brackets over a stud, if that isn’t possible having wood for the bracket to go into will still give added strength.
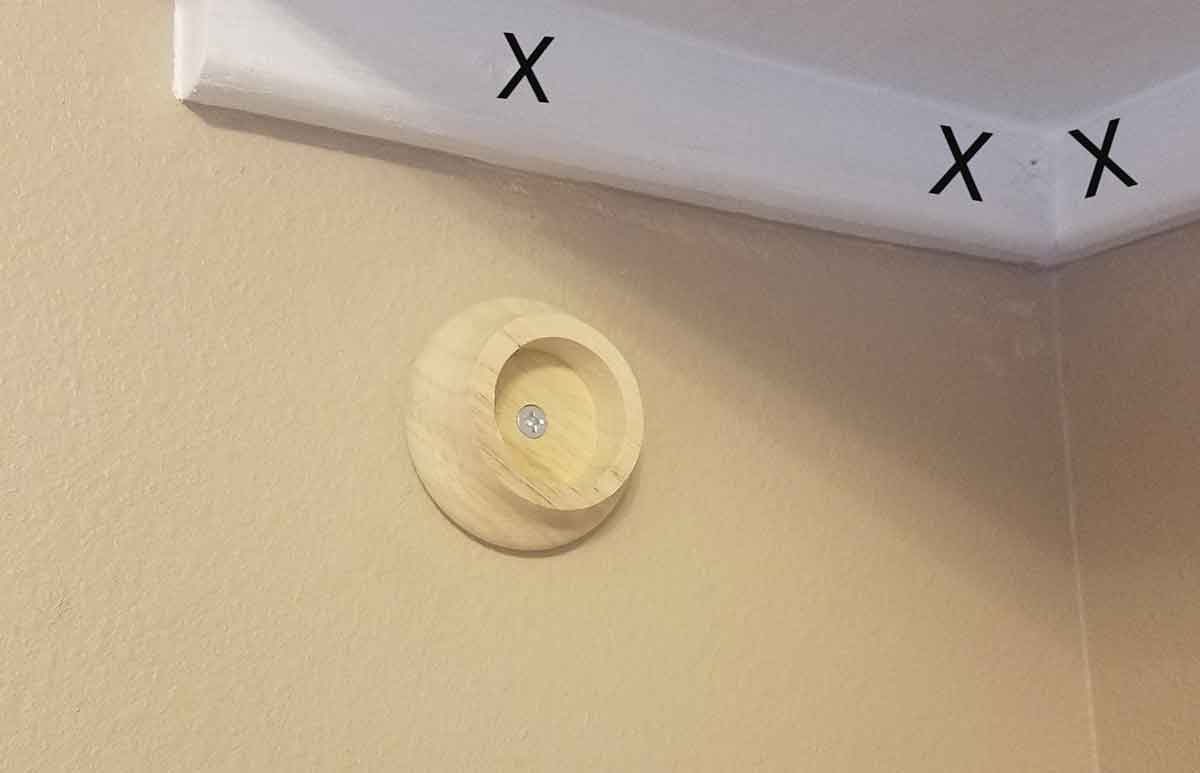
I also support the underside of the shelves in the corner like this. Each X is where it was attached to a stud. I then placed plywood on top of the supports and screwed them into the support boards from above.
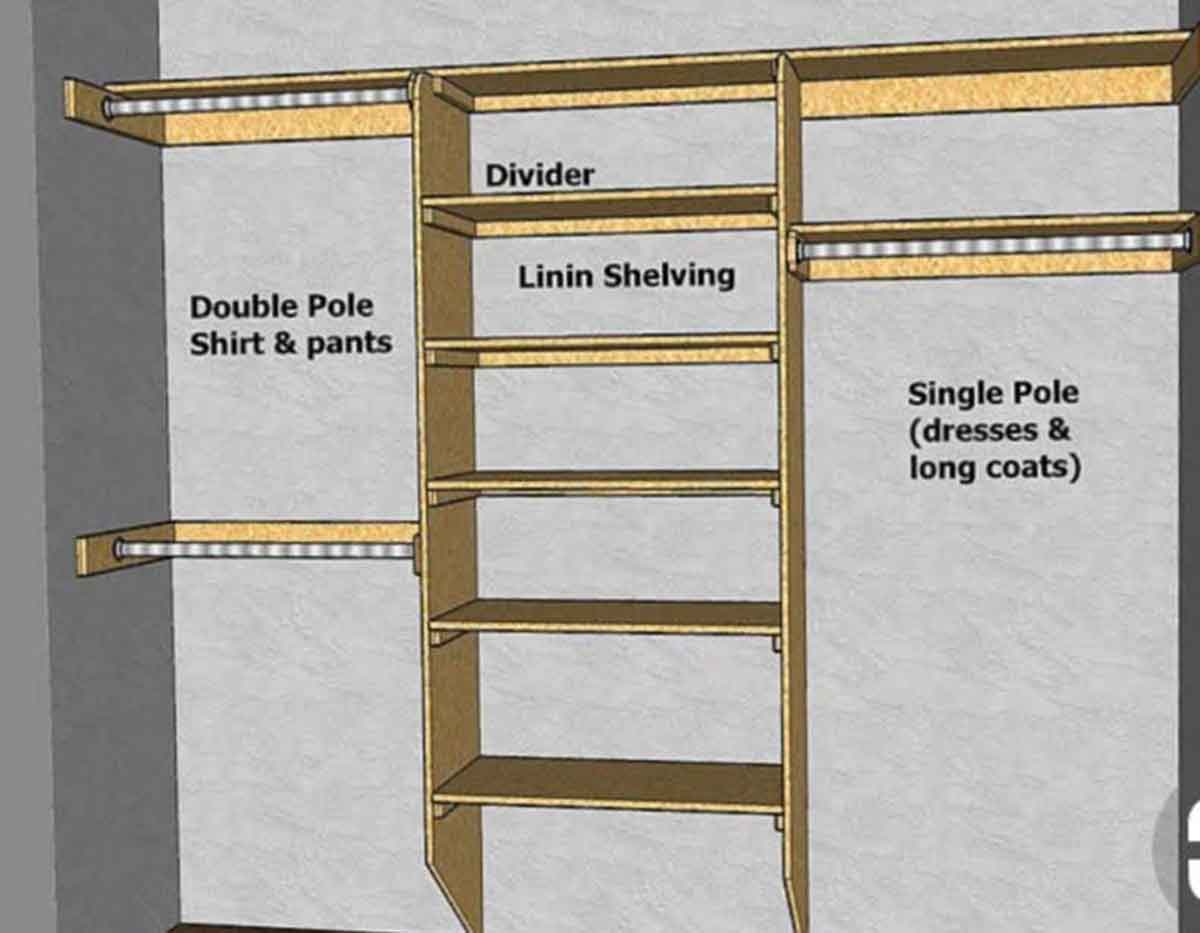
Choosing your own layout is the best part of a DIY closet. It is great to pick what you think you will need. The diagram below that I referenced above from GarymKatz.com clearly shows where to put support boards and how to position clothes rods so you have room for all your clothes. Basic closets usually have one long rod for dresses and long coats and nothing else. I love how efficient shelves and multiple clothing rods can be.
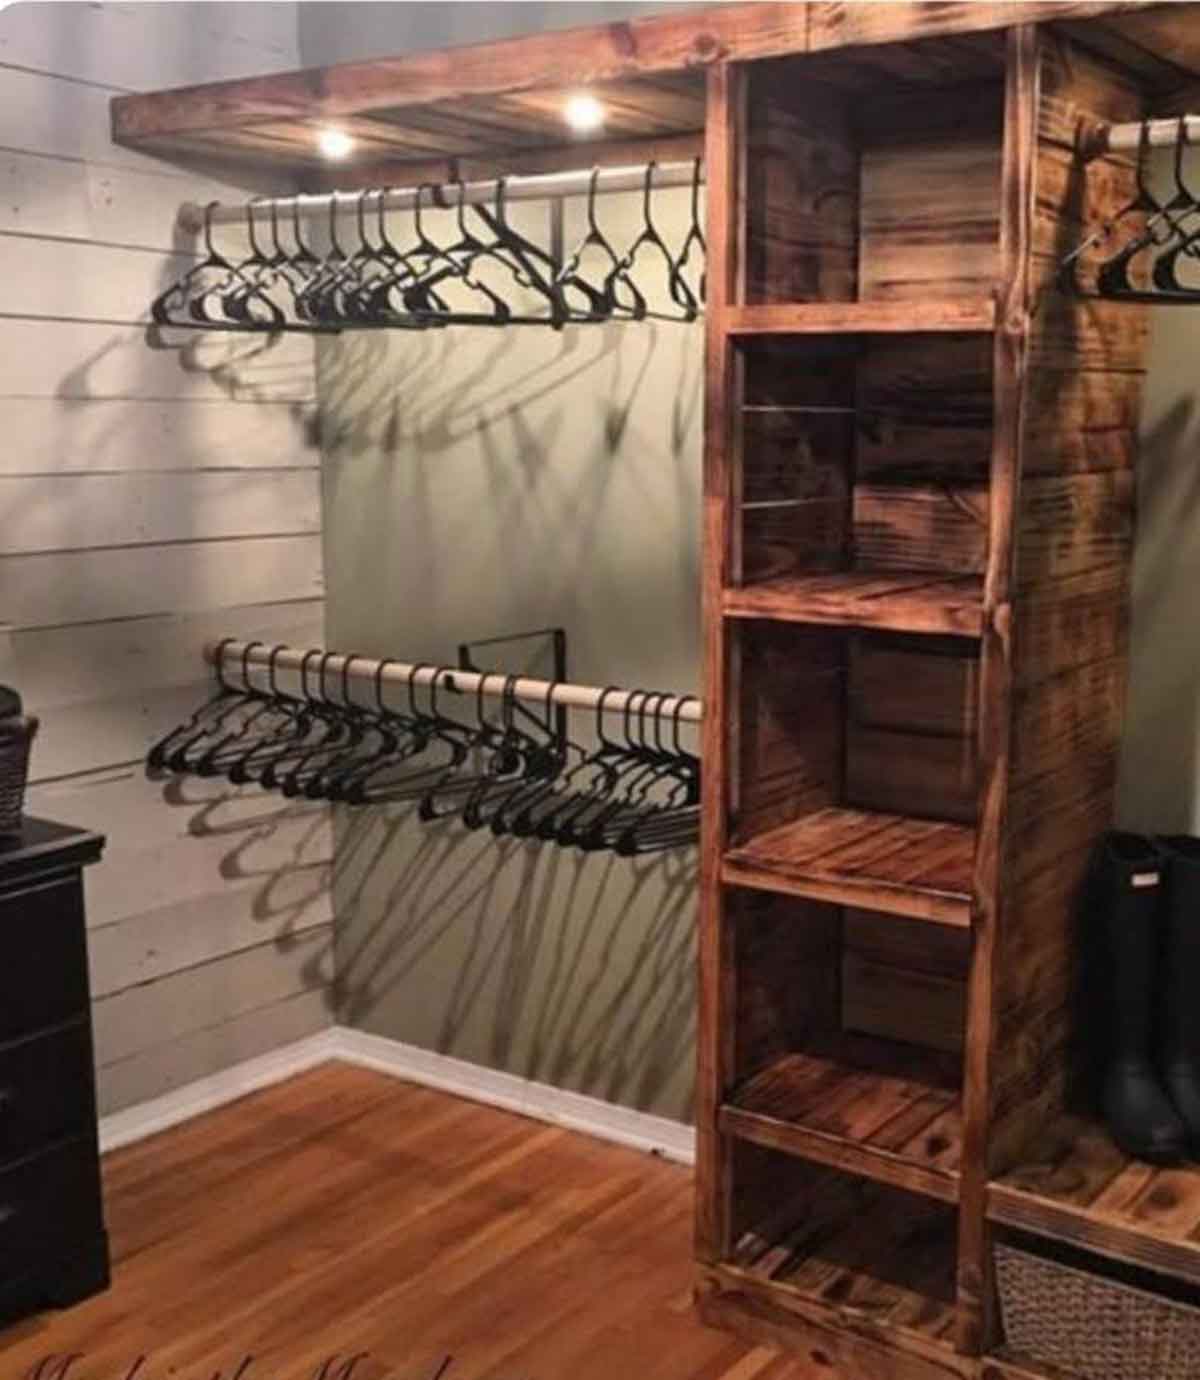
Closet #5 from MadeintheMeadows.com, is a beautiful closet. I love the ship lap on the wall and though the website does not say how they made this closet, it looks like it was made from pallet wood- Yay for reusing! You will see the same concepts of support boards and clothes rods as described above. The one thing this closet has that others don’t are those awesome lights under the shelf, lighting the clothes rod. Pretty awesome. It would be most convenient to have these wired in (the shelves here definitely look thick enough to hold wiring). If you are not handy with wiring or don’t want to hire it out, a close second is battery operated lights that can be installed anywhere and have a remote control. I used these in my kitchen to add extra light, they are awesome.
Well, there you go, my quick 5, closets you can do yourself. Anytime you spend building shelves in your closet is well worth the sacrifice. It makes life easier and less cluttered and if you have children they have nothing to hold them back from cleaning up. I wish you well on your upcoming projects. Post below your closet successes and remember to share this with someone who is looking to build their own closet.
– next time


Recent Comments