A friend asked if I would do a post on DIY closets. So here you go Alanna! I have built three closets and have a few tips to share, I hope you find it helpful. I am going to take you down the road I took as I began researching how to build an organized closet. First I would suggest you look through several layouts to see what you like, what meets your needs and what looks possible. Below are 5 closets you can build yourself and is a great place to start your search. There is a bit of sweat equity, but it is doable. I will also give explanations, links and videos on how to accomplish each one. Note, these are not all my closets. My closets are full of clothes and I’m not in the mood to empty them to photograph, but I will show you how to get each look and you will feel amazing when you are done.
Tools needed for this project
Pencil
Materials needed
1/2″ x 3″ boards for supports
3/4″ Plywood for shelves
1 1/2″ screws (long enough to get through the plywood, drywall and into your supporting stud)
Trim for plywood edge (optional)
Clothes rods (I like wooden ones)
Wire Shelves (optional)
Metal Plumbing Pipe (if you do the pipe closet)
Pipe Cutter (if you do the pipe Closet)
Closet #1 Why not start out with an Anna White, she is after all my hero and most of her designs are straightforward to build and beautiful. Two of the three closets I built were to encourage my children to hang up their clothes and have no excuse for putting them on the floor. Anna has step by step instructions so I won’t spend much time explaining here. Anna used screws to tighten the shelves into place from the outside of the shelf, she also made adjustable shelves with shelf pins, but you could make yours permanent if you wanted.
Closet #2 Another great option is to consider a floating shelf as found here at buildsomething.com.
To get this look you need a support boards screwed into studs like this. The shelf is then built onto this support board with another support board underneath the shelf where it is floating off the floor.
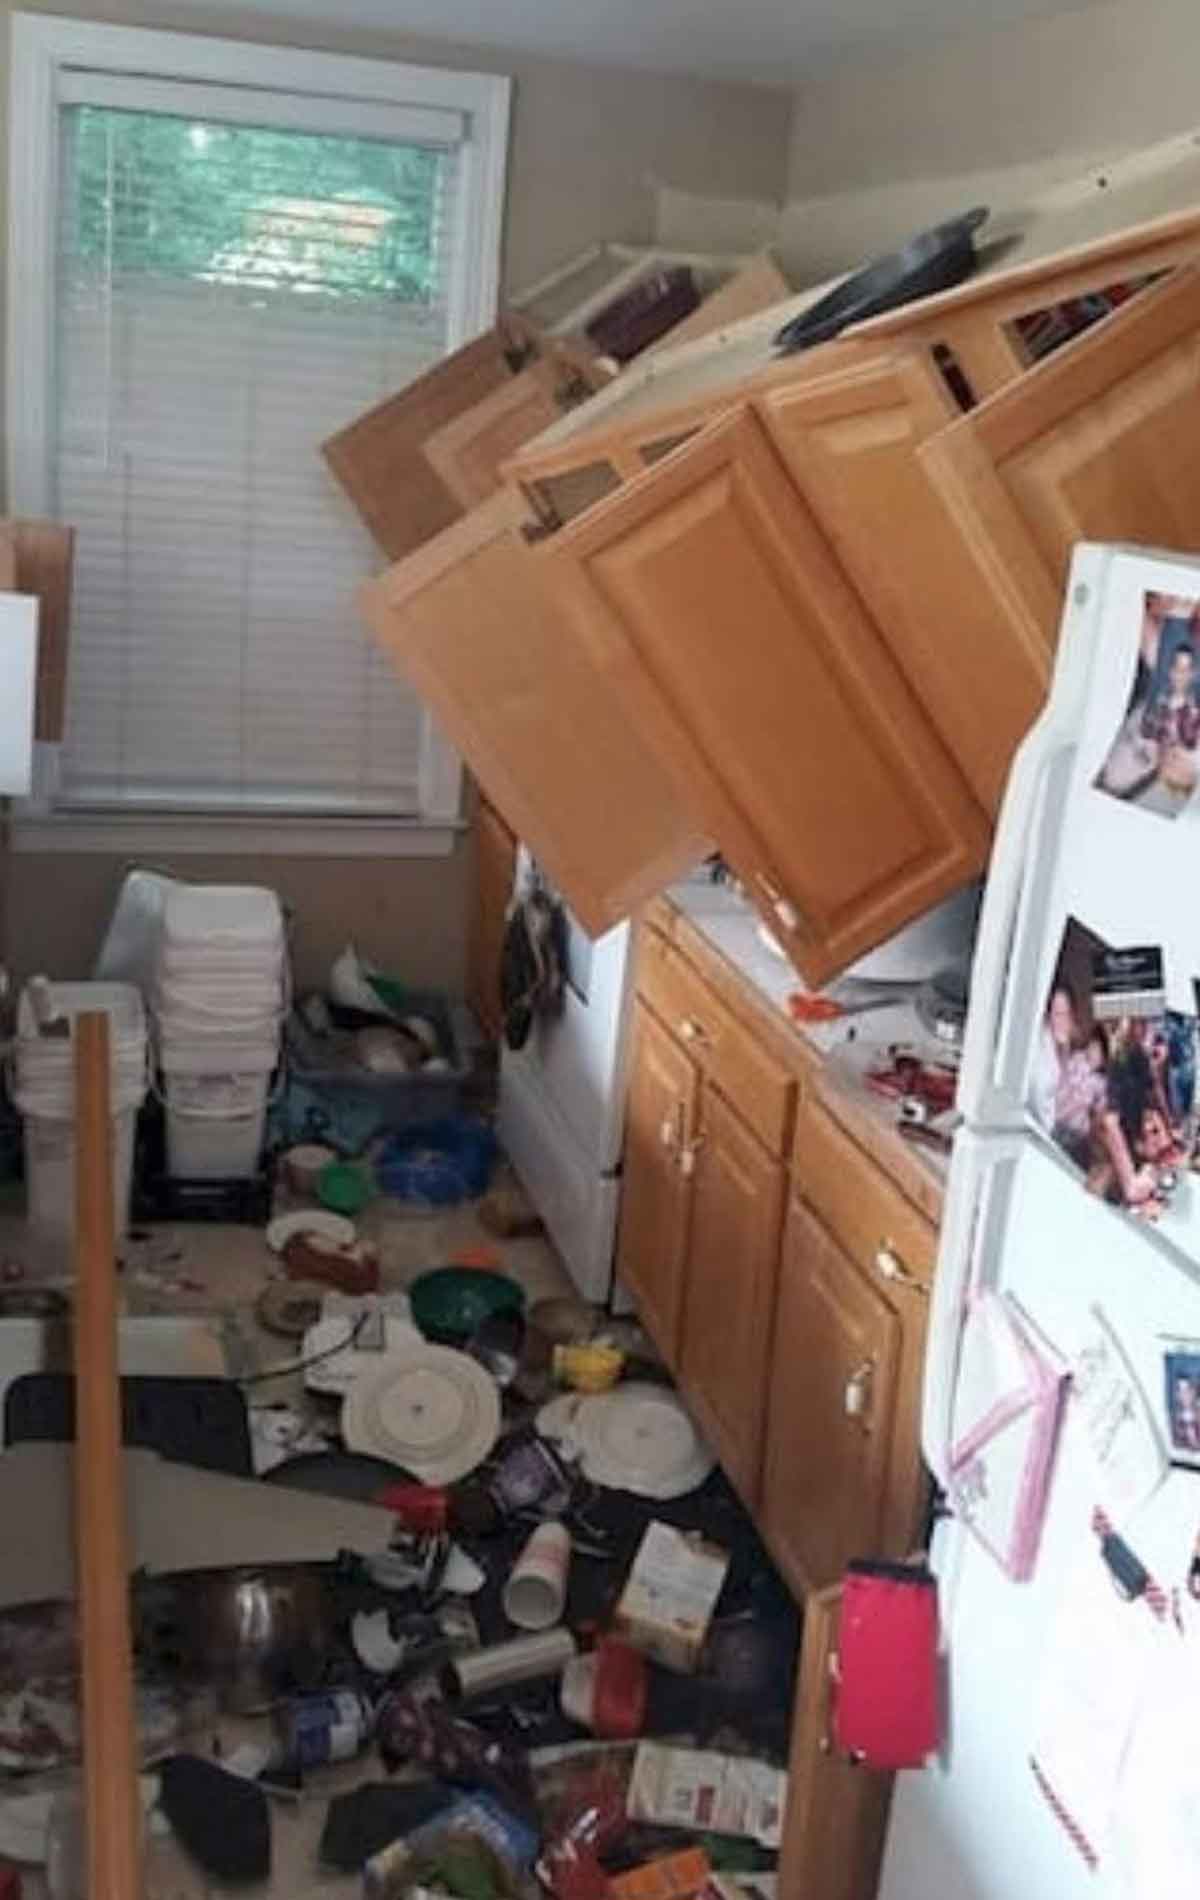
In fact support boards are needed in all the areas pointed at by an arrow. This allows you to add lots of clothes to your clothes rod, lots of stuff on your closet shelves and not have a disaster. This photo (minus the arrows) is found at garymkatz.com I can’t provide the exact link because I could not find it! So sad, but it was labeled with their website and I want to give them credit.

And this is what I mean by disaster. Find those studs and secure your support boards and shelves well.
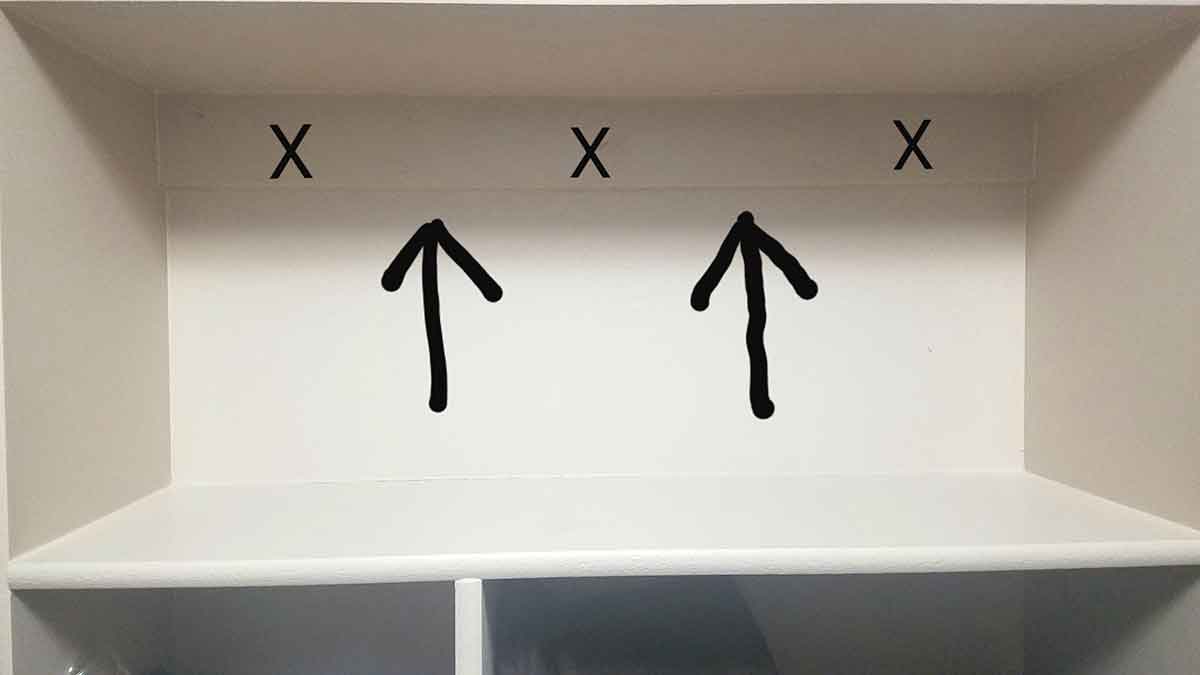
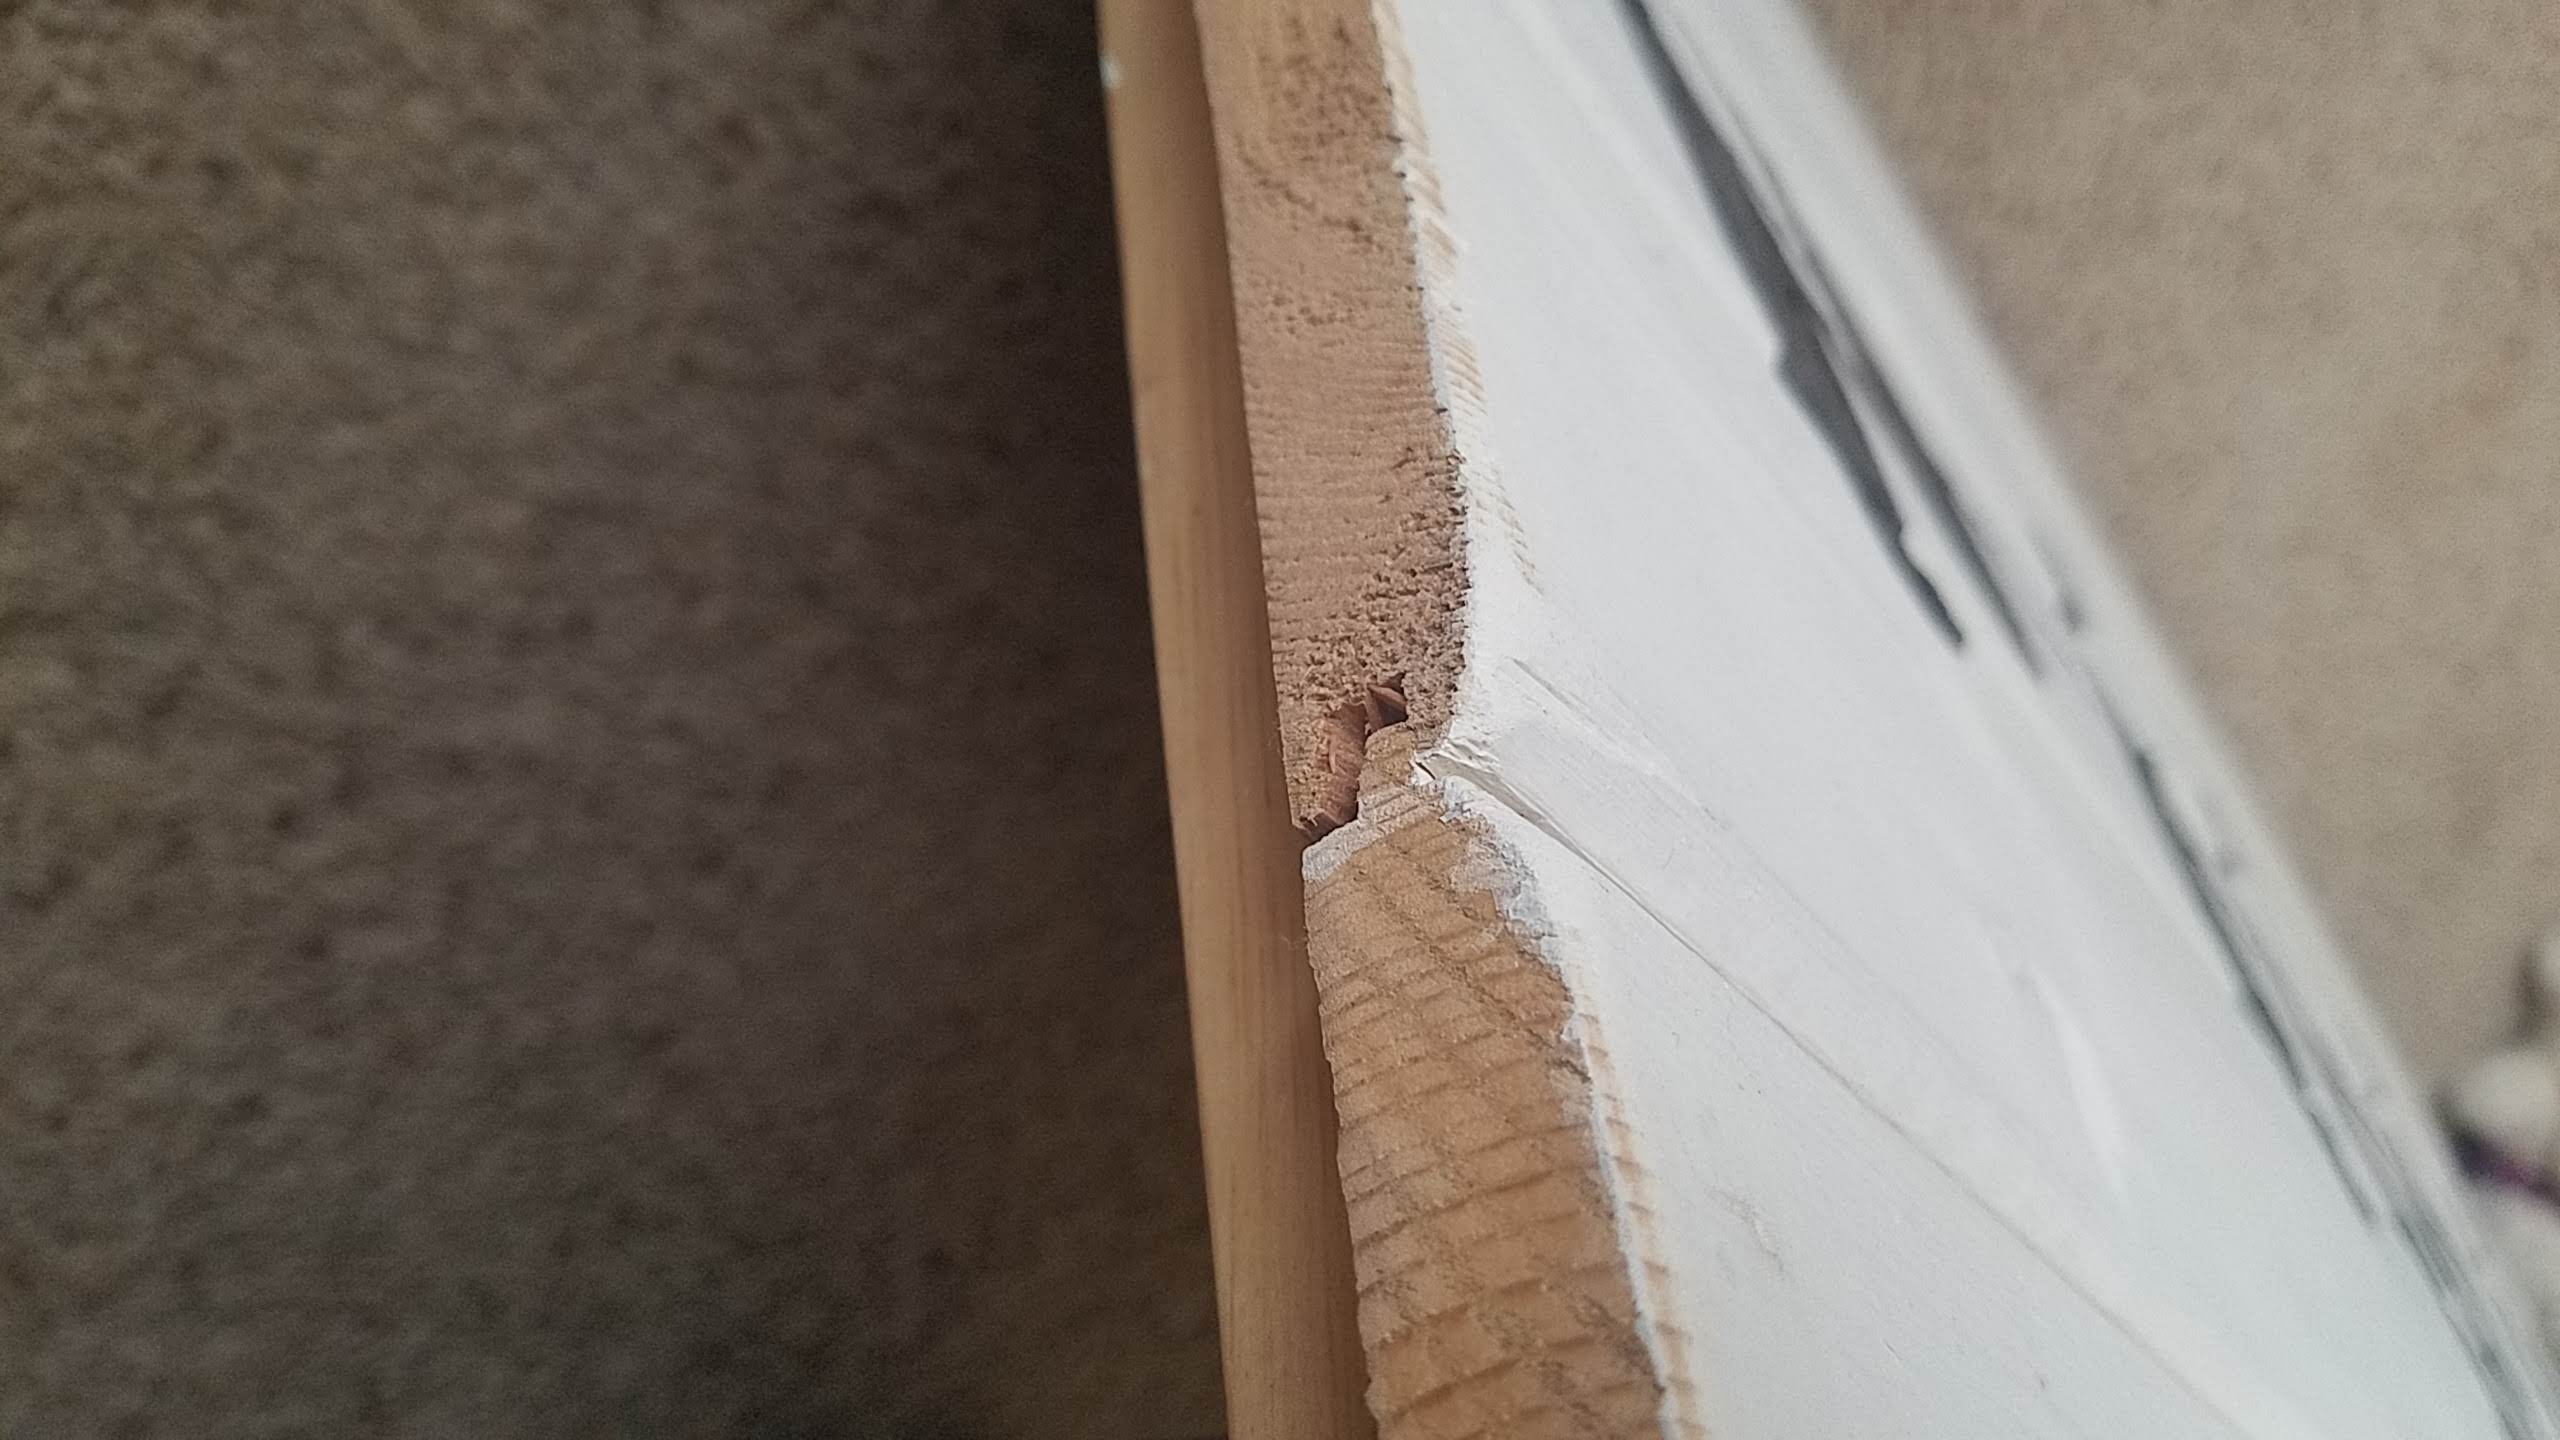
How to find a stud – as in a 2×4 behind the wall, I know what you were thinking 😉. If you are using a battery operated stud finder – first, hold down the button on the side of the stud finder, move from left to right, when it beeps make a mark. Now move from right to left, when it beeps make a mark. It should look like the picture below. This is an estimate of where the stud is. Place your screw between the two marks.
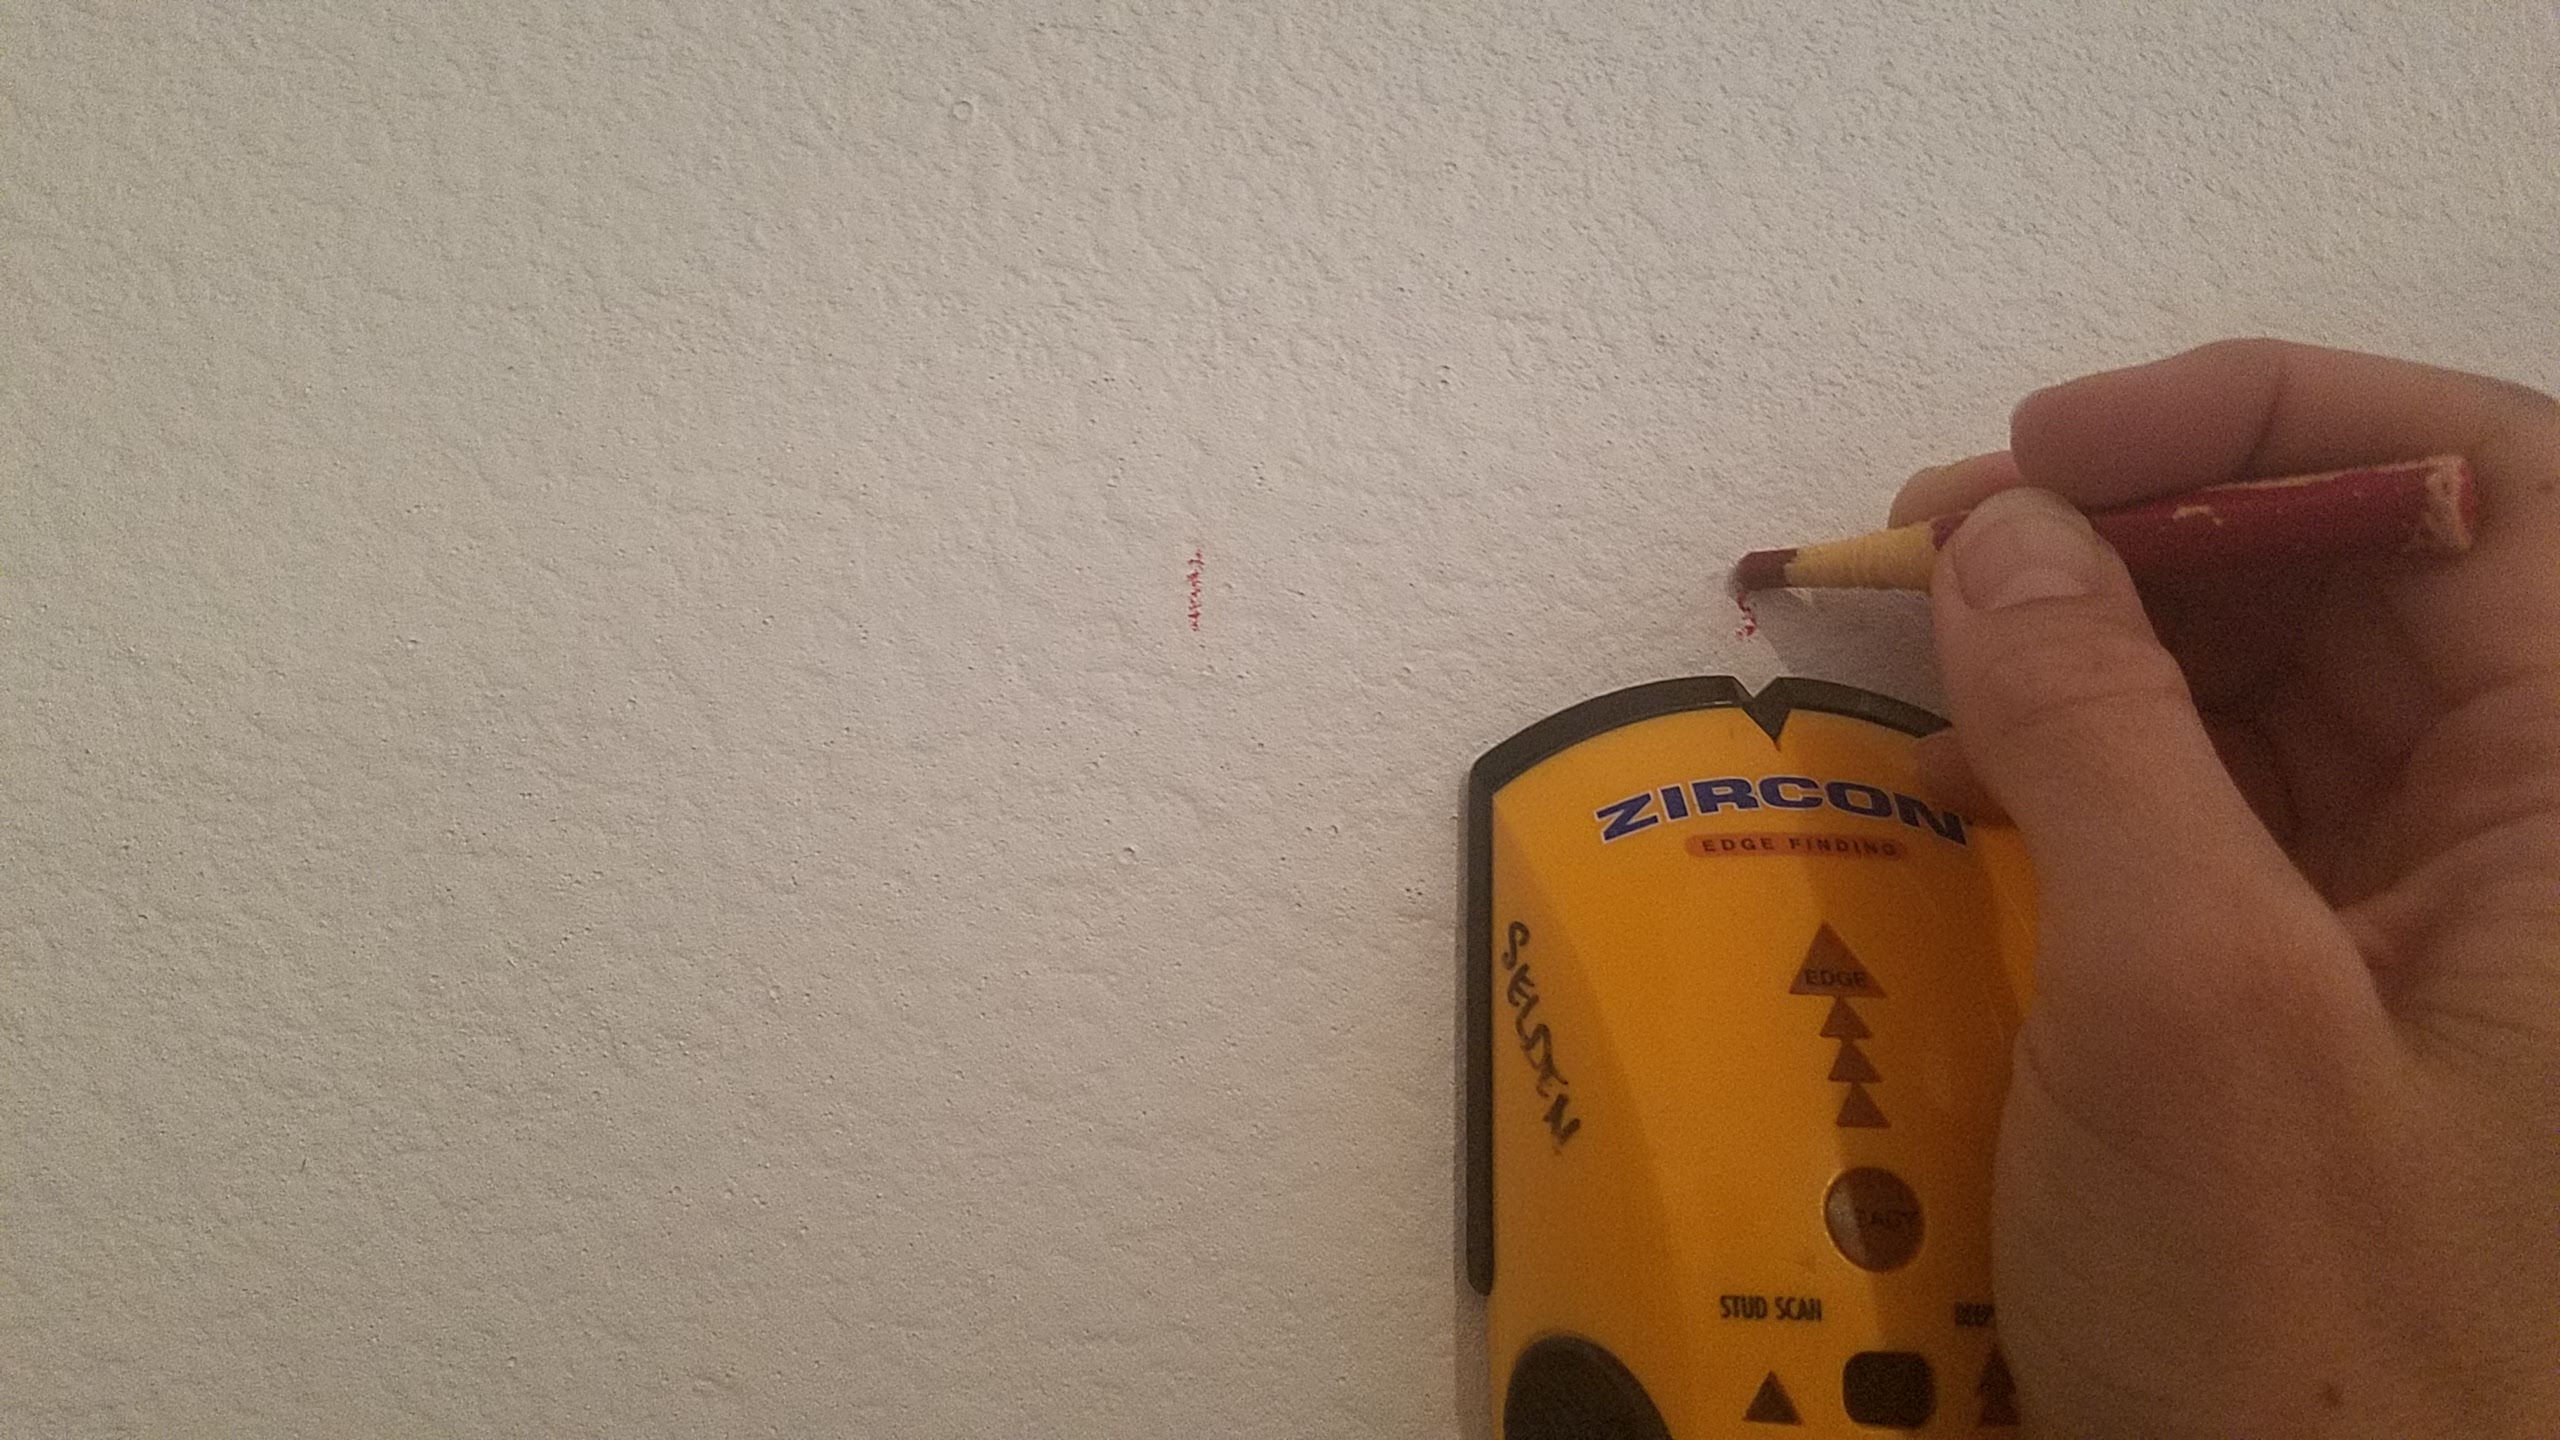
If you have a magnetic stud finder simply move the stud finder back and forth feeling for a magnetic connection to a screw in the stud. When found it will stick to the wall like a magnet on the fridge. This method is much more accurate as it actually finds a stud, where the battery operated at times may find a wire, the exact thing you don’t want to drill into. I have the battery operated stud finder, that is breaking and had to borrow one. When I read reviews the magnetic stud finder was highly rated, I think that will be my next tool purchase.
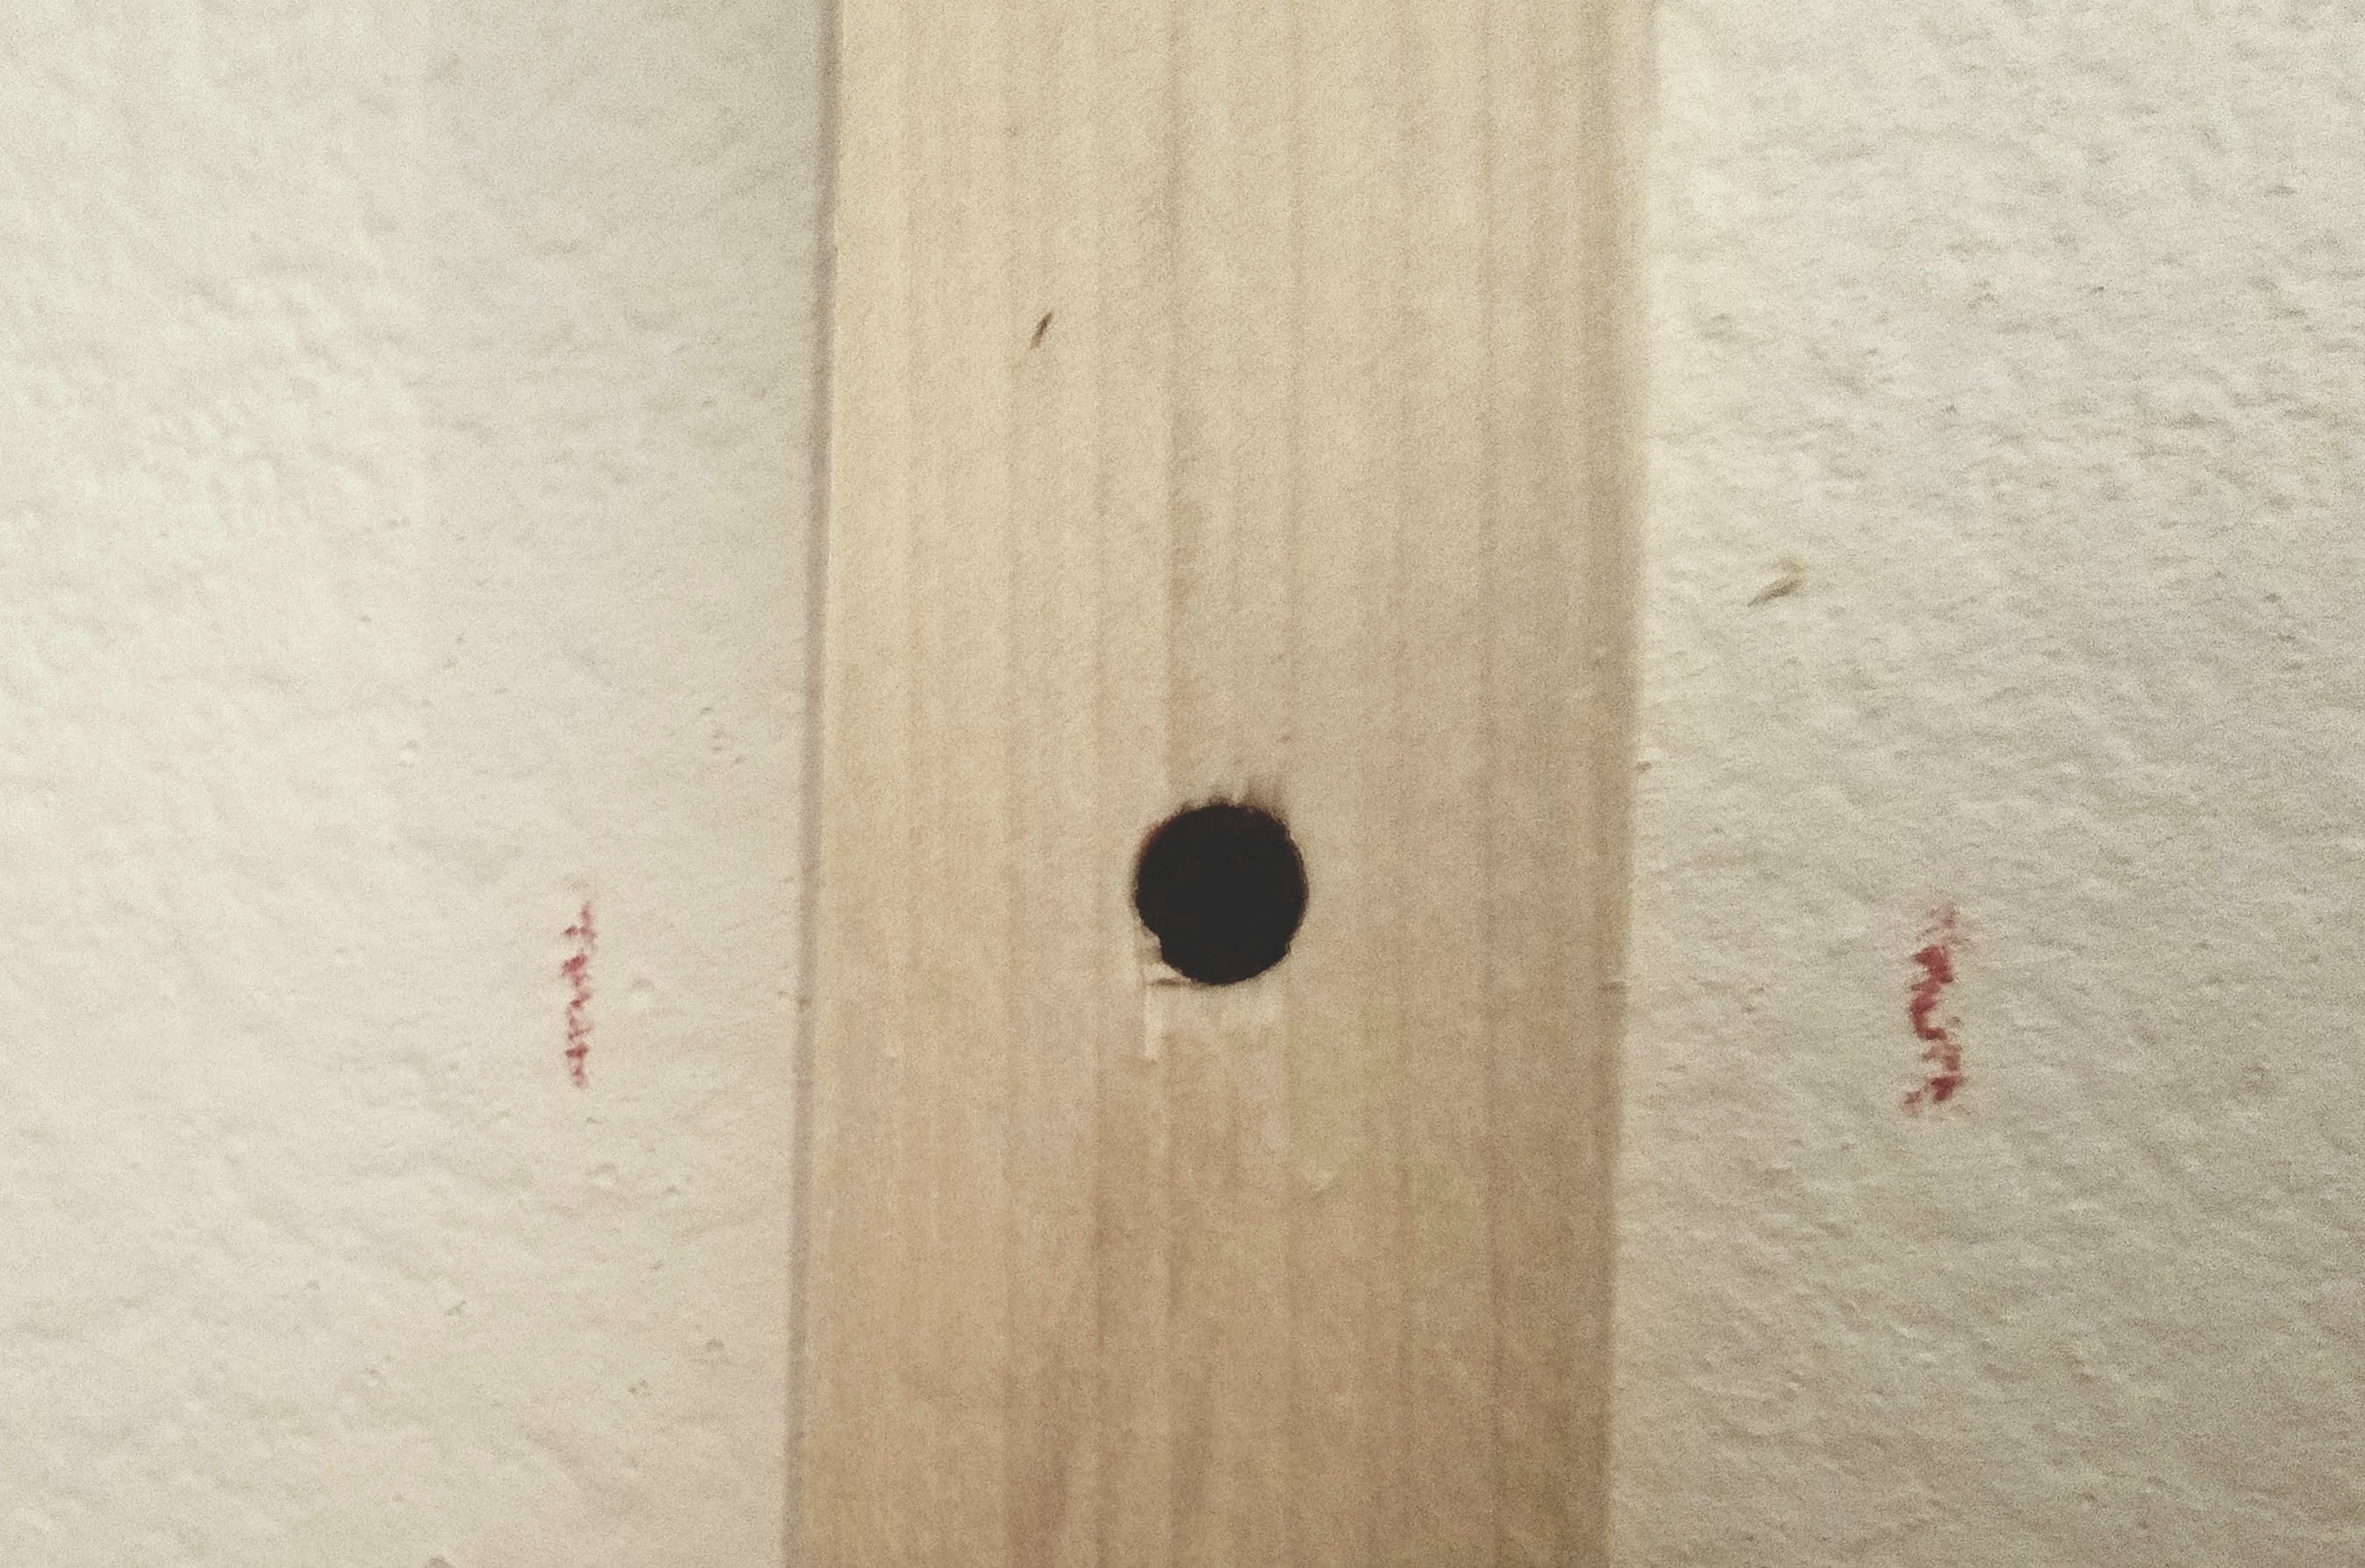
You will know for sure that you hit the stud because the screw will give a bit of resistance and pull into the wood. Remember to pre-drill to avoid split wood. If you are covering a large section of closet, 4-6 feet, it’s ok to miss a stud here and there, but make sure you have at least 3 studs secured to your support board.
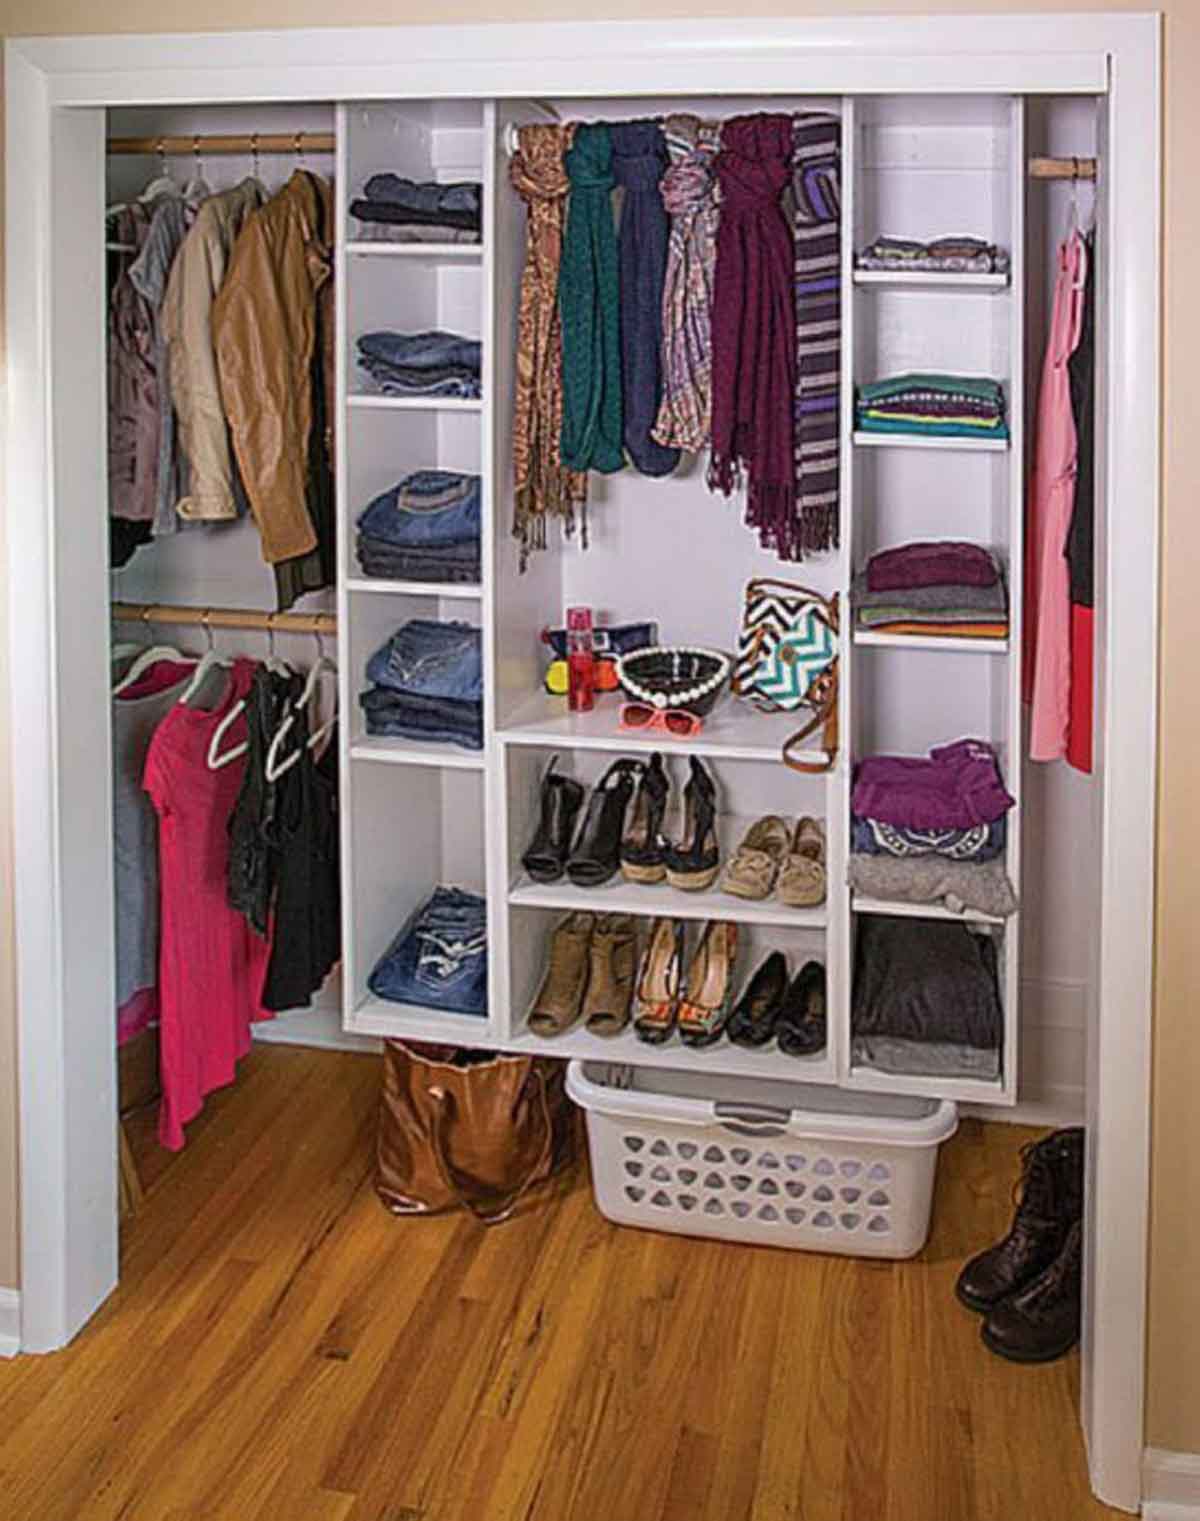
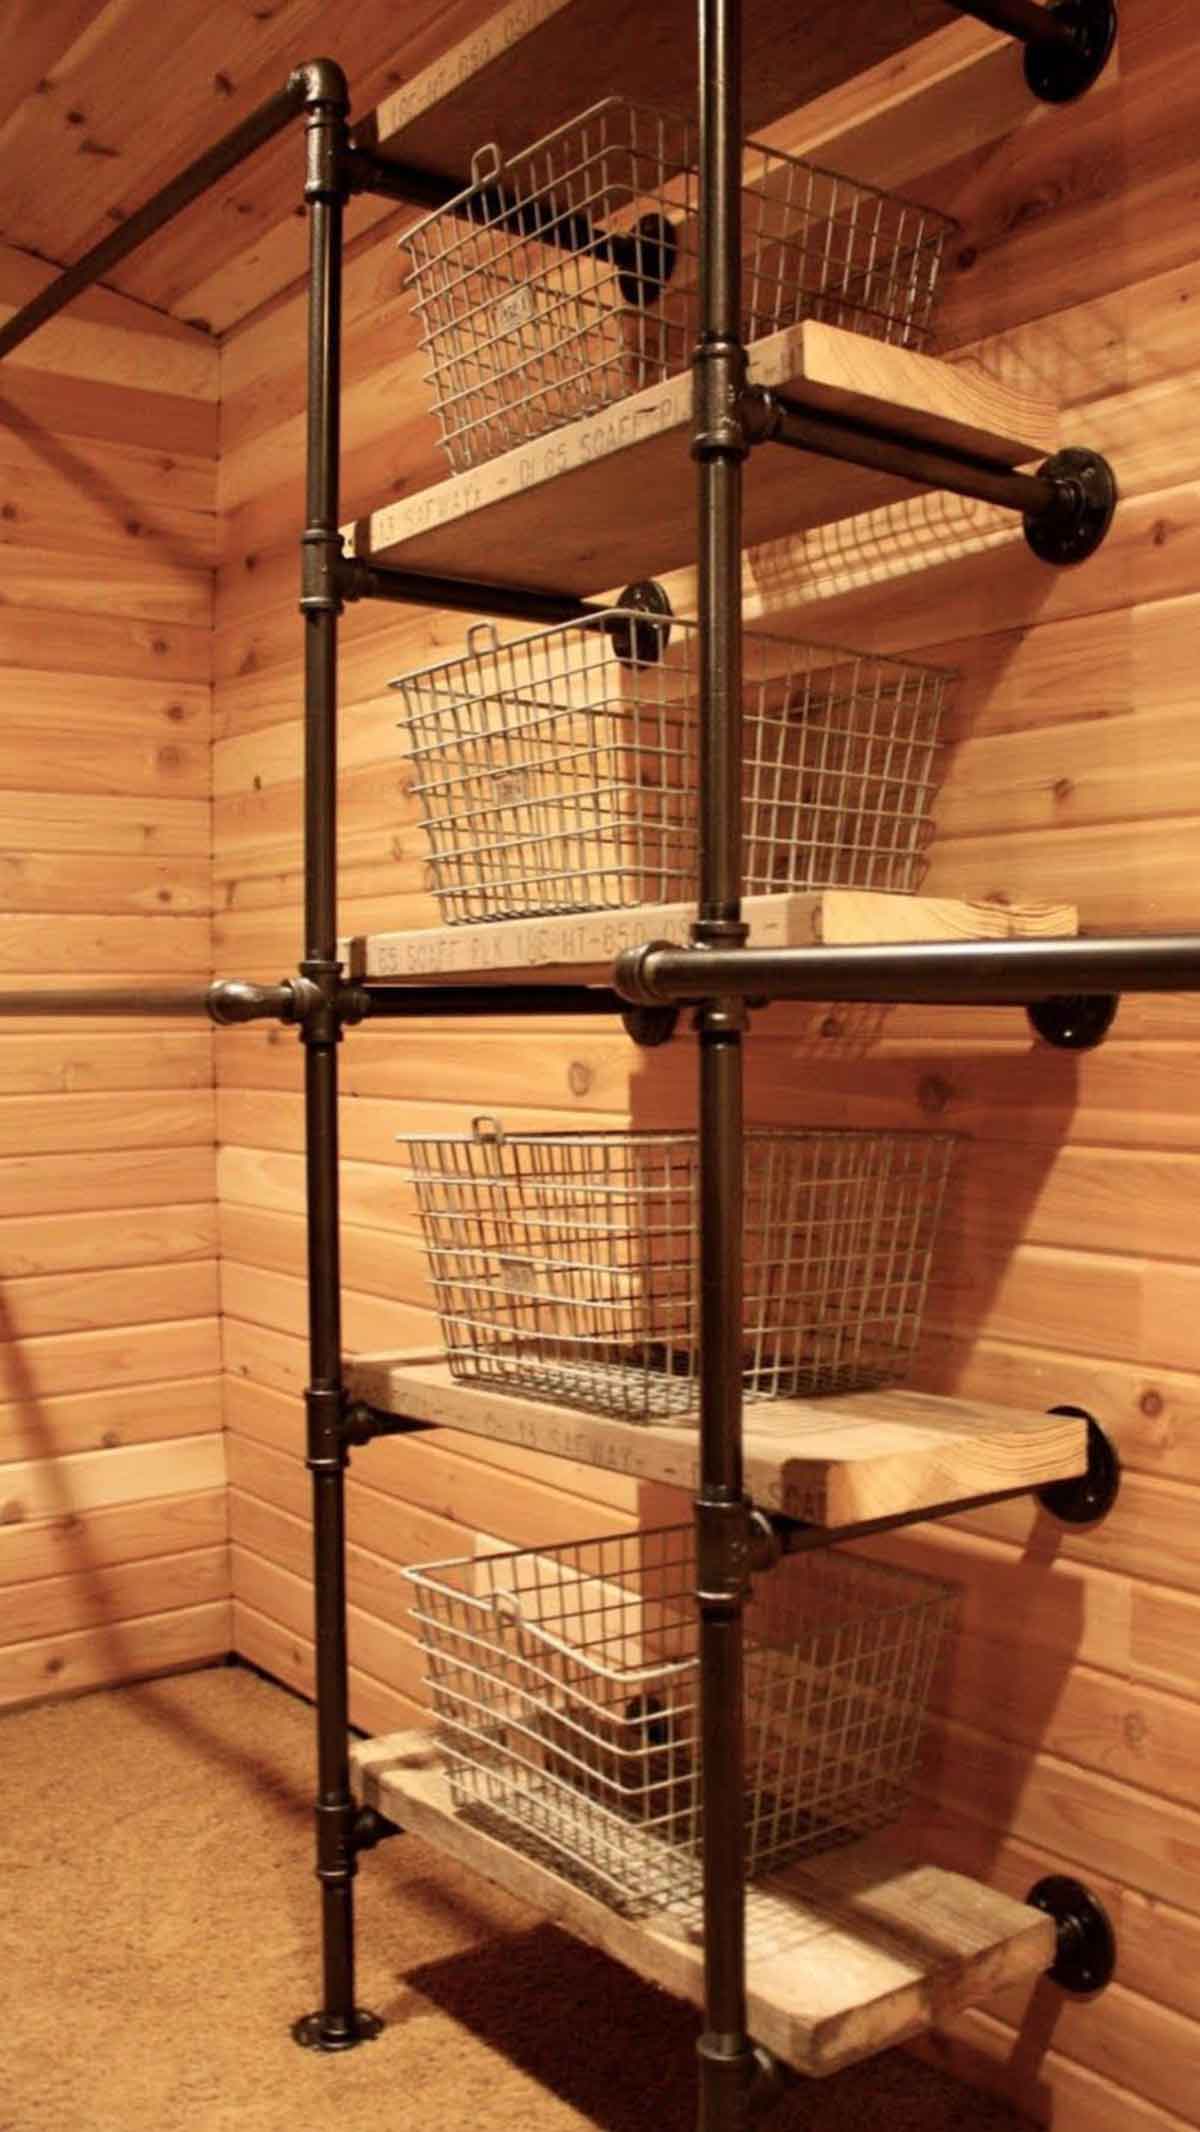
Closet #3 I love this look from Mysweetsavannahblog.com, its modern and and sleek, but calmed down by the cedar plank walls and ceiling. To cut plumbing pipe you will need a pipe cutter. You are then able to get this whole look. Check out thisoldhouse.com for a great tutorial on how to cut the pipe.
If you really want the ceiling and walls too, the pieces hook together tongue and groove like you see below. make sure you use a level or right angle because the boards can quickly tilt at an angle, by the time you notice they’re already nailed into place and it’s a pain to fix, not that I’ve ever done that 😉 , I’m just trying to save you time.
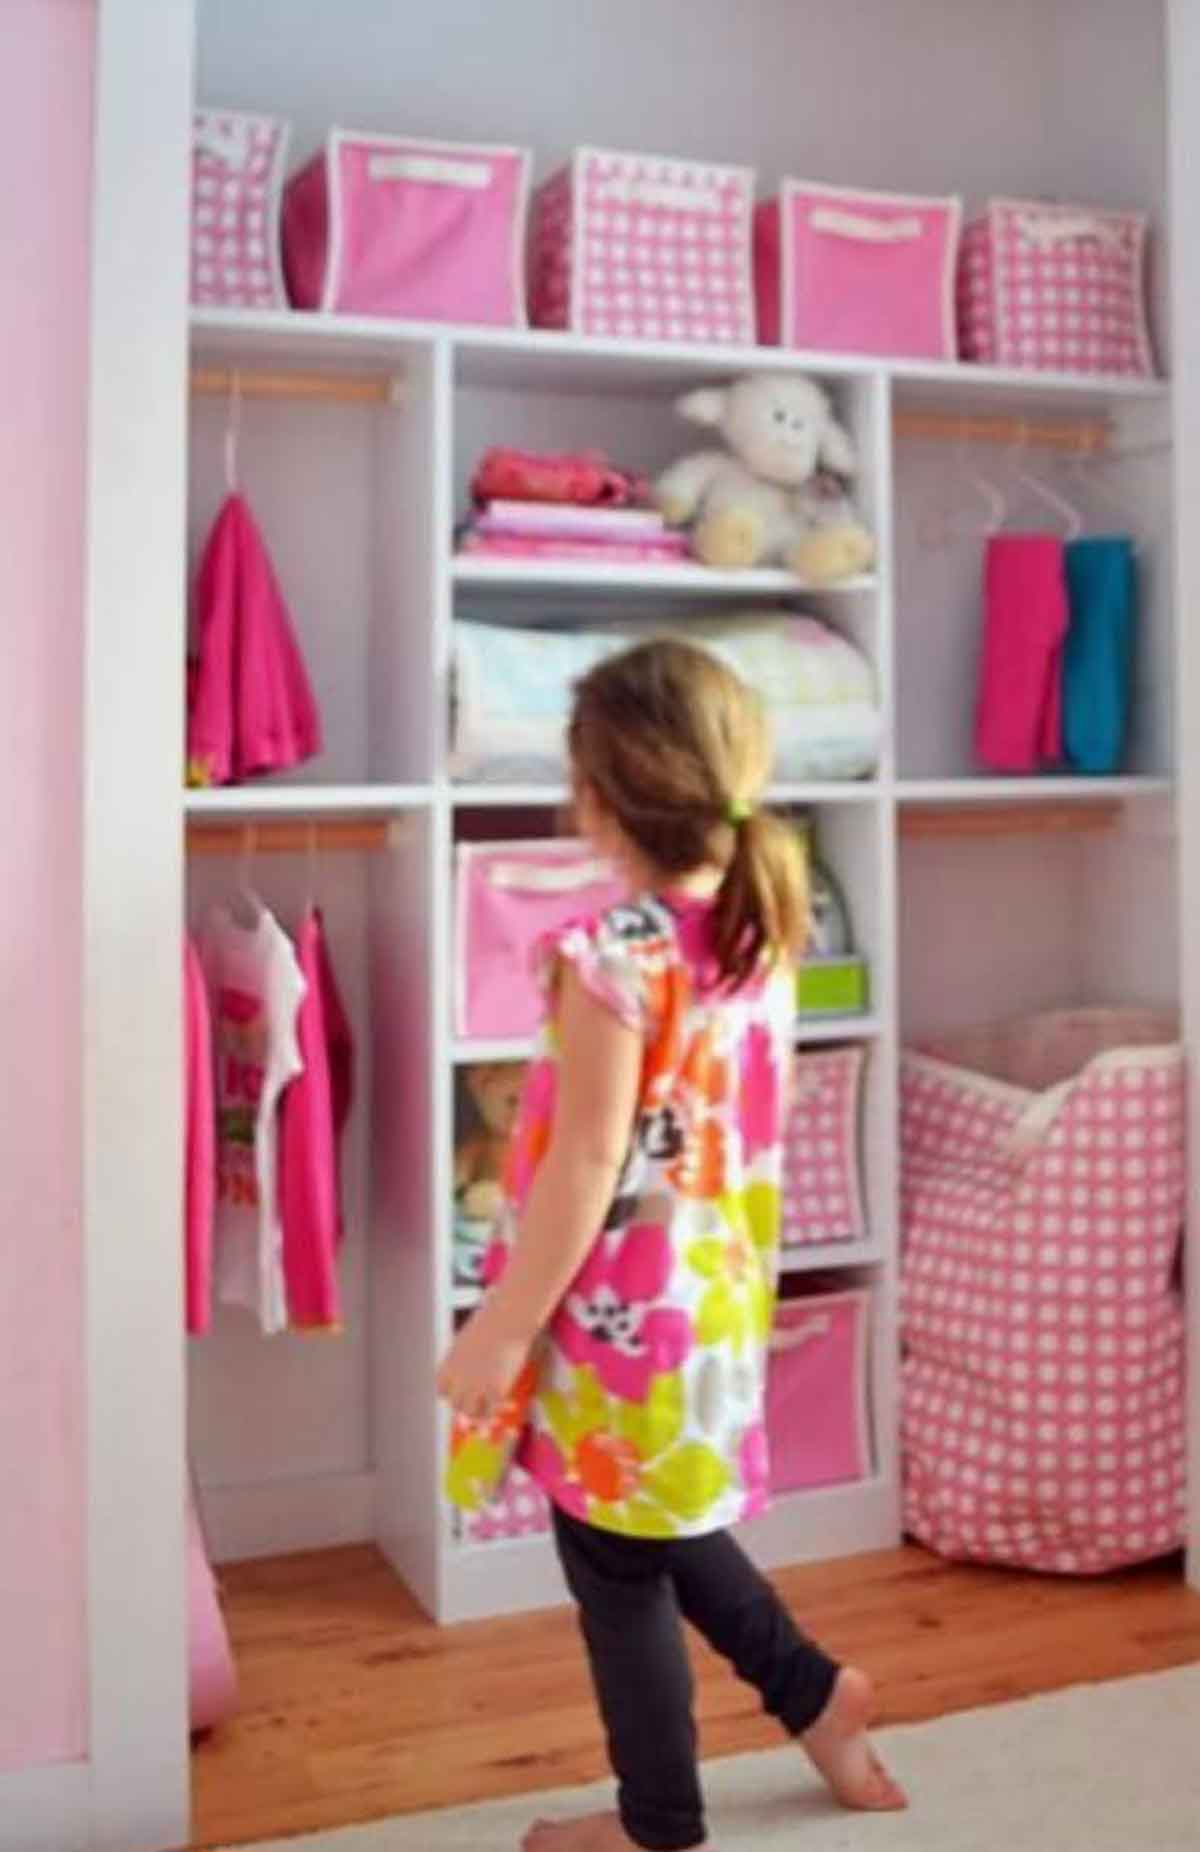
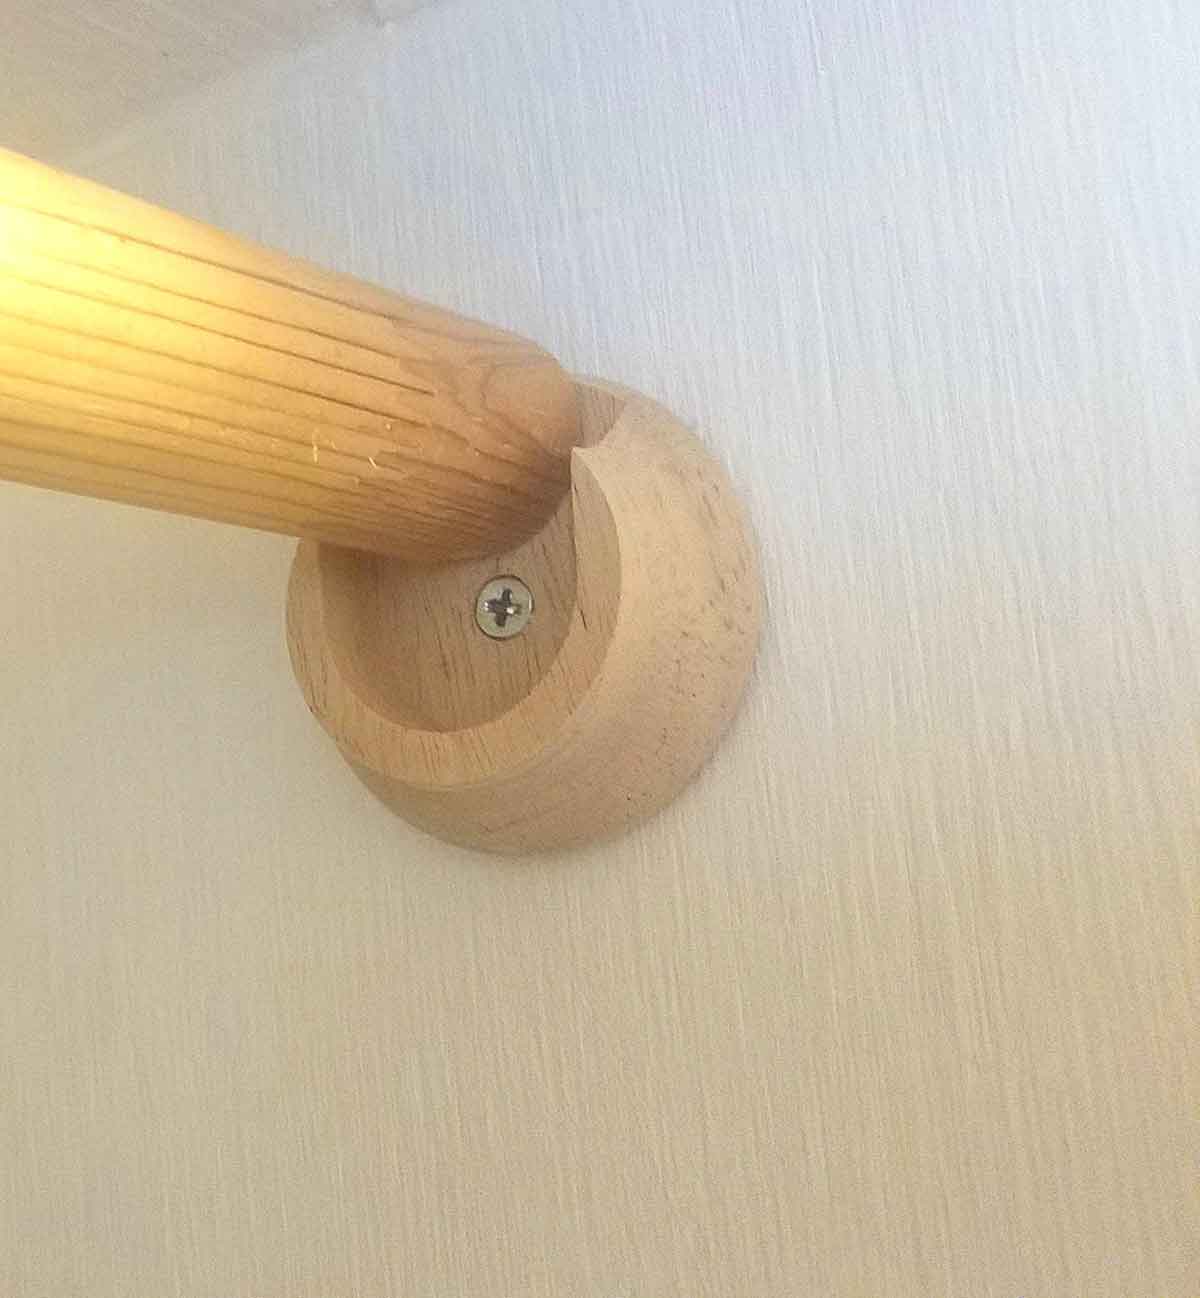
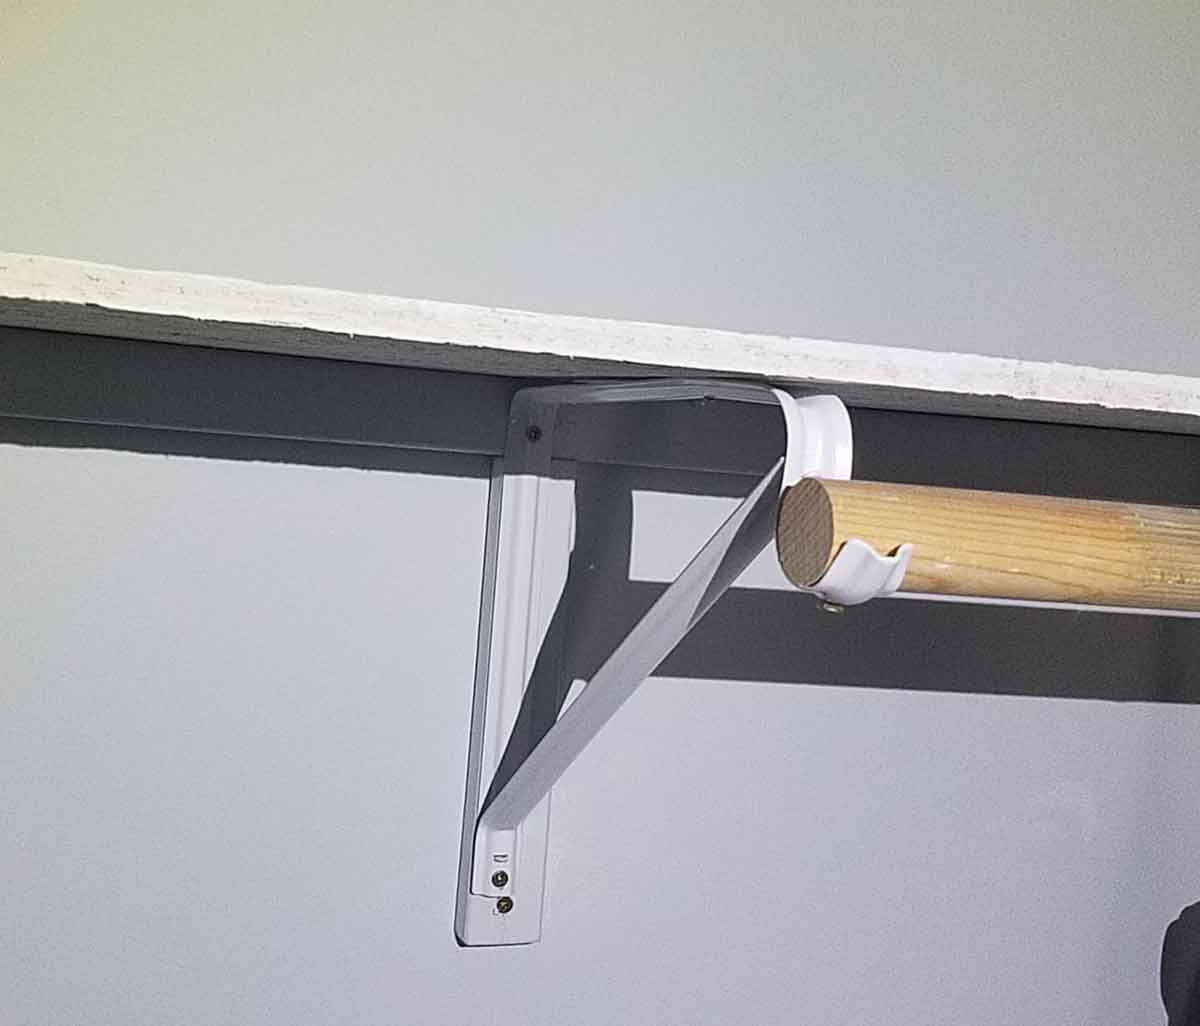
Closet #4 This design found on Houzz, is a great example of reinforced clothes rods. Put a hanger with a shirt on it and give a few inches, this is how far from the wall you should place your rod holder (about 11 1/2″). I like to make sure at least one end is in hardwood or the stud. You can see in this picture that a piece of wood has been fastened to the shelf to hold the rod in place.
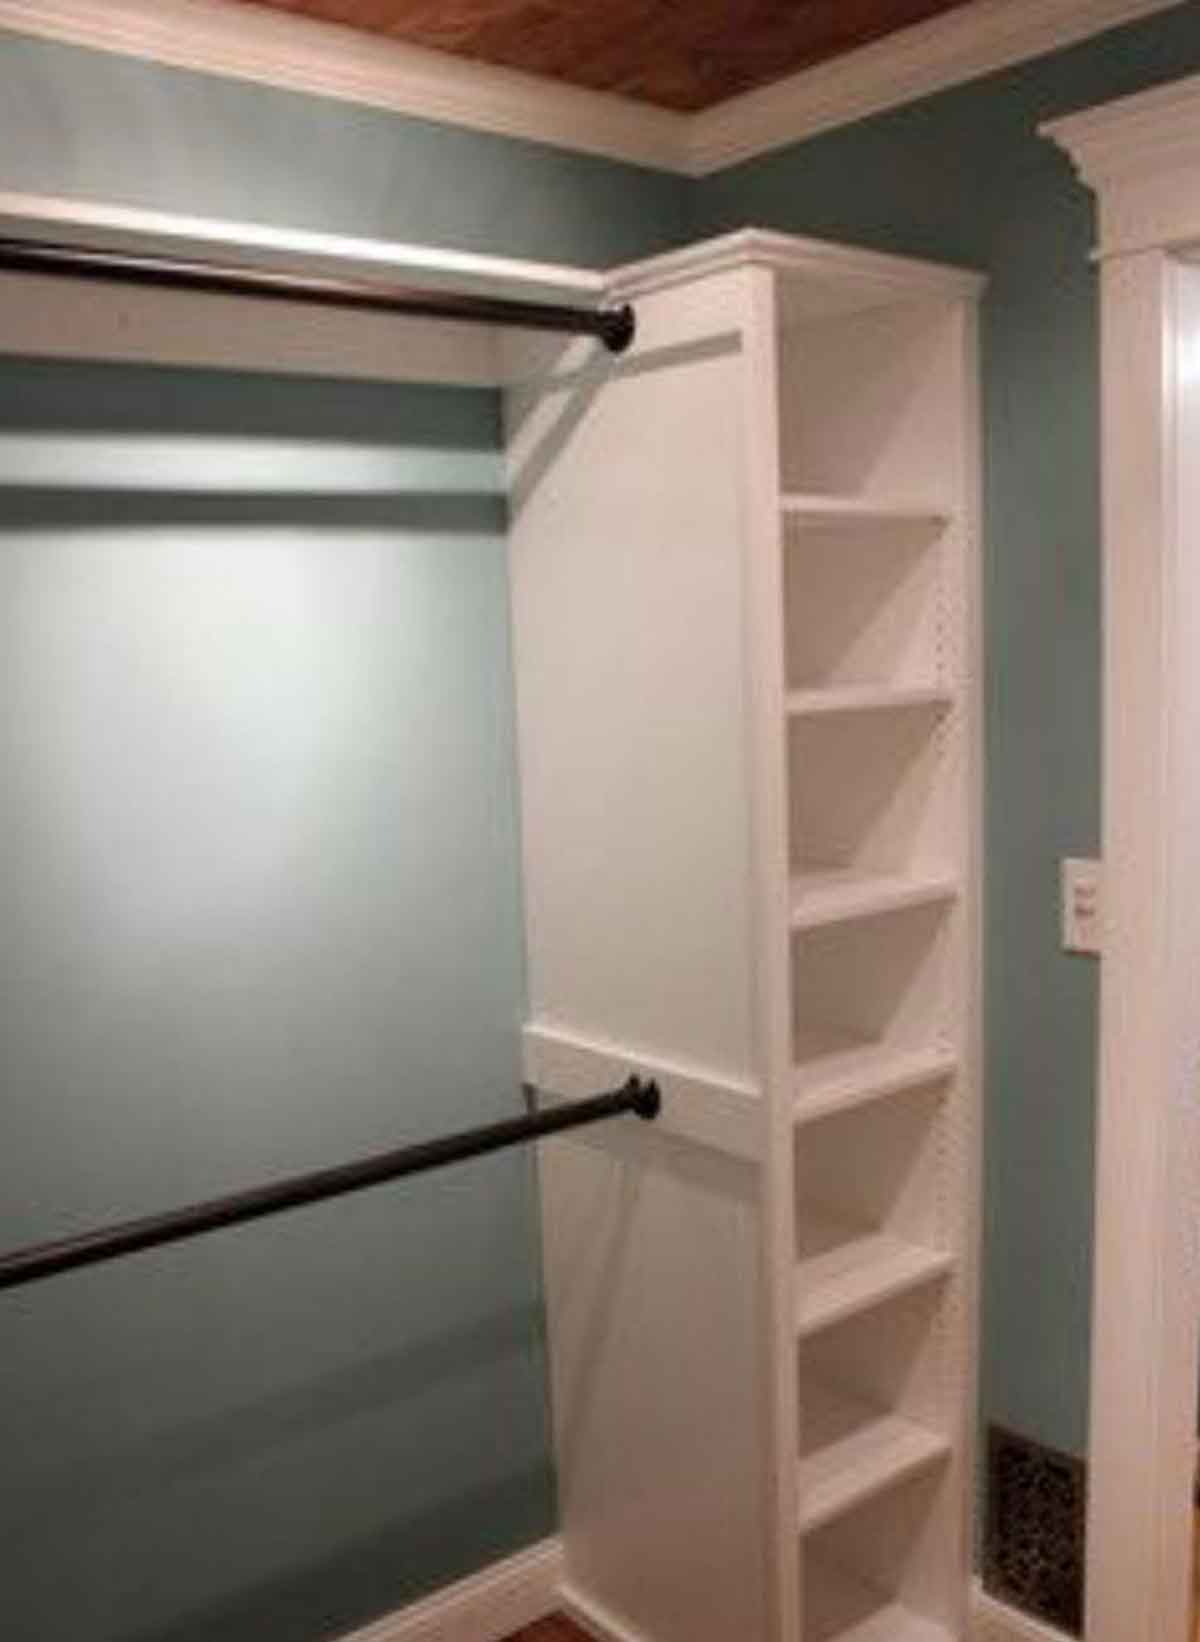
To install the rod holders make measurements and screw into place with the opening facing up. Then simply cut the clothes rod to size and slide into place.
For shelving that is below eye level, I like to install metal, wire shelves so you can see what you have without having to bend down. Check out your local ReStore to find wire shelving to do our earth a solid. I found these at the ReStore, and washed them up then spray painted them to give a nice new shine. Cut to length with a hacksaw or bolt cutters. I would suggest you use whichever tool you can access. A hacksaw takes a long time, but bolt cutters cost a lot for a tool you may never use again. For added convenience there are many options online for wire shelves if you can’t get to a ReStore. Notice that there are plastic support clips along the wall. I tried to get these into studs as often as possible (like the hole there in the wall where I missed the stud and readjusted? ha ha, that happens, I’ll fill that in with caulk and no one will know, except for you of course).
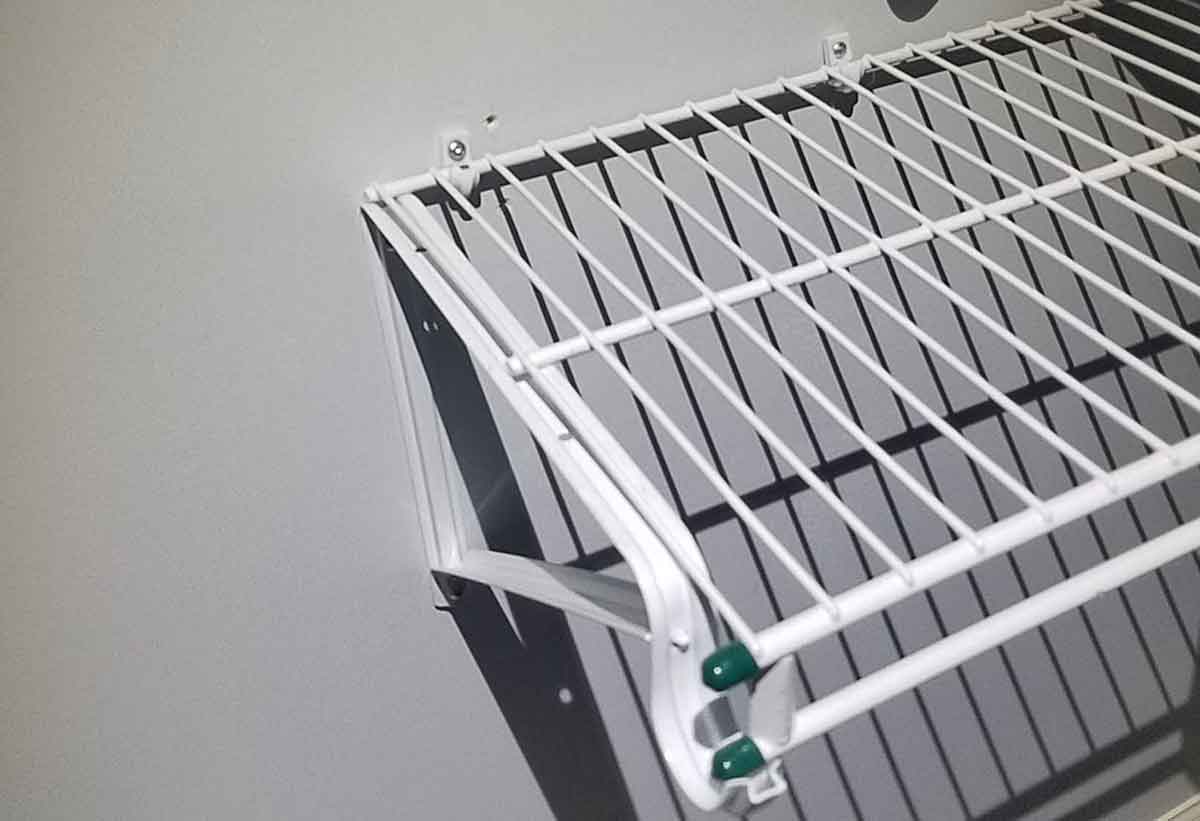
I also used these closet brackets to support the shelf and hold clothes rods. Notice how I have screwed the closet brackets into wood and not just into drywall, this gives better support and makes sure it can hold the weight of the clothes and what is put on the shelf. If possible I try to place my brackets over a stud, if that isn’t possible having wood for the bracket to go into will still give added strength.
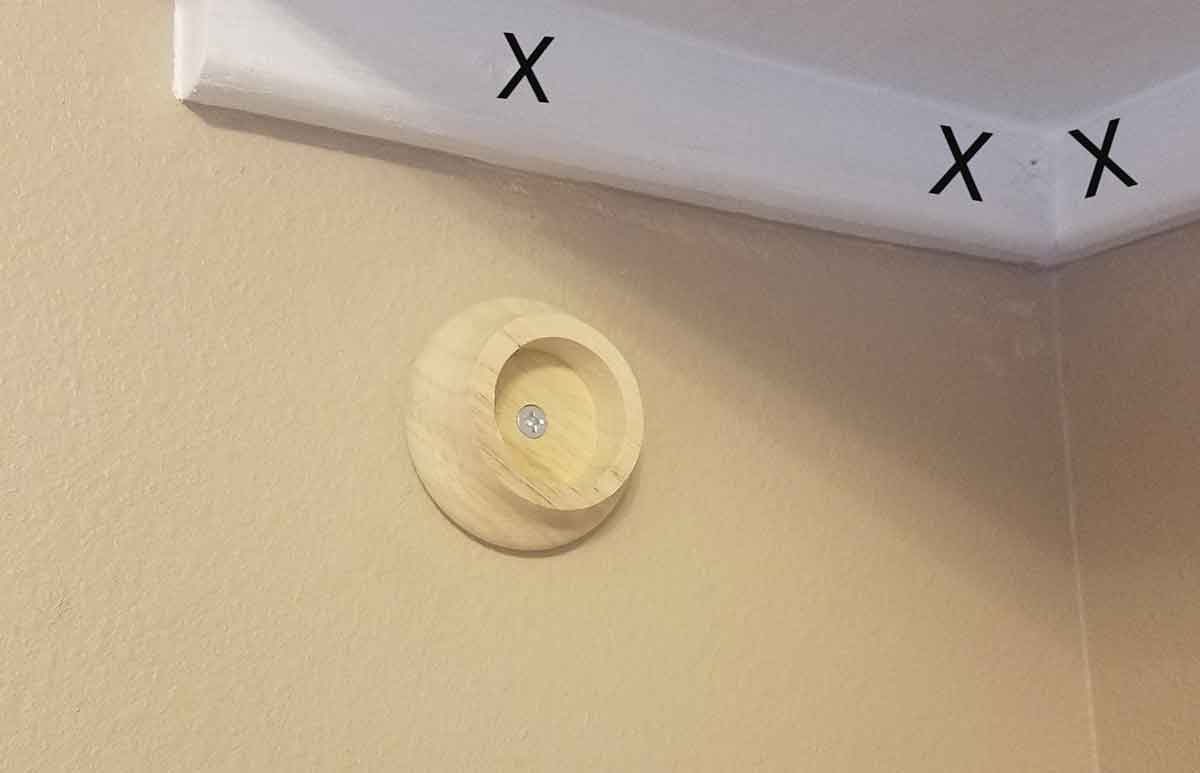
I also support the underside of the shelves in the corner like this. Each X is where it was attached to a stud. I then placed plywood on top of the supports and screwed them into the support boards from above.
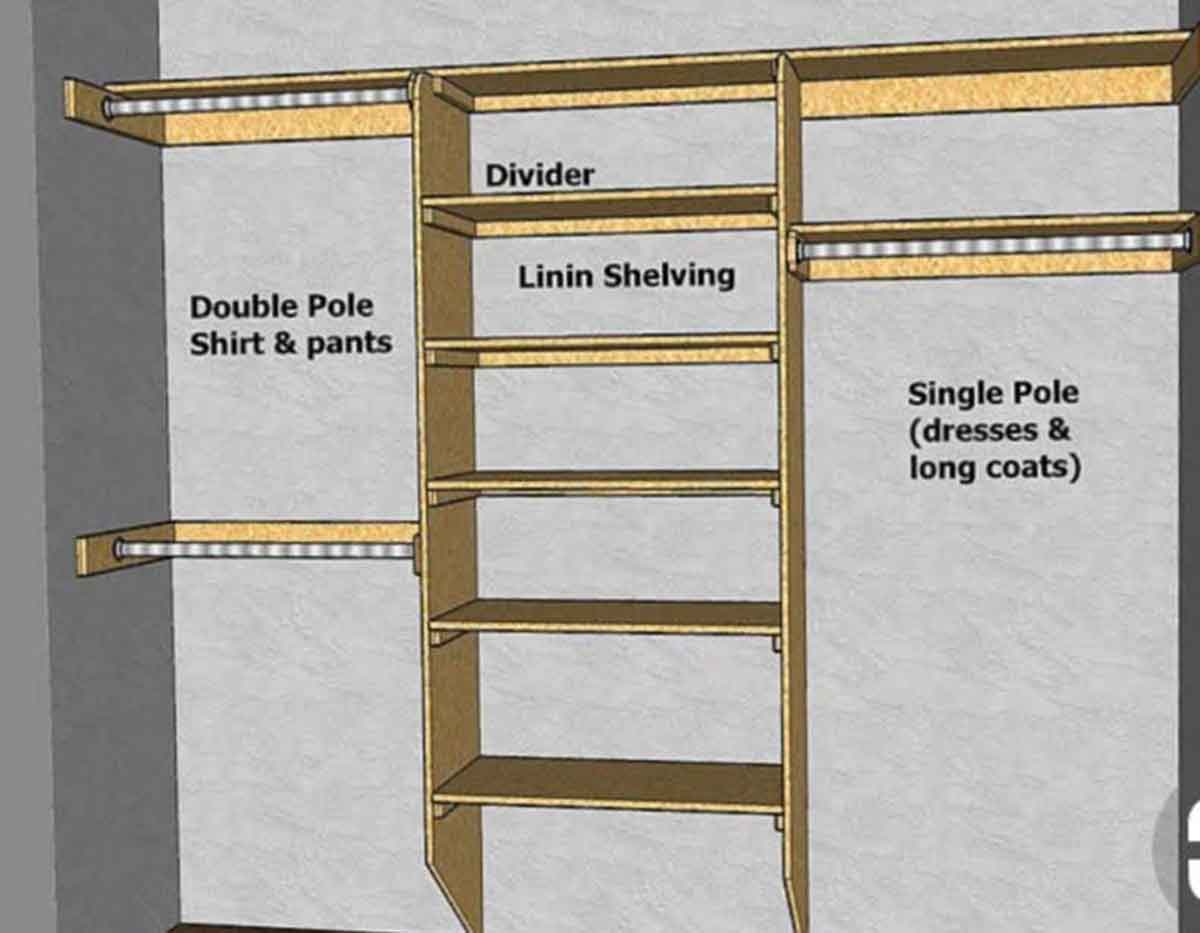
Choosing your own layout is the best part of a DIY closet. It is great to pick what you think you will need. The diagram below that I referenced above from GarymKatz.com clearly shows where to put support boards and how to position clothes rods so you have room for all your clothes. Basic closets usually have one long rod for dresses and long coats and nothing else. I love how efficient shelves and multiple clothing rods can be.
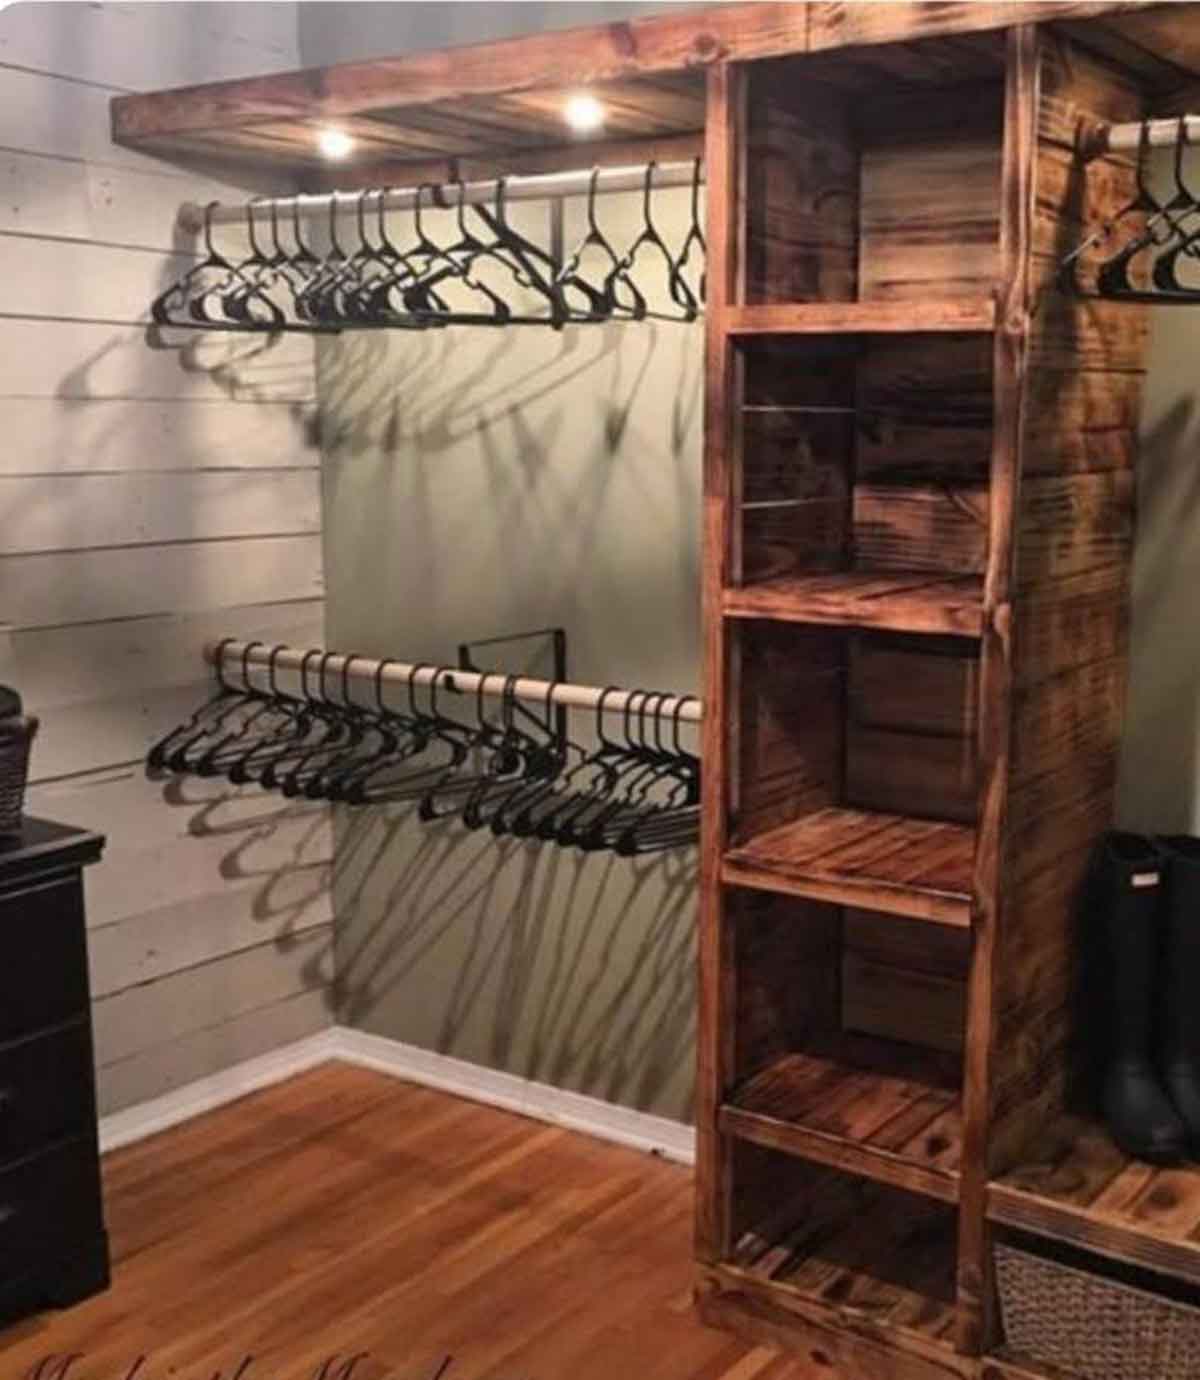
Closet #5 from MadeintheMeadows.com, is a beautiful closet. I love the ship lap on the wall and though the website does not say how they made this closet, it looks like it was made from pallet wood- Yay for reusing! You will see the same concepts of support boards and clothes rods as described above. The one thing this closet has that others don’t are those awesome lights under the shelf, lighting the clothes rod. Pretty awesome. It would be most convenient to have these wired in (the shelves here definitely look thick enough to hold wiring). If you are not handy with wiring or don’t want to hire it out, a close second is battery operated lights that can be installed anywhere and have a remote control. I used these in my kitchen to add extra light, they are awesome.
Well, there you go, my quick 5, closets you can do yourself. Anytime you spend building shelves in your closet is well worth the sacrifice. It makes life easier and less cluttered and if you have children they have nothing to hold them back from cleaning up. I wish you well on your upcoming projects. Post below your closet successes and remember to share this with someone who is looking to build their own closet.
– next time

Recent Comments