
by Natalie | Apr 12, 2019 | Furniture
This bench came about as a birthday present to myself. I had just finished up my daughter’s loft bed and I wanted to do something as a reward to myself. I’ve found I have to schedule in just – for – me projects or they remain forever on the back burner.
The entryway had been bothering me for quite a while. Mainly because nothing was there and I decided to put up a shelf and faux wainscoting.
This bench was the finale.
I learned alot along the way and wanted to share my how – to. I hope you find it helpful.
This article contains affiliate links, which means if you choose to purchase through that link (at no cost to you) I get a small percentage. All proceeds directly help in keeping this website up and running. Thank you for your support.
How to Create a Sturdy Base for the Farmhouse Bench
This Farmhouse Style Bench is 11″ in width, 17″ high and 2′ long. The width was determined by the board size at Home Depot. I determined the height by going a little shorter than my table chairs. I wanted kids to be able to sit and tie their shoes.
At Home Depot all the 8′ boards had cracks in them. The 10′ x 2″ boards looked great. This determined my bench length as I was able to get two 4′ benches and one 2′ bench.
To simplify things, I will only discuss the building of the 2′ bench in this post.
Each bench leg was positioned a 1/2 inch in from the seat width.
I found that by building the shoe platform first (10″x 1’10”) I could get my bench square and much more sturdy.

Attach Legs to the Base of the Farmhouse Bench
The bench legs were then attached next on the shoe rack. Here you can see I placed spacer boards to keep the shoe rack slightly elevated off the floor.
The legs and shoe rack are sitting on the bench top in this picture. I did this to make sure everything was positioned where I wanted them to be before I attached the bench legs.
I used an air nailer for this part, but you could easily use a Kreg Jig – I haven’t purchased one yet, but I really want one.
For ease of assembly, stain the shoe support and paint the legs before you attach them together. I did not do this and ended up having to paint and stain with a small brush where the pieces come together.

The shoe rack gave good support, but to make this bench really stand the test of time it needed support on the bottom and the top.
Create Diagonal Supports for a Classic Farmhouse Look
For a more classic farmhouse look I chose to add slanted supports on each leg.
To do this you’ll need a miter saw, I use a Chicago Electric miter saw, but you can also go with a Combo Miter Saw Kit which cost significantly less.
To create an angle cut for a 90° corner, you will want to angle your supports at 31.6°. This is a common angle so it is marked on my miter saw.

It can be difficult to get your angle going in the right direction. Before I cut, I place my board where I want it to go and draw a light line indicating the direction of the angle. Then I use the numbered degrees on my miter saw to get the exact angle I need.
It can be useful to do a few practice runs to get a feel of where to start the blade and make sure you have the correct angle for the job.
If you plan on doing alot of wood working I would definitely recommend an electric miter saw. Also get the 12″ over the 10″ blade. There are so many more things you can do with a 12″ size.
Attach the Bench Seat of the Farmhouse Bench
Attach the bench seat to the legs, then add the diagonal supports.

Add Finish to the Farmhouse Bench
Protect the stained wood either with water or oil based polyurethane.
Or I used a finishing wax and it worked great. I like using the wax because you can ease it into all the wood crevices and get a nice smooth finish. It also doesn’t smell as strong as the polyurethane.

I also distressed the edges with sand paper and stain to complete the farmhouse look. And it was ready to be used.
I absolutely love wood grain. Each piece tells its own story.

When finished this piece adds function and style to your living space. Our large bench was immediately put to work.
Thanks for stopping by. Please subscribe to stay up to date on the latest posts of DIY.
Until then, have a great day😊
Natalie


by Natalie | Apr 5, 2019 | Recipes
A quick and easy dinner that kids and parents will love, with a fresh salad so tasty it’s sure to get your pickiest eaters eating leafy greens.
My daughter’s eyes lit up when she came in the kitchen and saw what was for dinner. That’s always a nice feeling. 😊
Prep the Bread for Pizza
To make the pizza boats, line a cookie sheet with tin foil. Place French bread sliced length wise on top.
Spread with butter and then sprinkle with garlic salt and pepper. I wanted to simmer the spice and flavor into the spaghetti sauce, but I was too busy making farm house benches 😂 and had to get dinner on the table quick.
Adding the spices to the butter worked great! The butter also helps add flavor and keeps the bread from absorbing too much liquid and getting soggy.
I know you can’t see it in this picture, but it has butter… and spices… Great picture huh?

Special Pizza Boat Sauce
Then add the sauce. Yes I used spaghetti sauce from a can, because I was in a hurry and it still tasted great. 😊My Kids begged for more – if that isn’t a testiment to my cooking choices I don’t know what is.

Add Cheese to Pizza Boats
Sprinkle generously with mozzarella cheese. I used about two cups for both boats.

Decorate Boats with Pepperoni
Dot with pepperoni and cook in the oven for 10-15 minutes, until cheese is melted. You can cook it till it gets bubbly and slightly browned edges, but I didn’t want the French bread to get hard.
This way the bread was perfect and the cheese was melted enough to stay on the bread.
Pepperoni tip:
to keep your pepperoni longer place in the freezer. You can add it to pizzas still frozen. To separate bend the slices gently back and forth until they loosen.

Pair Pizza Boats with the Perfect Side
I paired it with a salad made with lettuce, tomatoes, chopped green onions, toasted tortilla chips and crumbled Queso Oaxaca and a homemade dressing that my husband loves.
Queso Oaxaca is a Mexican cheese that tastes great as a highlight to dishes when it’s crumbled up. It was my first time using it and I was a bit nervous my family wouldn’t eat it, but they actually loved it and ate it even more! So yay for Queso! 😊

Green onion tip :
after you use your green onions from the store, simply place the bulbs in fresh water in the window sill. Replace the water with fresh water every few days.
The onions will grow 3-4 more times giving you fresh onions and saving you a run to the store.

Add chicken to this salad and you’ve got a great meal. I found that my family still really loves it, even when I don’t have time to cook the chicken, which helps when I’m in a pinch.
It needs together quick and everyone loves it. Yay for easy dinner night. Now back to painting 😅

Pizza Boat Recipe
Loaf of French bread – sliced length wise
- 2 TBS butter
- 1 tsp garlic salt
- 1/2 tsp pepper
- 1 cup spaghetti sauce
- 2 cups Mozzarella cheese
- 22 pepperoni slices
Tortilla Salad Recipe
Dressing
- 1/4 conola or olive oil
- 2 Tbsp vinegar
- 1 TBS Sugar
- 2 tsps Accent or Salt
- 1/2 tsp pepper
Salad
- 1 head Romain lettuce chopped
- 3-4 toasted tortillas (400° 3 min on each side) break up in bite size pieces
- 1 Chicken breast- cooked and chopped
- 1 bunch Green onions chopped
- Optional (pretty much I throw in whatever I want ☺️)
- Cherry tomatoes – sliced
- Queso Oaxaca – crumbled
- Even the chicken can be optional.
This is a great travel salad when going to a function. I keep the tortillas crispy, broken up in a separate bag and the dressing is in a lidded container. Then mix it all together right before people eat.
This salad can be as in depth or easy as you want, if you have the crispy tortilla bites people almost don’t notice the chicken missing. 😂
I hope you like it!
Until next time,
Natalie


by Natalie | Mar 29, 2019 | Personal Development
Is that really true? Could video games really get kids outside? Not just an exercise video game, but truly outside?
This is how we got our kids voluntarily going outside because of video games. If you want to read the full history and cultural norms that let us on this situation, read more here.
Video Game Acceptance
I hated video games (full story in the link above) and vowed to never get them, but times change and we found ourselves looking for a lightly used Wii. Used because we are hard core financial thrifters. It just doesn’t make sense to buy some things new – video gaming consoles being one of them. 😊
Or maybe just because I hate video games and the cost had to be very low for us to be enticed.
It was important that our kids had boundaries with the technology. That they understood its potential for addiction.
Household Video Games Rules
We played around with different rules. The kids already liked to read and we wanted to keep it an enjoyable, voluntary pass time.
We had time restraints where they could only turn it on after a certain time of day. This rule was in hopes that they would play with each other and develop strong relationships. There always seemed to be a reason for them to want to play outside of those parameters, it’s a weekend, a friend is over that hasn’t played it etc. I felt like I was constantly making decisions.

It should be more streamlined right? I don’t want to keep making decisions on top of my decisions.
The Outside Video Game Rule
That is when I came up with the outside rule. For every half hour they were outside they got 15 minutes of game time.
It didn’t matter what they did, it just needed to be outside. They started playing with their dog on the lawn. Taking her for walks and lounging in the sun.

The kids then conserved their earned time to play at just the right time of night. Even after they come in, they still play with each other first.
Video Games Can be Used for Good
It has been a complete shock to me, they seem happier and are developing delayed gratification at the same time.
You may be wondering why I had to encourage them to go outside in the first place. The story can be found here.
What are your gaming rules?
Until next time,
Natalie

by Natalie | Mar 29, 2019 | Personal Development
It seems strange right? How could video games get kids outside? Growing up I hated video games. I grew up in the era of Atari and Nintendo. Up until 1985 (when Nintendo made their first home system) kids played outside it was a lot more fun than being inside.
I learned to tie my shoes just so I could go outside. That’s where all the kids were. Shoe tieing was my mom’s insentive plan.
Outside we made bows and arrows out of hay bail twine, climbed trees, made forts, peeked in birds nests and mastered the art of riding a bike without using our hands. It was a never ending adventure.
Kids Stopped Going Outside
In 1985 the kids next door got a Nintendo and my world changed. No one went outside anymore. I begged and they would decline without even looking up, eyes glued to the screen.
This wasn’t just my life, it happened everywhere. Video games, TV shows, and the constant flow of new Tech made it increasingly easier to keep kids entertained inside.
In fact, gaming is now a diagnosable addiction, with therapy groups and detox centers. Video game usage went up and time spent outside went down.
It became Rare to See Kids outside
Technology made it easier to not be outside. Maybe parents also became scared and stopped letting their kids outside because they knew about all the horrible stuff happening around the globe. I think it was probably a combination of both.
Society Became Suspicious When Kids Were Outside
Parents have been criticized for being too protective by some and not protective enough by others.
Like this Maryland couple, “accused of child neglect for letting their kids roam around their neighborhood.” Meaning, a 10 and 6 year old walked to the park in their neighborhood.

!! Right, I read this too my 11 year old and she was incredulous and insulted.
Here is my personal experience,
Why My Children Went Outside Less
A few years ago I went on a bike ride with my children on a quiet neighborhood street. Two on their own bikes, two pulled in a bike trailer.
A police officer pulled up next to us and slowly drove by, eyeing me like I was doing something wrong. True, not many people have four children, but I had better adult-to-child ratio than most daycares.
It was rare to see someone out with so many (four) children. It just isn’t common, so I was viewed suspiciously.
And also this
While at a grocery store I went to return my cart, about 4 car lengths away from where I was parked. A cute old woman asked if she could have my cart.
Now this grocery store has you put a quarter in the cart to unlock it. Even though it’s just a quarter there are never stray carts in the Aldi parking lot. People will walk a few yards to save the quarter for next time.
I passed the cart over to the nice old woman and began to walk away. She called me back, insisting she pay me. It was an over cast day, the sun was setting, the temperature maybe 40°. I determined my children would be just fine in the car while I wait.
The woman, no joke, payed me in pennies!
And just like in the movies, she put them in my hand one at a time. So it took a little while, like maybe 4 minutes – but when 25 pennies are being painstakingly placed in your hand – time goes a LOT slower.
By the time I got back to my car, remember about 4 minutes later, a woman I knew and her teenagers were staring angrily at me and my vehicle.
She slammed her door and hissed, “YOU left your children alone in the car!”
Surprised I said, “Well yes, I was returning my cart.” I was sure she would understand. Instead, she huffed and stomped away.
When parents are criticized for being over protective we need to stop and wonder why. The pressure is great my friends. Society is pressuring us to hyper-parent, believing it will be safer.
When I decide to give my children more autonomy I actually worry more about what “well intended” citizens are going to do, than what criminals are going to do. Though, I assure you I take creepy people into consideration while making decisions.

Video Game Use Stats
As I researched graphs and data I actually found several sources showing that as video game sales went up, the number of violent crimes went down.
Now data, can say what you want it to say depending on how you look at it. What I saw – people were no longer outside in society to do crimes, they were shooting behind a screen.
The data also clearly was pointing out violent crime incidents, not deaths total. We have definitely seen an increase in mass shootings, but a decrease in total individual crimes. So less people doing crimes yet more people doing insanely deadly crimes.
So why did we decide to get a gaming console?
Kids Go Where the Video Games Are
A woman with several teenagers once told me she was also weary of video games, but found her kids went where the games were. They still played video games and on top of that, games she couldn’t control. We’re they violent, were they risky? She didn’t know the kids weren’t in her home.
So they bought a gaming console.
As our kids got older we started to see a similar trend and decided to join the gaming community. We wanted to have more control of what was being played. We wanted our children to have a safe place to hang with their friends. And we wanted to set rules that would protect their brains from the very real gaming addiction.
The Video Gaming Rule That Got Our Kids Outside
The whole purpose of our video game rules were to avoid gaming addiction, promotes healthy relationships and development real world problem solving skills. You can read more about our gaming rules here.

The one that got our kids outside was simply that, we tied gaming to time spent outdoors. For every half hour outside they got 15 minutes game time.
You may be wondering, why weren’t your kids outside anyway? And… I don’t know – I’m guessing much of it had to do with the several things discussed above.
- There weren’t other kids outside
- There is pressure from others to not be outside
- The parks are empty
- There are no pick up games, it’s all organized sports now
The list could go on and on. What I do know is my kids started going outside voluntarily once I tied it to video games.
I hope they continue to discover the natural wonder and adventure of the outdoors – I’m only getting started.

Are you a gamer? What to you do for balance?
What do you do to get your kids independently outdoors?
Than you for stopping by. To continue receiving the newest Homemade Home post remember to like and subscribe!
See you next time!
Natalie

by Natalie | Mar 23, 2019 | Home Decor, Home Renovation
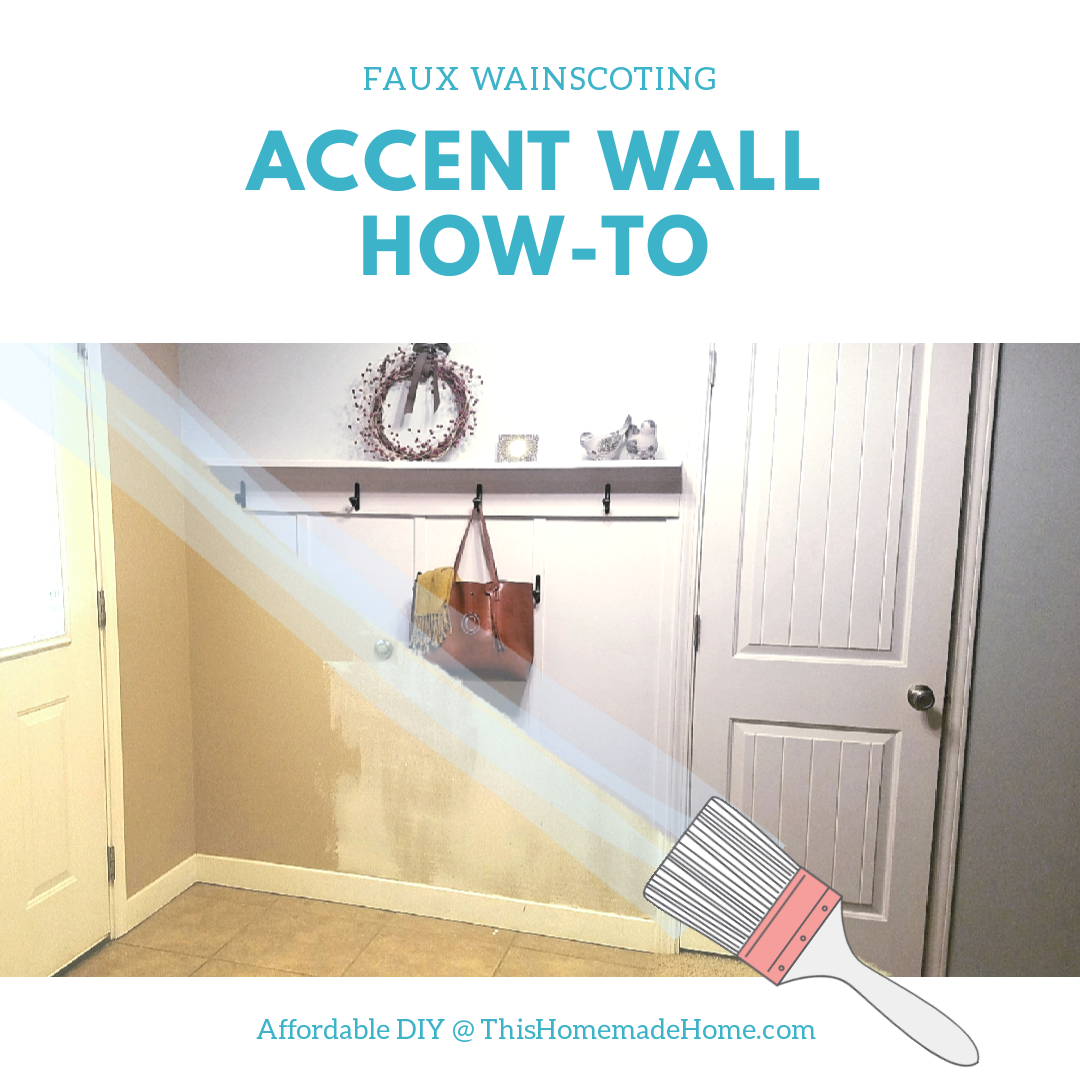
How to hang hooks and faux wainscoting to increase the use of your space and make your entry feel more welcoming.
This post contains affiliate links, which means I make a small percentage of the sale of items you may purchase at no increased price to you.
The entryway is the first and often only place many people see of your home. By making it welcoming and spacious you give an impression of what you’re whole home looks like.
There are different techniques to use whether you have a small, narrow space or large space that needs focus. Today I am writing about how we gave a larger entry focus. Read here for tips on a smaller space.
The reason for the project
I found that when people arrived at our home they had no convenient place to put their jackets. Though we do have a small coat closet, people usually chose to just lay them on the floor. I wanted there to be an attractive and useful spot to quickly put visitors items and help them feel welcome.

I also hated the orange peel texture, so you can see in my before picture that the project is already underway…And I forgot to take a picture before I had started 😅.
If you would like to see how to change the texture of your walls, check out my YouTube channel.
Patch Walls / Smooth-out Texture
This can be done (as demonstrated on my YouTube channel) with a skim coat of dry wall mud. You can buy this in powder form and mix to the desired consistency or pre mixed.
Tip:
Bumps on the wall are more concerning than dips in the wall. You can always come back and fill in a hole. It’s much harder to scrape off a poorly filled hole that sticks up and is now painted.

Space Vertical Trim
When I first started doing faux wainscoting, someone had suggested to use a computer program to decide where to put each piece of vertical slat. I don’t have the patience for that.
I place the piece where it looks normal up close, then I back up to see if it looks good.
After it visually looks good, I measure between each piece and make slight adjustments. You may have light switches, plugs or door frames to maneuver around.
The slats are pine, 1/4 inch by 2 inches, found in the buy-by-the-foot trim section at the Home Depot. I believe they are lattice slats.

Tape Each Slat in Place
Once I am sure of the location of each slat, I tape it in place with painters tape. It is also a good idea to use a level as you tape them down. It may look perfectly vertical when you are up close, but when you move away the slight slants really stick out.
Secure the slates in place with either finish nails and a hammer or an automatic finish nailer. We bought the Porter – Cable combo pack nailers and upholstery stapler with an air compressor. It had the best price and highest reviews.

Add Boards for a Shelf
Two 6″ X 1″ pine boards make a narrow shelf and a great support to add coat hooks. You can also add a piece of decorative trim where the boards come together, for extra support and detail.
Secure in place with finish nails and a few screws. I used my awesome magnetic stud finder and placed the screws into studs. The shelf isn’t meant to hold much weight, but it will be holding several hooks and weight from coats.

Caulk All Joints
Use paintable caulk along all joints. This is what gives a finished, professional look.
Friends have told me before that they were intimidated by all the caulk choices. See my caulk choosing guide here.
For this project I went with DAP paintable caulk.
Fill in any nail or screw holes with caulk.

Choose Your Paint Color
Paint can dramatically change the feel of a room. I went with a light blue on the upper wall to help soften my crazy horizontal lines along the ceiling.
As you can see in the image below the diagonal wall painted in blue draws less attention to the strange angle, than the brown.
It works because the wall color comes closer to matching the ceiling. It blend in instead of sticking out. In this case I really wanted that effect.
I painted the faux wainscoting the same color as my baseboards and trim. This created continuity and gave the impression of more space.

Add Coat Hooks
I searched everywhere for hooks that looked nice and weren’t too big or expensive. Many were too tall to fit under the shelf and leave enough head room to fit a coat over the hook. Many looked cheap.
Eventually I chose these. They had good shape, good reviews, they held your attention, but didn’t draw away from the rest of the design.

Our home immediately looked elevated. I recieved complements from people who were seeing the home for the first time as well as old friends.
I thought it, “worked! The entry really does speak for the whole home.” 🙂 It’s worth investing in.
I hope you liked this little tutorial today. What is something you want to upgrade in your home? What do you wish you knew how to do (maybe I’ll make a tutorial 😉).
Take care,
Have a great day,
Natalie


Recent Comments